Crestron MMK-12L, Installation Manual
The Crestron MMK-12L Installation Manual is a crucial resource for setting up this advanced device. Easily accessible for free download at manualshive.com, this comprehensive manual offers step-by-step instructions and detailed diagrams, ensuring a hassle-free installation experience. Unlock the full potential of your Crestron MMK-12L with this indispensable manual.
Share
Download


Reviews:
No comments
Related manuals for MMK-12L
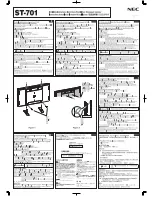
MultiSync P701
Brand: NEC Pages: 2

2247
Brand: NCR Pages: 12

MPS2
Brand: Sealey Pages: 2

CAL-F4040
Brand: Caliber Pages: 2

PSTA-2955
Brand: peerless-AV Pages: 9

Simpler 25ET
Brand: KSL Pages: 2

BF16
Brand: Sanus Systems Pages: 2

RE668
Brand: Rivers Edge Treestands Pages: 20

Neomounts CPU-D100WHITE
Brand: NewStar Pages: 3

JX1827
Brand: GE Pages: 4

481A47001
Brand: BalanceBox Pages: 2

10-602
Brand: NEO TOOLS Pages: 9

AX27
Brand: AA Products Pages: 6

15045
Brand: Konig & Meyer Pages: 4

MH-3002
Brand: Havis Pages: 2

Thinstall TAMMS
Brand: CHIEF Pages: 12

LGC-7598
Brand: Logic Pages: 8

WM58
Brand: Loewe Pages: 8


