ZUMMESH-KP10A/ZUMMESH-KP10B
Z
ū
m™ Wireless Keypad
Installation Guide
Description
The Crestron
®
ZUMMESH-KPA and ZUMMESH-KP10B are ac-powered Z
ū
m wireless
wall-box keypads. Configured with either a rocker switch or a four-button layout, the
keypads are a versatile and easy-to-use addition to the Z
ū
m commercial lighting system.
Powered via line-voltage ac power, the keypad’s streamlined design and out-of-the-box
functionality is advantageous in new or retrofit installations.
The ZUMMESH-KP10A and ZUMMESH-KP10B are functionally identical. For simplicity
in this guide, the term ZUMMESH-KP is used.
A basic single-room Z
ū
m system consists of Z
ū
m mesh devices, i.e., dimmers, switches,
keypads, and sensors. The Z
ū
m mesh devices in the room communicate directly with
each other without the need for a centralized gateway or processor.
To monitor or control the room from a centralized Crestron control system, use the
ZUMMESH-NETBRIDGE.
NOTE
: The ZUMMESH-NETBRIDGE requires a J-box device to provide power.
For quick network setup, use the Z
ū
m app on a smartphone or tablet for setup.
Additional Resources
Visit the product page on the Crestron website (www.crestron.com)
for additional information. Use a QR reader application on your
mobile device to scan the QR image.
Installation
WARNING
: Turn off the power at the circuit breaker. Installing with power on can
result in serious personal injury and damage to the device.
To install the ZUMMESH-KP10, do the following:
1. Turn the power off at the circuit breaker.
2. Wire the device as shown in the following diagram.
Important Notes
WARNING
: To avoid fire, shock, or death, turn off the power at the circuit breaker or
fuse and test that the power is off before wiring!
NOTES
: Observe the following points.
• Neutral: The ZUMMESH-KP10 requires a neutral connection to operate.
• Codes: Install in accordance with all local and national electrical codes.
• Installation: A qualified electrician should install this product .
• Wiring: Use copper wire only. For supply connections, use wire rated for at least
75 °C.
• Temperature: For use where temperatures are between 32° to 104 °F (0° to 40 °C).
• Electrical Boxes: Devices mount in standard electrical boxes. For easy installation,
Crestron recommends using 3-1/2 in (89 mm) deep electrical boxes. Several
devices can be installed in one electrical box (multigang). For a smooth
appearance, one-piece multigang faceplates (not supplied) can be installed.
• Switches: Mechanical 3- or 4-way switches do not work with the ZUMMESH-KP10.
• Spacing: If mounting one device above another, leave at least 4-1/2 in (115 mm)
vertical space between them.
3. Push all power wires back into the electrical box and fasten the device to the
electrical box with the provided screws.
4. Attach the decorative faceplate.
5. Restore the power at the circuit breaker.
Multigang Installations
In multigang installations, several devices are grouped horizontally in one electrical box.
For a smooth appearance, install a one-piece multigang faceplate (not supplied).
NOTE
: When installing into a multigang box, do not fully tighten devices to the box
until the faceplate has been aligned.
NOTE
: Devices do not mount within a 2-gang mud ring. Use a standard 2-gang box.
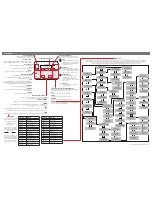
Press to set lights
to 90% (scene 1).
Press and hold to
raise the lights.
Press to turn the
lights off. Press and
hold to lower the
lights.
Operation
The ZUMMESH-KP10A or ZUMMESH-KP10B functions as described below.
ZUMMESH-KP10A Operation
ON
SCENE 2
SCENE 3
OFF
Set loads to 90%. Press and hold to raise lights.
Turns loads off. Press and hold to lower lights.
Set loads to 50%. Press and hold 5 seconds to save preset.
Set loads to 10%. Press and hold 5 seconds to save preset.
ZUMMESH-KP10B Operation
Neutral (white)
Hot (black)
Ground (bare or green)
100-277 Vac power
from breaker
Basic Room Setup
A basic single-room Z
ū
m system consists of Z
ū
m mesh devices, i.e., dimmers, switches,
keypads, and sensors. The Z
ū
m mesh devices in the room communicate directly with
each other without the need for a centralized gateway or processor.
To set up a new single-room Z
ū
m system, do the following:
Step 1a: Create a new single-room Z
ū
m system.
Step 2: Add Z
ū
m mesh devices to the room.
Step 3: Finish creating the single-room Z
ū
m system.
To modify an existing Z
ū
m system, do the following:
Step 1b: Place the system in Joining mode.
Step 2: Add Z
ū
m mesh devices to the room.
Step 3: Finish creating the single-room Z
ū
m system.
Step 1a – Creating a Single-Room Z
ū
m System
To create a new single-room Z
ū
m system, first form a new room.
NOTE
: This can be performed on only one device in the room.
NOTE
: The device that is used to create the room is automatically added to the room.
The device does not need to be added to the room.
NOTE
: A room can be created only from an ac-powered device.
Start a New Single-Room System with a Keypad, Dimmer, or Switch
Press the bottom button 5 times, and then press and hold the bottom button for
2 seconds. If the device is not factory fresh, hold the button for 10 seconds. Release the
button when the LED lights. The LED illuminates for 3 seconds and then slowly flashes to
indicate that the room is in Joining mode and that other devices can join the room.
Start a Single-Room System with a J-Box Device
Press the SETUP button 5 times, and then press and hold the SETUP button for
2 seconds. If the device is not factory fresh, hold the button for 10 seconds. Release the
button when the LED lights. The LED illuminates for 3 seconds and then slowly flashes to
indicate that the room is in Joining mode and that other devices can join the room.
2s or 10s
TEST
SETUP
2s or 10s
SPECIFICATION
DETAILS
Power Requirements
100-277 Vac, 50/60 Hz, line power
Enclosure
1-gang mountable in a 3-1/2 in deep electrical
box;
Requires decorator-style faceplate (sold
separately)
Environmental
Temperature
32° to 104 °F (0° to 40 °C)
Humidity
10% to 90% RH (noncondensing)
Dimensions
Height
4.125 in (105 mm)
Width
1.75 in (45 mm)
Depth
1.8 in (46 mm)
Weight
5 oz (142 g)