CreativeStar Artemis TI-CS-T11, Quick Manual
Introducing the CreativeStar Artemis TI-CS-T11 - a remarkable product designed to capture your imagination. To help you get started quickly, we offer a user-friendly Quick Manual that you can easily download for free from our website. Discover the endless possibilities of the Artemis TI-CS-T11 and enhance your creativity today! (Website: manualshive.com)
Share
Download


Reviews:
No comments
Related manuals for Artemis TI-CS-T11

NAVCAM-GPS
Brand: Navig8r Pages: 18

ISC-3000HD
Brand: iCES Pages: 126

Smart Dashcam
Brand: Maisi Pages: 16
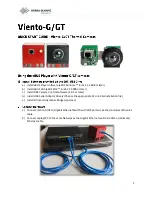
Viento-G
Brand: Sierra Olympic Pages: 10

CFD-03F
Brand: Crux Pages: 5

DTI 1/19
Brand: Zeiss Pages: 15

302F
Brand: NextBase Pages: 20

SC100
Brand: Cobra Pages: 26

Drive HD CDR 900
Brand: Cobra Pages: 27

CDR835
Brand: Cobra Pages: 27

Panox MX200
Brand: Easypix Pages: 8

GOXTREME VISION+
Brand: Easypix Pages: 28

Roadscan Pro DE Series
Brand: RCBI Pages: 44

YMA-CV03Y-00
Brand: Yamaha Pages: 21

Race
Brand: gobandit Pages: 10

IRIS092
Brand: IRIS Pages: 8

Z3
Brand: Z-EDGE Pages: 13

1159
Brand: Monoprice Pages: 2


