background image

Summary of Contents for 315.212900

Page 1: ...TION Read and follow all Safety Rules and Operating Instructions before first use of this product Customer Help Line 1 800 932 3188 Safety Features Adjustments Operation Maintenance Parts List Sears Roebuck and Co 3333 Beverly Rd Hoffman Estates IL 60179 USA Visit the Craftsman web page www sears com craftsman 983000 037 4 02 ...

Page 2: ... cutting operationsmore pZeasantand enjoyable Safety pedormance and dependability have been given top priorityin thedesign of this saw making it easy to maintainand operate _ CAUTION Carefully read through this entire operator s manua before using your new saw Pay close attention to the Rules For Safe Operation and all Safety Alert Symbols including Danger Warning and Caution if you use your saw p...

Page 3: ...cetechnician For servicewe suggest you return the tool to your nearest Sears storeor repair centerfor repair Alwaysuse originalfactory replacement parts when servicing READ ALL INSTRUCTIONS KNOW YOUR POWER TOOL Read the operator smanual carefully Learn the saw s applications and limitationsas well as the specific poten _ial hazards related to thistool GUARD AGAINST ELECTRICAL SHOCK by preventing b...

Page 4: ... A guard or other part that is damaged must be properly repaired or replaced by an authorized service center to avoid risk of personal injury NEVER LEAVE TOOL RUNNING UNATTENDED TURN THE POWER OFF Do not leave tool until it comes to a complete step USE ONLY CORRECT WHEELS Do not use wheels with incorrect size holes Never use wheel washers or wheel screws that are defective or Incorrect The maximum...

Page 5: ...since this can cause cracks CHECKTHE WHEEL FOR FISSURES AND CRACKS and test for normal operation prior tO use ALWAYS EASE THE ABRASIVE WHEEL AGAINST THE WORK PIECE when starting to cut A harsh impact can break the wheel ONLY USE A CUT OFF WHEEL RATED FOR 3300 RPM OR GREATER and manufactured in compliance with ANSi B 7 1 Always store wheels in a dry place with tittle temperature variation BEFORE cU...

Page 6: ...hould be connected to a power supply that is 120 volts 60 Hz If the machine does not operate when plugged into art outlet double check the power supply GROUNDING INSTRUCTIONS In the event of a malfunction or bre_ ciown grounding provides a path of least resistance for electric current to reduce the risk of electric shock This tool is equipped with an electric cord having an equipment grounding con...

Page 7: ... so couldresult inpossibleserious injury LOOSE PARTS LIST The following itemsare includedwith your Abrasive Cut off Machine 14 in 356 ram AbrasiveWheel installed on Machine Wheel Wrench 8 mm Hax Kay Stored on Machine Operator sManual Wheel Type Wheel Diameter Wheel Thickness Wheel Arbor Hole Overall Wheel Size No Load Speed Rating Input Net Weight ReinforcedAbrasive Wheels FenceAngle 14 in 356 ram...

Page 8: ...ith your cut off machine It is located on the end of the vise screw and provides greater contTolby clampingthe workpieceto the fence It also prevents the workp _cefrom creep ing toward the wheel duringa cutting operation ADJUSTABLE FLIP FENCE ASSEMBLY see Figure 2 The fence on your cut offmachine has been provided to supportthe workplaceand provide clamping support to the vise for holdingyour work...

Page 9: ...d your machine becomes disconnected from power supply disengage the lock on feature immediately SPINDLE LOCK BU FI ON A spindle lock button has been provided for locking the spindle which keeps the wheel in your machine from rotating Depress and hold the spindle lock button while installing changing or removing wheel only CARRYING HANDLE SPINDLE LOCK BuI rON UPPER WHEELGUARD TRIGGER LOCK See Figur...

Page 10: ...key provided loosen and remove bolt Note Bolt has right hand threads Turn bolt counterclockwise to loosen Remove outer washer outer flange spacer and wheel Do not remove inner flange or inner washer Removal of these two parts are not required for wheel changes _ WARNING If inner flange or inner washer has been removed replace both before placing wheel on spacer and wheel arbor Failure to do so cou...

Page 11: ...hine base For precise cuts check the angle of cutfor the fence against the abrasive wheel with a protractor bevel square or other similardevice Using the fence lock handle securelytighten the fence in place at desired angle See Figure6 ADJUSTING WIDTH OF CUT See Figures 7 and 8 Unplug your cut off machine _1 WARNING Failure to unplugcut offmachine could result in accidental startingcausing possibl...

Page 12: ...ndle 1 2 to 1turn counterclockwise Lilt up the quick lock release lever as shown in figure 9 and pull back onvise crank handle to slide open the vise To tighten See Figure 10 Unplug your cut offmachine _1_ WARNING Failure to unplug cut off machine could result in accidentat starting causing poss ble serious persona injury Push the vise crank handle forward to slide the vise clamp against the workp...

Page 13: ...th stop bolt that is against the machine base The depth stop is lowered by turning the depth stop bolt clockwise and raised by turning the bolt counterclockwise By pressing down on the machine arm lower the wheel and check clearance and maximum cutting distance distance from adjustable stationary vise where wheel enters to front of machine base slot Adjust it necessary _ CAUTION Do not start your ...

Page 14: ... or masonry with this cut off machine Never cut magnesium or magnesium alloy with this machine Failure to comply could result in serious personal injury Toprevent maohlne movement ortippingduring cuttingprocedure secure cut of machine in place to a workbench or work sudace that is also secure _1 WARNING Always use the vise on the cut off machine to prevent accidents that could result in possible s...

Page 15: ...6 2 mm from wheel II When cutting long pieces support the opposite end of the materiel with e roller stand or with a work surface level with the machine base _ WARNING Never perform any cutting operationfreehand without placing workpieoe in the vise Material will get hot during cutting operation Keep hands off of metal being cut to avoid serious personal injury Before turning on machine perform a ...

Page 16: ...lastic parts Most plastics are susceptible to damage from various types of commercial solvents and may be damaged by their use Use a clean cloth to remove dirt carbon dust etc CAUTION Do not at any time let brake fluids gasoline petroleum based products penetrating oils etc come in contact with plastic parts They contain chemicals that can damage weaken or destroy plastic LUBRICATION All of the be...

Page 17: ...r wear Replace both brushes when either has less than 1 4 in length of carbon remaining Do not replace one side without replacing the other Reassemble using new brush assemblies Make sure curvature of brush matches curvature of motor and that brush moves freely in brush tube BRUSHCAP BRUSH ASSEMBLY Fig 17 Make sure brushcap is oriented correctly straight and replace Tighten brushcap securely Do no...

Page 18: ... power company 3 Have an electdcJan replace with a 15 amp fuse or circuit breaker Motor overheats 1 Motor is overloaded 1 Request a voltage check from the power company 2 Wheel is being fed into worktoo fast 2 Feed wheel into work slower Machine is noisy when running 1 Motor needs attention 1 Have the motor checked at your nearest author zealservice center Wheel hits table 1 Wheel not properly met...

Page 19: ...__ i nl i iw 19 ...
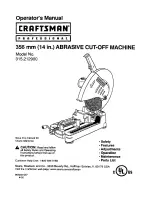
Page 20: ...CRAFTSMAN 14 in 356 mm ABRASIVE CUT OFF MACHINE MODEL NO 212900 14 15 16 19 2524 23 27 26 21 12 30 O 4 2 10 8 29 11 11 3 FIGURE A ...

Page 21: ...Power Cord 14 AWG 1 Bend Reliel 1 Screw M5 X 24 B Screw M5 X 22 1 Left Handle 1 Screw 4 CordClamp 1 Switch 1 Right Handle 1 Nut M5 g Bumper 2 UpperBlade Guard 1 LockNut M6 2 LowerBladeGuard 1 Washer M3 1 Screw M6 X16 1 Key Pe_ No Number 17 C 357020 BB 1B C357017 BB 19 C2600007 BB 20 C2600008 BB 21 C357021 BB 22 C2600072 BB 23 C2600005 BB g4 C2600004 BB 25 C357011 BB 26 C357010 BB 27 C357009 BB 28 ...

Page 22: ...CRAFTSMAN 14 in 356 mm ABRASIVE CUT OFF MACHINE MODEL NO 212900 16 15 19 2O Io 1_3 FIGURE B 4 7 5 31 25 ...

Page 23: ... Flat Washer M5 2 SpringWasher M5 2 Screw M5 X 12 2 Screw MS X 12 2 BrushHolder 2 BrushAssembly 2 BrushCap 2 MotorHousing 1 LeadWire 1 Data Plate 1 Grommet 1 Fie dAssembly 1 Gear Case 1 Ball Bearing 6000 1 Retaining Ring 1 Key Part No Number t 7 C357046 BB 16 C357048 BB 19 C2600023 BB 20 C2600024 BB 21 C357054 BB 22 C357050 BB 23 C2600025 BB 24 C357051 BB 25 C2600 20 BB 26 C357041 BB 27 C2600018 B...

Page 24: ...Po j_ 6 i 4 3 2 FIGURE C CRAFTSMAN 14 in 356 ram ABRASIVE CUT OFF MACH NE MODEL NO 212900 7 13 9 12 16 15 i i l 39 i 19 25 24 26 jJ j 54 J 52 53 44 51 47 46 47 48 47 27 30 31 45 i7 ...

Page 25: ... SocketHex HeadScrew MIO X 70 1 Right Cover 1 Fence 1 Scale 1 Scale Rivet 2 LookHandle 1 HexSocket Screw MIO X 20 1 SpringWasher 1 Wa sher 1 Washer MIO 1 Rol erPin M6 x20 1 ExtensionFence Pin 1 Threaded Rod M16 X 344 1 RollPin M3 X 4 1 Key Part No Number Description 28 C357060 t B 29 C357081 BB 30 C2600061 BB 31 C2000056 BB 32 C2600054 BB 33 C357094 BB 34 C2600059 BB 35 C357087 BB 36 C2600064 BB 3...

Page 26: ...es and owner s manuals that you need to do it yourself call Sears PartsDirect s t 1 800 366 PART 6_ m 11pmCST t 800 366 7278 7 days a week www sears om partsdirect I 41 p p To purchase or inquire about a Sears Service Agreement 1 800 827 6655 _ _ _ 7 a m 5 p m CST Mon Sat F_ Para pedir servicio de reparacibn a domi ilio Au Canada pour service en franr als _ it _i y para ordenar piezas con entrega ...

Reviews: