background image

Maintaining the Server

This chapter contains the following sections:

Status LEDs and Buttons, on page 1

Preparing For Component Installation, on page 6

Serviceable Component Locations, on page 11

Replacing Components Inside the Main Chassis, on page 17

Replacing Components Inside a CPU Module, on page 67

Replacing Components Inside an I/O Module, on page 90

Recycling the PCB Assembly (PCBA), on page 101

Service DIP Switches, on page 111

Status LEDs and Buttons

This section contains information for interpreting LED states.
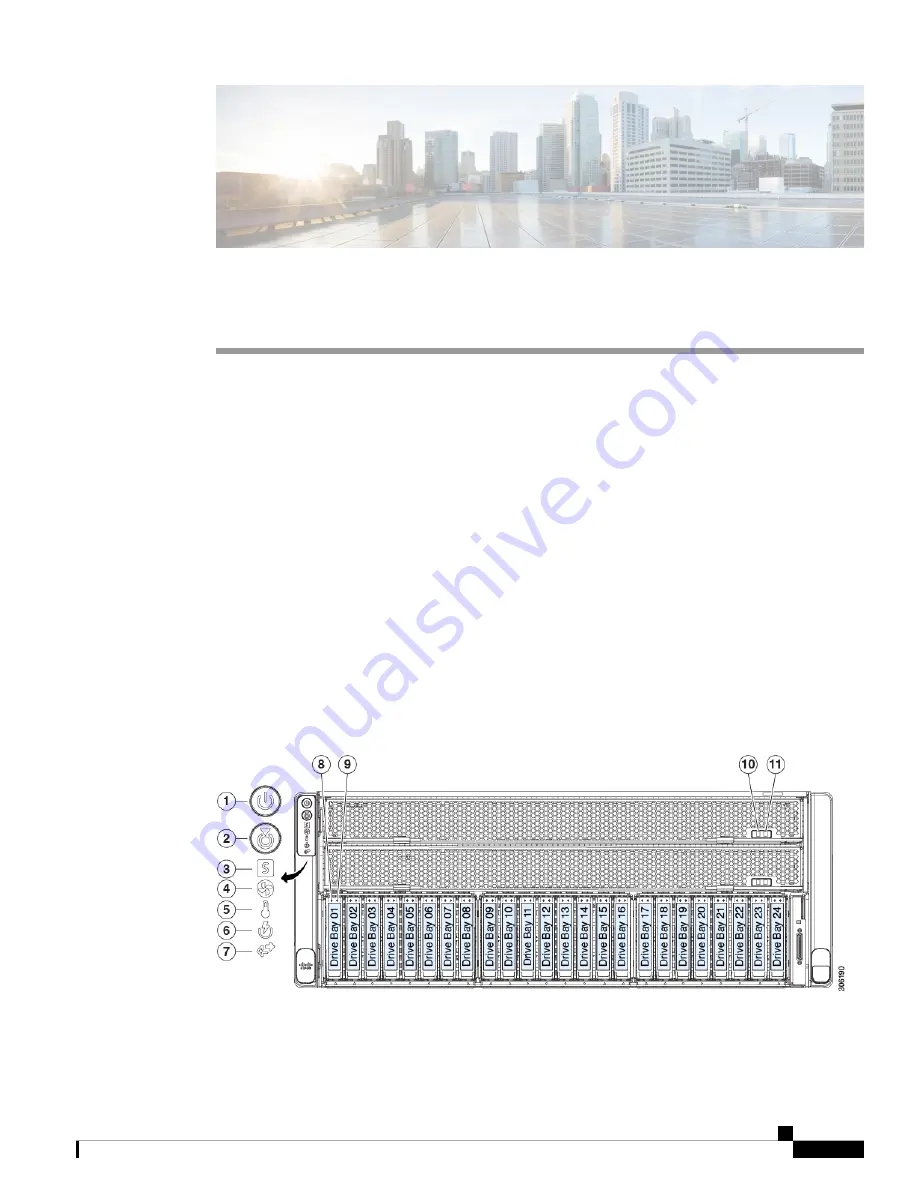
Front-Panel LEDs

Figure 1: Front Panel LEDs

Maintaining the Server

1

Summary of Contents for UCS C480 M5

Page 1: ... Replacing Components Inside the Main Chassis on page 17 Replacing Components Inside a CPU Module on page 67 Replacing Components Inside an I O Module on page 90 Recycling the PCB Assembly PCBA on page 101 Service DIP Switches on page 111 Status LEDs and Buttons This section contains information for interpreting LED states Front Panel LEDs Figure 1 Front Panel LEDs Maintaining the Server 1 ...

Page 2: ...condition Amber steady The server is in a degraded operational state minor fault For example Power supply redundancy is lost CPUs are mismatched At least one CPU is faulty At least one DIMM is faulty At least one drive in a RAID configuration failed Amber blinking The server is in a critical fault state For example Boot failure Fatal processor and or bus error detected Over temperature condition S...

Page 3: ... blinking The device is rebuilding Amber blinking with one second interval Drive locate function activated in the software SAS SATA drive fault NVMe solid state drive SSD drive tray LEDs have different behavior than SAS SATA drive trays Note 8 SAS Off There is no hard drive in the hard drive tray no access no fault Green The hard drive is ready Green blinking The hard drive is reading or writing d...

Page 4: ...or DIMMs on the CPU module board Amber There is a fault with a CPU or DIMM on the CPU module board such as an over temperature condition CPU module fault 11 Off The drive is idle Green steady The drive is spinning up a disk Green blinking The drive is accessing data DVD drive activity optional DVD module not shown Rear Panel LEDs Figure 2 Rear Panel LEDs Table 2 Rear Panel LEDs Definition of State...

Page 5: ...cation function is not in use Blue blinking The unit identification function is activated Rear unit identification 5 AC power supplies Off No AC input 12 V main power off 12 V standby power off Green blinking 12 V main power off 12 V standby power on Green solid 12 V main power on 12 V standby power on Amber blinking Warning threshold detected but 12 V main power on Amber solid Critical error dete...

Page 6: ...ved from the chassis Figure 3 Internal Diagnostic LED Locations DIMM fault LEDs one next to each DIMM socket on the board Amber DIMM has a fault Off DIMM is OK 3 CPU fault LEDs one behind each CPU socket on the board Amber CPU has a fault Off CPU is OK 1 Switch SW1 SW1 is labeled PRESS HERE TO SEE FAULTS 2 Preparing For Component Installation This section includes information and tasks that help p...

Page 7: ...pplies in the server as directed in the service procedures You can shut down the server by using the front panel power button or the software management interfaces Caution Shutting Down Using the Power Button Step 1 Check the color of the Power button LED Amber The server is already in standby mode and you can safely remove power Green The server is in main power mode and must be shut down before ...

Page 8: ...r Example server scope chassis Step 2 At the chassis prompt enter Example server chassis power shutdown The operating system performs a graceful shutdown and the server goes to standby mode which is indicated by an amber Power button LED Step 3 If a service procedure instructs you to completely remove power from the server disconnect all power cords from the power supplies in the server Shutting D...

Page 9: ...icated by an amber Power button LED Step 8 If a service procedure instructs you to completely remove power from the server disconnect all power cords from the power supplies in the server Removing the Server Top Cover Step 1 Remove the top cover a If the cover latch is locked use a screwdriver to turn the lock 90 degrees counterclockwise to unlock it b Lift on the end of the latch that has the gre...

Page 10: ...moved and replaced without shutting down and removing power from the server This type of replacement has two varieties hot swap and hot plug Hot swap replacement You do not have to shut down the component in the software or operating system This applies to the following components SAS SATA hard drives SAS SATA solid state drives Cooling fan modules Power supplies when redundant as 2 2 or 1 1 Maint...

Page 11: ... The Technical Specifications Sheets for all versions of this server which include supported component part numbers are at Cisco UCS Servers Technical Specifications Sheets scroll down to Technical Specifications Serviceable Components Inside the Main Chassis on page 12 Serviceable Components Inside a CPU Module on page 15 Serviceable Components Inside an I O Module on page 16 Maintaining the Serv...

Page 12: ...Serviceable Components Inside the Main Chassis Figure 5 Serviceable Component Locations Inside the Main Chassis Maintaining the Server 12 Maintaining the Server Serviceable Component Locations ...

Page 13: ...ay module drive bays 1 8 Bays 1 2 7 8 support SAS SATA or NVMe drives Front NVMe drives are not supported in a single CPU module system Bays 3 4 5 6 support SAS SATA drives only An NVMe only front drive module is available that supports up to 8 NVMe SSDs You cannot mix this NVMe only module with SAS SATA modules or change module types in the field Note 15 Position of the supercap unit RAID backup ...

Page 14: ...ctions on page 62 PCIe slot 12 is not available when the auxiliary internal drive cage is used because of internal clearance 8 Power supplies 1 4 hot swappable redundant as 2 2 default or 3 1 All power supplies in the system must be identical no mixing 19 PCIe slot 11 Default slot for rear RAID controller whenthe rear drive module is used with SAS SATA drives In systems with only one CPU module sl...

Page 15: ... module is in lower bay 1 CPU 4 and heatsink when module is in upper bay 2 The CPUs in CPU module 1 must be identical with the CPUs in CPU module 2 no mixing Note 1 Release levers for module two each module 5 DIMM sockets controlled by CPU 2 or 4 channels G H J K L M See DIMM Population Rules and Memory Performance Guidelines on page 82 for DIMM slot numbering 2 Maintaining the Server 15 Maintaini...

Page 16: ...able Component Locations Inside an I O Module RTC battery vertical socket 3 Micro SD card socket 1 Mini storage module socket Options SD card module with two SD card slots M 2 module with slots for either two SATA M 2 drives or two NVMe M 2 drives Cisco Boot Optimized M 2 RAID Controller module with two slots for SATA M 2 drives plus an integrated SATA RAID controller that can control the two M 2 ...

Page 17: ...are servicing when you go to the opposite side of the rack You can also activate these LEDs remotely by using the Cisco IMC interface Tip This section describes how to install and replace main chassis components See also Replacing Components Inside a CPU Module on page 67 Replacing Components Inside an I O Module on page 90 Replacing a CPU Module CPU Module Population Rules The server can operate ...

Page 18: ...t the power LED on the front of the CPU module is off before removing the module Note a Grasp the two ejector levers on the module and pinch their latches to release the levers b Rotate both levers to the outside at the same time to evenly disengage the module from the midplane connectors c Pull the module straight out from the chassis and then set it on an antistatic surface Figure 8 CPU Module F...

Page 19: ... mode indicated when the front panel Power button LED lights amber Step 7 Fully power on the server by pressing the Power button Verify that the power LED on the front of the CPU module returns to solid green Note Replacing Front Loading SAS SATA Drives You do not have to shut down the server or drive to replace SAS SATA hard drives or SSDs because they are hot swappable Note Front Loading SAS SAT...

Page 20: ...y mode See the procedures in this section Do not configure 4K sector format and 512 byte sector format drives as part of the same RAID volume For operating system support on 4K sector drives see the interoperability matrix tool for your server Hardware and Software Interoperability Matrix Tools Setting Up UEFI Mode Booting in the BIOS Setup Utility Step 1 Enter the BIOS setup utility by pressing t...

Page 21: ...ible after the system reboots Replacing a Front Loading SAS SATA Drive You do not have to shut down the server or drive to replace SAS SATA hard drives or SSDs because they are hot swappable Note Step 1 Remove the drive that you are replacing or remove a blank drive tray from the bay a Press the release button on the face of the drive tray b Grasp and open the ejector lever and then pull the drive...

Page 22: ...ernal SAS SATA Drives You do not have to shut down the server or drive to replace SAS SATA hard drives or SSDs because they are hot swappable Note Rear SAS SATA Drive Population Guidelines The server supports an internal rear drive module that holds up to eight 2 5 inch drives Maintaining the Server 22 Maintaining the Server Replacing Rear Internal SAS SATA Drives ...

Page 23: ...ves and SSDs That is when you create a logical volume it must contain all SAS SATA hard drives or all SAS SATA SSDs See also 4K Sector Format SAS SATA Drives Considerations on page 20 Note Figure 11 Internal Drive Module Bays Top View Rear SAS SATA Drive Requirements Observe these requirements The optional rear drive module UCSC C480 8HDD The rear drive module requires minimum Cisco IMC and BIOS 3...

Page 24: ... from the server as described in Removing the Server Top Cover on page 9 Step 2 Remove the drive that you are replacing or remove a blank drive tray from the bay a Press the release button on the face of the drive tray b Grasp and open the ejector lever and then pull the drive tray up out of the bay c If you are replacing an existing drive remove the four drive tray screws that secure the drive to...

Page 25: ...Ds OS informed hot insertion and hot removal must be enabled in the system BIOS See Enabling Hot Plug Support in the System BIOS on page 27 Note OS surprise removal is not supported OS informed hot insertion and hot removal are supported on all supported operating systems except VMware ESXi Note Maintaining the Server 25 Maintaining the Server Replacing Front Loading NVMe SSDs ...

Page 26: ... system Note UCSC C480 8HDD SAS SATA NVMe drive bay modules that support up to four NVMe drives each Left drive bay module Bays 1 2 7 8 support SAS SATA or NVMe drives bays 3 4 5 6 support SAS SATA drives only Front NVMe drives are not supported in a single CPU module system Center drive bay module Bays 9 10 15 16 support SAS SATA or NVMe drives bays 11 12 13 14 support SAS SATA drives only Front ...

Page 27: ... 5 inch SSDs and HHHL form factor SSDs in the same system but the same partner brand must be used For example two Intel NVMe SFF 2 5 inch SSDs and two HGST HHHL form factor SSDs is an invalid configuration A valid configuration is two HGST NVMe SFF 2 5 inch SSDs and two HGST HHHL form factor SSDs UEFI boot is supported in all supported operating systems Hot insertion and hot removal are supported ...

Page 28: ...m interface to shut down the drive and then observe the drive tray LED Green The drive is in use and functioning properly Do not remove Green blinking the driver is unloading following a shutdown command Do not remove Off The drive is not in use and can be safely removed b Press the release button on the face of the drive tray c Grasp and open the ejector lever and then pull the drive tray out of ...

Page 29: ...king the driver is initializing following hot plug insertion Green The drive is in use and functioning properly Figure 14 Replacing a Drive in a Drive Tray Drive tray screws two on each side 3 Ejector lever 1 Drive removed from drive tray 4 Release button 2 Maintaining the Server 29 Maintaining the Server Replacing a Front Loading NVMe SSD ...

Page 30: ...actor NVMe solid state drives SSDs in the internal rear drive bay module Rear NVMe SSD Population Guidelines The server supports an rear internal drive bay module that holds up to eight 2 5 inch drives When using NVMe drives the eight drives must be all NVMe no mixing with SAS SATA drives is allowed When populating drives add drives to the lowest numbered bays first Keep an empty drive blanking tr...

Page 31: ...and two HGST HHHL form factor SSDs is an invalid configuration A valid configuration is two HGST NVMe SFF 2 5 inch SSDs and two HGST HHHL form factor SSDs UEFI boot is supported in all supported operating systems Hot insertion and hot removal are supported in all supported operating systems except VMWare ESXi Replacing a Rear Internal NVMe Drive This topic describes how to replace 2 5 inch form fa...

Page 32: ...tep 3 Install a new drive a Place a new drive in the empty drive tray and install the four drive tray screws b With the ejector lever on the drive tray open insert the drive tray into the empty drive bay c Push the tray into the slot until it touches the backplane and then close the ejector lever to lock the drive in place Step 4 Observe the drive tray LED and wait until it returns to solid green ...

Page 33: ...ection is for replacing half height half length HHHL form factor NVMe SSDs in the PCIe slots HHHL SSD Population Guidelines Observe the following population guidelines when installing HHHL form factor NVMe SSDs Dual CPU Module systems You can populate up to 12 HHHL form factor SSDs using PCIe slots 1 12 Maintaining the Server 33 Maintaining the Server Replacing HHHL Form Factor NVMe Solid State Dr...

Page 34: ...h the server via the PCIe bus You can combine NVMe SFF 2 5 or 3 5 inch SSDs and HHHL form factor SSDs in the same system but the same partner brand must be used For example two Intel NVMe SFF 2 5 inch SSDs and two HGST HHHL form factor SSDs is an invalid configuration A valid configuration is two HGST NVMe SFF 2 5 inch SSDs and two HGST HHHL form factor SSDs Replacing HHHL NVMe Drives Step 1 Prepa...

Page 35: ...k in the tops of the PCIe slots Push the wire locking latching back to the forward locked position Step 4 Replace the top cover to the server Step 5 Reconnect power cords to all power supplies and then allow the server to boot to standby power mode indicated when the front panel Power button LED lights amber Step 6 Fully power on the server by pressing the Power button Figure 17 PCIe Slot Hinged R...

Page 36: ... the module out the front of the chassis e Pull the module and its attached interposer board out the front of the chassis and then set it aside Step 6 Install a new drive module a Insert the new module with attached interposer into the opening in the chassis front b Gently slide the module into the opening ensuring that the connector on the end of the interposer board engages with the socket on th...

Page 37: ...Figure 18 Front Drive Bay Module Securing Screws CPU Modules Removed Maintaining the Server 37 Maintaining the Server Replacing a Front Drive Bay Module ...

Page 38: ...rver SKU If you do not do this drive enumeration might not display correctly in the software This issue does not affect servers controlled in UCSM mode Note Step 1 Prepare the server for component installation a Shut down and remove power from the server as described in Shutting Down and Removing Power From the Server on page 7 b Slide the server out the front of the rack far enough so that you ca...

Page 39: ...p cover to the server Step 7 Reconnect power cords to all power supplies and then allow the server to boot to standby power mode indicated when the front panel Power button LED lights amber Step 8 Fully power on the server by pressing the Power button Step 9 If your server is running in standalone mode use the Cisco UCS Host Upgrade Utility to update the controller firmware and program the correct...

Page 40: ...CPU modules removed 1 Metal retainer plate securing screws 2 Replacing the Front RAID Supercap Unit This server supports installation of up to two supercap units one for a front RAID controller and one for a rear RAID controller The front supercap unit mounts to a bracket on the inner chassis wall below the CPU modules Maintaining the Server 40 Maintaining the Server Replacing the Front RAID Super...

Page 41: ...ep 3 Remove an existing supercap unit a Disconnect the supercap cable from the existing supercap b Lift gently on the top securing tab that holds the supercap unit to its bracket c Lift the supercap unit free of the bracket and set it aside Step 4 Install a new supercap unit a Lift gently on the top securing tab on the bracket while you set the supercap unit into the bracket Relax the tab so that ...

Page 42: ...Figure 20 Front Supercap Bracket Location Below CPU Modules Maintaining the Server 42 Maintaining the Server Replacing the Front RAID Supercap Unit ...

Page 43: ...Maintaining the Server 43 Maintaining the Server Replacing the Front RAID Supercap Unit ...

Page 44: ...le remove the diffuser Lift straight up on the diffuser and set it aside It is not necessary to remove the rear supercap unit from the diffuser c Disconnect any cable from a RAID controller or NVMe switch card from the module connectors d Loosen the two screws that secure the module to the chassis e Grasp the module at each end and lift up evenly to disengage its connector from the socket on the m...

Page 45: ...when SAS SATA drivs are installed in the rear drive module 1 Two drive module securing screws 5 Diffuser alignment points against the chassis mid brace 2 Rear RAID supercap unit location on the inside surface of the diffuser 3 Replacing an Air Diffuser on the Rear Drive Module The air diffuser UCSC BAFF C480 M5 must be installed on the rear drive module when SAS SATA hard drives or solid state dri...

Page 46: ...e supercap from its clip and set it aside Do not disconnect the supercap cable Step 3 Install the new air diffuser a Set the supercap unit into the clip on the inside of the air diffuser and push gently until it clicks in place and is secured b Position SAS and supercap cables so that they do not interfere with the diffuser installation Cables must route out the rear of the diffuser c Set the air ...

Page 47: ...ap units one for a front RAID controller and one for a rear RAID controller The rear supercap unit mounts to a clip on the air diffuser that wraps around the internal drive module The supercap provides approximately three years of backup for the disk write back cache DRAM in the case of a sudden power loss by offloading the cache to the NAND flash Step 1 Prepare the server for component installati...

Page 48: ...the new supercap unit into the clip on the inside of the air diffuser and push gently until it clicks in place and is secured b Connect the supercap cable to the rear RAID controller card c Position SAS and supercap cables so that they do not interfere with the diffuser installation Cables must route out the rear of the diffuser d Set the air diffuser in place and carefully lower it using the groo...

Page 49: ...pports one rear RAID controller card for control of up to eight internal SAS SATA drives in the optional auxiliary drive module The default slot for a rear RAID controller is PCIe slot 11 However in a single CPU module system slot 11 is not supported In this case install the rear RAID controller in PCIe slot 10 and install the required blank filler to PCIe slot 11 to ensure adequate air flow Note ...

Page 50: ...rom the server as described in Removing the Server Top Cover on page 9 Step 2 Remove an existing rear RAID card a Disconnect the SAS and supercap cables from the existing card b Open the hinged retainer bar that covers the top of PCIe slot 11 or 10 Use your fingertips to pull back on the wire locking latches at each end of the retainer bar and then hinge the bar open to expose the tops of the PCIe...

Page 51: ...HUU guide for your Cisco IMC release for instructions on downloading and using the utility to bring server components to compatible levels HUU Guides Note Figure 24 Rear RAID Card and PCIe Slot 11 Filler Single CPU Module System Shown PCIe slot 10 secondary slot for rear RAID controller In a single CPU module system slot 11 is not supported so the controller must install to slot 10 2 PCIe slot 11 ...

Page 52: ...lots c Open the card s blue ejector lever to unseat it from PCIe slot 10 d Pull both ends of the card vertically to disengage the card from the socket and then set it aside Step 3 Install a new rear NVMe switch card a Carefully align the card edge with the socket of PCIe slot 10 b Push on both corners of the card to seat its connector in the socket c Fully close the blue ejector lever on the card ...

Page 53: ...t correctly seated Tip You do not have to shut down or remove power from the server to replace fan modules because they are hot swappable However to maintain proper cooling do not operate the server for more than one minute with any fan module removed Caution Step 1 Remove an existing fan module a Slide the server out the front of the rack far enough so that you can remove the top cover You might ...

Page 54: ...e server b Press down gently on the fan module to fully engage it with the connector on the motherboard c Replace the top cover to the server d Replace the server in the rack Figure 26 Top View of Fan Module Fan module fault LED 2 Fan module release latches 1 Replacing an Internal USB Drive This section includes procedures for installing a USB drive and for enabling or disabling the internal USB p...

Page 55: ...ove the top cover from the server as described in Removing the Server Top Cover on page 9 d Locate the USB socket on the motherboard as shown below near PCIe slot 12 e Grasp the USB drive and pull it horizontally to free it from the socket Step 2 Install a new internal USB drive a Align the USB drive with the socket b Push the USB drive horizontally to fully engage it with the socket c Replace the...

Page 56: ...s into a motherboard socket and is then permanently secured with a one way screw TPM Considerations This server supports either TPM version 1 2 or TPM version 2 0 Field replacement of a TPM is not supported you can install a TPM after factory only if the server does not already have a TPM installed If there is an existing TPM 1 2 installed in the server you cannot upgrade to TPM 2 0 If there is no...

Page 57: ...ibed in Removing the Server Top Cover on page 9 Step 2 Install a TPM a Locate the TPM socket on the motherboard as shown below b Align the connector that is on the bottom of the TPM circuit board with the motherboard TPM socket Align the screw hole on the TPM board with the screw hole that is adjacent to the TPM socket c Push down evenly on the TPM to seat it in the motherboard socket d Install th...

Page 58: ...ice as prompted Note Step 1 Enable TPM Support a Watch during bootup for the F2 prompt and then press F2 to enter BIOS setup b Log in to the BIOS Setup Utility with your BIOS Administrator password c On the BIOS Setup Utility window choose the Advanced tab d Choose Trusted Computing to open the TPM Security Device Configuration window e Change TPM SUPPORT to Enabled f Press F10 to save your settin...

Page 59: ...mpt to press F2 Step 2 When prompted press F2 to enter the BIOS Setup utility Step 3 Verify that the prerequisite BIOS values are enabled a Choose the Advanced tab b Choose Intel TXT LT SX Configuration to open the Intel TXT LT SX Hardware Support window c Verify that the following items are listed as Enabled VT d Support default is Enabled VT Support default is Enabled TPM Support TPM State d Do ...

Page 60: ...h a Disconnect the intrusion switch cable from the socket on the motherboard b Use a 1 Phillips head screwdriver to loosen and remove the single screw that holds the switch mechanism to the chassis wall c Slide the switch mechanism straight up to disengage it from the clips on the chassis Step 3 Install a new intrusion switch a Slide the switch mechanism down into the clips on the chassis wall so ...

Page 61: ...the server out from the rack or remove the server cover Note See also Power Specifications for more information about the supported power supplies See also Rear Panel LEDs on page 4 for information about the power supply LEDs Replacing AC Power Supplies Do not mix power supply types or wattages in the server All power supplies must be identical Note Step 1 Remove the power supply that you are repl...

Page 62: ...ied and sold by Cisco PCIe cards not qualified or sold by Cisco are the responsibility of the customer Although Cisco will always stand behind and support the C Series rack mount servers customers using standard off the shelf third party cards must go to the third party card vendor for support if any issue with that particular card occurs Note PCIe Slot Specifications and Restrictions The server p...

Page 63: ...Support GPU Card Support NCSI Support Card Height Rear Panel Opening Maximum Card Length Connector Length Electrical Lane Width Slot Number Yes primary slot Yes Yes Full height Full length x24 connector Gen 3 x16 1 Maintaining the Server 63 Maintaining the Server PCIe Slot Specifications and Restrictions ...

Page 64: ... and restrictions Control of the PCIe sockets is divided between the CPUs that are present in the system Some PCIe slots are not available if your system does not have CPU module 2 installed If your system has four CPUs all PCIe slots are supported If your system has only two CPUs CPU module 2 is not present see the following table for the PCIe slots that are supported PCIe Slots Controlled by CPU...

Page 65: ...the tops of the PCIe slots b Pull both ends of the card vertically to disengage the card from the socket and then set it aside Step 3 Install a new PCIe card a Carefully align the card edge with the socket while you align the card s rear tab with the rear panel opening b Push down on both corners of the card to seat its edge connector in the socket c Close the hinged retainer bar over the top of t...

Page 66: ...d configurations cabling and other requirements Table 4 VIC Support and Considerations in This Server Minimum Cisco IMC Firmware Primary Slot For Cisco Card NIC Mode Primary Slot For Cisco UCS Manager Integration Slots That Support the VIC How Many Supported in Server VIC 3 1 2 PCIe 1 PCIe 1 PCIe 1 8 8 Cisco UCS VIC 1385 UCSC PCIE C40Q 03 4 0 1 PCIe 1 PCIe 1 PCIe 1 8 8 Cisco UCS VIC 1455 UCSC PCIE...

Page 67: ...in Chassis on page 17 Replacing Components Inside an I O Module on page 90 Replacing CPUs and Heatsinks This section contains information for replacing CPUs and heatsinks inside a CPU module Special Information For Upgrades to Second Generation Intel Xeon Scalable Processors You must upgrade your server firmware to the required minimum level before you upgrade to the Second Generation Intel Xeon S...

Page 68: ... Figure 33 CPU Numbering The server can operate with one or two CPU modules two or four identical CPUs installed The CPUs in CPU module 1 must be identical with the CPUs in CPU module 2 no mixing Note The minimum configuration is that the server must have at least CPU module 1 installed in the lower CPU module bay Install CPU module 1 first and then CPU module 2 in the upper bay If CPU module 2 is...

Page 69: ...rear RAID controller is used it must be installed in PCIe slot 10 rather than the default slot 11 A blank filler must be installed in slot 11 The following NVIDIA GPUs are not supported with Second Generation Intel Xeon Scalable processors NVIDIA Tesla P100 12G NVIDIA Tesla P100 16G Tools Required For CPU Replacement You need the following tools and equipment for this procedure T 30 Torx driver Su...

Page 70: ... that the power LED on the front of the CPU module is off before removing the module Note a Grasp the two ejector levers on the front of the CPU module and pinch their latches to release the levers b Rotate both levers to the outside at the same time to evenly disengage the module from the midplane connectors c Pull the module straight out from the chassis and then set it on an antistatic surface ...

Page 71: ... the heatsink from the CPU assembly the CPU assembly includes the CPU and the plastic CPU carrier a Place the heatsink with CPU assembly so that it is oriented upside down as shown in the following figure Note the thermal interface material TIM breaker location TIM BREAKER is stamped on the CPU carrier next to a small slot Maintaining the Server 71 Maintaining the Server Replacing a CPU and Heatsi...

Page 72: ...CPU carrier at the TIM breaker slot Use caution to avoid damaging the heatsink surface Note d Gently rotate the screwdriver to lift up on the CPU until the TIM on the heatsink separates from the CPU Do not allow the screwdriver tip to touch or damage the green CPU substrate Note e Pinch the CPU carrier clip at the corner opposite the TIM breaker and push up to disengage the clip from its slot in t...

Page 73: ...d must be handled with extreme care to avoid damaging pins Caution Figure 36 CPU Assembly Tool CPU Assembly and Heatsink Alignment Features Angled corner on heatsink pin 1 alignment feature 4 CPU assembly tool 1 Triangle cut into plastic carrier pin 1 alignment feature 5 CPU assembly CPU in plastic carrier frame 2 Angled corner on CPU assembly tool pin 1 alignment feature 6 Heatsink 3 Step 6 Apply...

Page 74: ...n shown below to ensure even coverage Figure 37 Thermal Interface Material Application Pattern Step 7 With the CPU assembly on the CPU assembly tool set the heatsink onto the CPU assembly Note the Pin 1 alignment features for correct orientation Push down gently until you hear the corner clips of the CPU carrier click onto the heatsink corners In the following step use extreme care to avoid touchi...

Page 75: ...tening the heatsink nuts evenly so that the heatsink remains level while it is lowered Tighten the heatsink nuts in the order shown on the heatsink label 1 2 3 4 The captive nuts must be fully tightened so that the leaf springs on the CPU socket lie flat Note Step 9 Return the CPU module to the chassis a With the two ejector levers open align the CPU module with an empty bay b Push the module into...

Page 76: ...io 1 You are reusing the existing heatsinks Heat sink cleaning kit UCSX HSCK One cleaning kit can clean up to four CPUs Thermal interface material TIM kit for M5 servers UCS CPU TIM One TIM kit covers one CPU Scenario 2 You are replacing the existing heatsinks Heat sink UCSC HS 02 EX New heatsinks have a pre applied pad of TIM Heat sink cleaning kit UCSX HSCK One cleaning kit can clean up to four ...

Page 77: ... an M5 Generation CPU on page 77 Moving an M5 Generation CPU Tool required for this procedure T 30 Torx driver When you receive a replacement server for an RMA it includes dust covers on all CPU sockets These covers protect the socket pins from damage during shipping You must transfer these covers to the system that you are returning as described in this procedure Caution Step 1 When moving an M5 ...

Page 78: ...he CPU socket covers from the new system to the system that you are returning a Remove the socket covers from the replacement system Grasp the two recessed finger grip areas marked REMOVE and lift straight up Keep a firm grasp on the finger grip areas at both ends of the cover Do not make contact with the CPU socket pins Note Maintaining the Server 78 Maintaining the Server Moving an M5 Generation...

Page 79: ... down anywhere on the cover except the two points described Pressing elsewhere might damage the socket pins Caution c Press down on the two circular markings next to the word INSTALL that are closest to the two threaded posts see the following figure Press until you feel and hear a click You must press until you feel and hear a click to ensure that the dust covers do not come loose during shipping...

Page 80: ...em a On the new board align the assembly over the CPU socket as shown below Note the alignment features The pin 1 angled corner on the heatsink must align with the pin 1 angled corner on the CPU socket The CPU socket posts must align with the guide holes in the assembly Maintaining the Server 80 Maintaining the Server Moving an M5 Generation CPU ...

Page 81: ... CPU assembly down onto the CPU socket c Use a T 30 Torx driver to tighten the four captive nuts that secure the heatsink to the board standoffs Alternate tightening the heatsink nuts evenly so that the heatsink remains level while it is lowered Tighten the heatsink nuts in the order shown on the heatsink label 1 2 3 4 The captive nuts must be fully tightened so that the leaf springs on the CPU so...

Page 82: ...maximum memory performance You must use DIMM blanking panels in any DIMM slots that do not have DIMMs installed to ensure adequate air flow Note DIMM Slot Numbering The following figure shows the numbering of the DIMM slots on the CPU module board When a CPU module is in bay 1 the lower bay the system numbers the CPUs as CPU 1 and CPU 2 When a CPU module is in bay 2 the upper bay the system number...

Page 83: ...2 H2 K2 L2 G1 H1 K1 L1 A2 B2 D2 E2 A1 B1 D1 E1 8 G2 H2 J2 K2 L2 M2 G1 H1 J1 K1 L1 M1 A2 B2 C2 D2 E2 F2 A1 B1 C1 D1 E1 F1 12 The maximum combined memory allowed in the 12 DIMM slots controlled by any one CPU is 768 GB To populate the 12 DIMM slots with more than 768 GB of combined memory you must use a high memory CPU that has a PID that ends with an M for example UCS CPU 6134M All DIMMs must be DD...

Page 84: ...ond duplicate channel provides redundancy Replacing DIMMs Identifying a Faulty DIMM Each DIMM socket has a corresponding DIMM fault LED directly in front of the DIMM socket See Internal Diagnostic LEDs on page 5 for the locations of these LEDs Step 1 Caution Never remove a CPU module without shutting down and removing power from the server Prepare the server for component removal a Shut down and r...

Page 85: ... the server to boot to standby power mode indicated when the front panel Power button LED lights amber Step 7 Fully power on the server by pressing the Power button Verify that the power LED on the front of the CPU module returns to solid green Note Replacing Intel Optane DC Persistent Memory Modules This topic contains information for replacing Intel Optane Data Center Persistent Memory modules D...

Page 86: ... the following rules and guidelines To use DCPMMs in this server four CPUs must be installed Intel Optane DC persistent memory modules require Second Generation Intel Xeon Scalable processors You must upgrade the server firmware and BIOS to version 4 0 4 or later and then install the supported Second Generation Intel Xeon Scalable processors before installing DCPMMs When using DCPMMs in a server T...

Page 87: ...rovision a specific replacement DCPMM on a preconfigured server Note Step 1 Caution Never remove a CPU module without shutting down and removing power from the server Prepare the server for component removal a Shut down and remove power from the server as described in Shutting Down and Removing Power From the Server on page 7 Maintaining the Server 87 Maintaining the Server Installing Intel Optane...

Page 88: ...y on the top corners of the DCPMM until it is fully seated and the ejector levers on both ends lock into place Step 5 Return the CPU module to the chassis a With the two ejector levers open align the CPU module with an empty bay b Push the module into the bay until it engages with the midplane connectors and is flush with the chassis front c Rotate both ejector levers toward the center until they ...

Page 89: ...egions goals and namespaces and to update DCPMM firmware To open the BIOS Setup Utility press F2 when prompted during a system boot The DCPMM menu is on the Advanced tab of the utility Advanced Intel Optane DC Persistent Memory Configuration From this tab you can access other menu items DIMMs Displays the installed DCPMMs From this page you can update DCPMM firmware and configure other DCPMM param...

Page 90: ...s Update firmware 2 Under File provide the file path to the bin file 3 Select Update Replacing Components Inside an I O Module When handling server components handle them only by carrier edges and use an electrostatic discharge ESD wrist strap or other grounding device to avoid damage Caution Never remove an I O module without shutting down and removing power from the server Caution This section d...

Page 91: ...emoving Power From the Server on page 7 You do not have to pull the server out of the rack or remove the server cover because the I O module is accessible from the rear of the server Note Step 2 Remove an I O module from the chassis a Disconnect any cables from the ports on the I O module b Push down on the locking clip on the I O module s ejector handle and then hinge the handle upward to disenga...

Page 92: ...g a Micro SD Card There is one socket for a Micro SD card on the I O module board Never remove a CPU module without shutting down and removing power from the server Caution Step 1 Prepare the server for component removal a Shut down and remove power from the server as described in Shutting Down and Removing Power From the Server on page 7 You do not have to pull the server out of the rack or remov...

Page 93: ... it engages with the midplane connector c Hinge the ejector handle down until it sits flat and its locking clip clicks The module face mst be flush with the rear panel of the chassis d Reconnect cables to the ports on the I O module Step 6 Reconnect power cords to all power supplies and then allow the server to boot to standby power mode indicated when the front panel Power button LED lights amber...

Page 94: ...O module from the chassis a Disconnect any cables from the ports on the I O module b Push down on the locking clip on the I O module s ejector handle and then hinge the handle upward to disengage the module s connector from the chassis midplane c Pull the module straight out from the chassis and then set it on an antistatic surface Step 3 Remove a carrier from its socket a Locate the mini storage ...

Page 95: ...tandby power mode indicated when the front panel Power button LED lights amber Step 7 Fully power on the server by pressing the Power button Replacing an SD Card in a Mini Storage Carrier For SD This topic describes how to remove and replace an SD card in a mini storage carrier for SD UCS MSTOR SD The carrier has one SD card socket on its top and one socket on its underside Population Rules For Mi...

Page 96: ... storage carrier for M 2 UCS MSTOR M2 The carrier has one M 2 SSD socket on its top and one socket on its underside Population Rules For Mini Storage M 2 SSDs You can use one or two M 2 SSDs in the carrier M 2 slot 1 is on the top side of the carrier M 2 slot 2 is on the underside of the carrier the same side as the carrier s motherboard connector If you use the server s embedded software RAID con...

Page 97: ...rrier Step 4 Install the mini storage module carrier back into the server and then power it on as described in Replacing a Mini Storage Module Carrier on page 94 Replacing a Boot Optimized M 2 RAID Controller Module The Cisco Boot Optimized M 2 RAID Controller module connects to the mini storage module socket on the I O module board It includes slots for two SATA M 2 drives plus an integrated 6 Gb...

Page 98: ...ch as UEFI HII PMCLI XMLAPI and Redfish Updating firmware of the controller and the individual drives For standalone servers use the Cisco Host Upgrade Utility HUU Refer to the HUU Documentation For servers integrated with Cisco UCS Manager refer to the Cisco UCS Manager Firmware Management Guide The SATA M 2 drives can boot in UEFI mode only Legacy boot mode is not supported If you replace a sing...

Page 99: ...king clip on the I O module s ejector handle and then hinge the handle upward to disengage the module s connector from the chassis midplane c Pull the module straight out from the chassis and then set it on an antistatic surface Step 3 Remove a controller from its socket a At each end of the controller board push outward on the clip that secures the carrier b Lift both ends of the controller to di...

Page 100: ... the carrier g Turn the controller over and install the second M 2 drive Figure 50 Cisco Boot Optimized M 2 RAID Controller Showing M 2 Drive Installation Step 5 Install the controller to its socket on the motherboard a Position the controller over the socket with the controller s connector facing down and at the same end as the motherboard socket Two alignment pegs must match with two holes on th...

Page 101: ...recyclers who will be reclaiming the electronics for proper disposal to comply with local eco design and e waste regulations Note To remove the printed circuit board assembly PCBA the following requirements must be met The server must be disconnected from facility power The server must be removed from the equipment rack The server s top cover must be removed See Removing the Server Top Cover on pa...

Page 102: ...unter clockwise until it disengages b When all screws are removed grasp the plastic fobs and remove them by hand The following image shows the locations of the screws and components Figure 52 Locations of Mounting Screws and Components Top Down View Step 3 Continue disassembly Maintaining the Server 102 Maintaining the Server Recycling the PCB Assembly PCBA ...

Page 103: ...iver or similar tool Note c Detach the fan cage from the Midplane assembly d Using a screwdriver rotate the each of the screws for the latch bracket counter clockwise until it disengages The following image shows the location of these screws Figure 53 Location of Interior Mounting Screws Top Down View Step 4 Remove the I O module a Lift the I O Module latch b Slide the I O Module out of the chassi...

Page 104: ... if present that is connected to it b Using a screwdriver rotate each of the screws for the cable management bracket counter clockwise until it disengages c Remove the cable bracket The following image shows the location of the bracket and its screws Maintaining the Server 104 Maintaining the Server Recycling the PCB Assembly PCBA ...

Page 105: ...crews counter clockwise until it disengages g Grasp the ends of the RAID card bracket and lift it straight up to disengage it from the metal pins that hold it in place h Using a screwdriver rotate each of the screws in the black plastic supercap bracket counter clockwise until it disengages i Remove the black plastic supercap bracket The following image shows the location of these screws and brack...

Page 106: ... s security screw counter clockwise until it disengages b Placing your fingers on the metal card guide near the socket connector pull to disconnect the KVM card and slide it out of the chassis The following image shows the location of this component Maintaining the Server 106 Maintaining the Server Recycling the PCB Assembly PCBA ...

Page 107: ...y hand c Grasp the Midplane stiffener and remove it by hand The following image shows the location of these screws and components Figure 58 Location of Mounting Screws Bridge Card and Midplane Stiffener Step 8 Using a screwdriver continue disassembling the Bridge card by rotating each of its screws counter clockwise until it disengages The following image shows the location of the screws Maintaini...

Page 108: ... View Step 10 Remove the rear sub assembly a Using a screwdriver rotate each of the screws counter clockwise until it disengages from the midplane frame b Grasp the rear sub assembly and disconnect it from the Midplane frame c Grasp the PCIE module and separate it from the Midplane frame The following illustration shows the location of the screws The following image is straight on showing the rear...

Page 109: ...ng a screwdriver rotate each of the screws counter clockwise until it disengages then detach the motherboard from the sheet metal tray b Remove the vertical metal PCBA handle c Remove the plastic baffle The following image shows these components Maintaining the Server 109 Maintaining the Server Recycling the PCB Assembly PCBA ...

Page 110: ...side is facing down This step exposes the Power Distribution board and its mounting screws b Using a screwdriver rotate each of the screws counter clockwise until it disengages c Detach the Power Distribution Board from the PCBA The following image shows the location of these components Maintaining the Server 110 Maintaining the Server Recycling the PCB Assembly PCBA ...

Page 111: ...d Service DIP Switches This server includes a block of DIP switches SW1 that you can use for certain service and Cisco IMC debug functions The block is located on the chassis motherboard as shown in the following figure The switches in the following figure are shown in the default open position off Maintaining the Server 111 Maintaining the Server Service DIP Switches ...

Page 112: ...ate Cisco IMC image 7 10 Reset Cisco IMC to factory defaults 6 11 Reset Cisco IMC password to default 3 14 Clear CMOS 2 15 Recover BIOS 1 16 Password clear Using the Clear Password Switch Positions 1 16 You can use this switch to clear the administrator password Maintaining the Server 112 Maintaining the Server Using the Clear Password Switch Positions 1 16 ...

Page 113: ...to shut down the server to standby power mode Step 9 Remove AC power cords from the server to remove all power Step 10 Remove the top cover from the server Step 11 Move the DIP switch back to its default off position If you do return the switch back to the default open position the password is cleared every time you power cycle the server Note Step 12 Replace the top cover to the server Step 13 Re...

Page 114: ...te the BIOS update and then remove the USB drive from the server During the BIOS update Cisco IMC shuts down the server and the screen goes blank for about 10 minutes Do not unplug the power cords during this update Cisco IMC powers on the server after the update is complete Note Procedure 2 Use BIOS Recovery Switch and bios cap File Step 1 Download the BIOS update package and extract it to a temp...

Page 115: ...its default off position If you do not return the switch to the default open position after recovery completion you see the prompt Please remove the recovery jumper Note Step 13 Replace the top cover to the server Step 14 Reconnect power cords to all power supplies and then allow the server to boot to standby power mode Step 15 Fully power on the server to main power by pressing the Power button U...

Page 116: ...C Password to Default Switch Positions 6 11 You can use this Cisco IMC debug switch to force the Cisco IMC password back to the default Step 1 Shut down and remove power from the server as described in Shutting Down and Removing Power From the Server on page 7 Disconnect power cords from all power supplies Step 2 Slide the server out the front of the rack far enough so that you can remove the top ...

Page 117: ... on page 9 Step 4 Locate DIP switch block SW1 and the switch for pins 7 10 see Figure 64 Location of DIP Switches on Chassis Motherboard on page 112 Step 5 Move the DIP switch from position 7 to the closed on position Step 6 Reinstall the top cover and reconnect AC power cords to the server The server powers up to standby power mode indicated when the Power LED on the front panel is amber You do n...

Page 118: ...standby power mode indicated when the Power LED on the front panel is amber You do not have to return the server to main power for the change to take effect Only Cisco IMC the BMC must reboot The change takes effect after Cisco IMC finishes booting When you next log in to Cisco IMC you see a message similar to the following Boot from alternate image debug functionality is enabled CIMC will boot fr...

Reviews: