background image

user guide

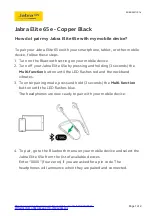
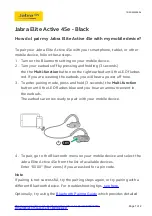
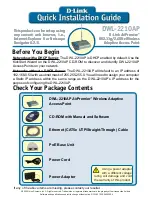
Summary of Contents for M10-CA

Page 1: ...user guide ...

Page 2: ...i Table of Contents User Guide Contents Chapter 1 Valet 1 Chapter 2 Cisco Connect 4 Chapter 3 Advanced Configuration 14 Appendix A Troubleshooting 36 Appendix B Specifications 37 ...

Page 3: ...tup Button doesn t need to be used if you use the Easy Setup Key to connect devices to your network If you have client devices such as wireless adapters that supportWi Fi Protected Setup then you can use theWi Fi Protected Setup button to automatically configure wireless security for your wireless network s To use Wi Fi Protected Setup refer to Wi Fi Protected Setup on page 21 The Wireless LED lig...

Page 4: ... connect the Valet to computers or other devices that have Ethernet ports such as gaming consoles HDTVs Blu ray disc players or printers using network Ethernet cables The Reset Button resets the Valet to its factory default settings when held for approximately ten seconds The Power Port connects the power adapter Easy Setup Key The Easy Setup Key is used to install the Cisco Connect software on yo...

Page 5: ...Mounting Template Print this page at 100 size Cut along the dotted line and place on the wall to drill precise spacing 152 mm Follow these instructions 1 Determine where you want to mount the Valet Make sure that the wall you use is smooth flat dry and sturdy Also make sure the location is within reach of an electrical outlet 2 Drill two holes into the wall Make sure the holes are 152 mm apart 3 I...

Page 6: ...ublished by Cisco Consumer Products LLC Set AutoPlay defaults in Control Panel Open folder to view files using Windows Explorer Speed up my system using Windows ReadyBoost Connect to your Cisco Valet If you do not see this open the Easy Setup Key folder and double click Connect To do so perform the following steps for your specific operating system Windows 7 a Go to Start Computer b Double click E...

Page 7: ...onal computers to your Valet s local network Click OK Installation is Complete NOTE If you have any trouble during the installation process refer to the FAQs in the setup software or use a computer with an active Internet connection to visit www thevalet com support Main Menu The main menu offers four options Computers and Devices Parental Controls Guest Access and Valet Settings To select an opti...

Page 8: ...twork provides Internet access only To grant Internet access to friends or family provide the guest network name and password displayed on this screen NOTE Guest Access provides Internet access only it does not provide access to your local network and its resources or your personal information For example the guest computer cannot print to a printer on the local network or access files on a comput...

Page 9: ...lly using my wireless settings If you want to connect manually without an Easy Setup Key select this option Click Next and go to Connect without the Easy Setup Key on page 8 Do You Have an Easy Setup Key Connect with the Easy Setup Key 1 Insert the Easy Setup Key into an available USB port on the computer that you want to connect to the Valet Connecting Another Computer 2 On that computer click Co...

Page 10: ...work Settings 2 After connecting your device click Next Waiting for New Device or Computer to Connect to Your Valet 3 Enter a name that will be used to identify this device Then click Finish Name Your Device Wireless printer 1 Refer to your printer s documentation to learn how to connect it to a wireless network 2 Enter the Network name SSID Security Key and Security Type settings on your wireless...

Page 11: ...pecific times You can also block specific websites Parental Controls Password First Time Access of Parental Controls 1 The first time you access parental controls you will be asked to create a parental controls password Complete the following Parental controls password Create a password that protects access to parental controls Verify password Re enter the password Secret question Create a secret ...

Page 12: ... Select the computer whose parental controls you want to set up Then click OK Remove If there is a computer that should not have parental controls applied select the computer and click Remove Rename To give a computer a new name select the computer and click Rename and the Rename the device screen appears Rename the Device Enter the new name Then click Rename Set Up Parental Controls To set up par...

Page 13: ...ontrols Password If you clicked Change parental controls password the Change your parental controls password screen appears Change Your Parental Controls Password Old password Enter the old password New password Enter a new password of 4 32 characters Verify password Re enter the new password Click Change to save your setting Blocked Sites When you attempt to access a website that has been blocked...

Page 14: ...e information refer to Update or create an Easy Setup Key on page 7 Safe Web Surfing On off Safe web surfing alerts you when you are about to visit a potentially harmful website You can choose whether to visit the site or not Safe web surfing is enabled by default Other Options Register now to receive special offers and updates To sign up to receive special offers and updates click this option Val...

Page 15: ...o the Valet settings screen Advanced Settings If you are an advanced user you can access the browser based utility to access the advanced configuration settings of the Valet WARNING Modifying some settings in the browser based utility may disable settings you ve already applied using the Easy Setup Key Username Enter this username to access the browser based utility Password Enter this password to...

Page 16: ...8 1 1 Then press Enter NOTE You can also access the browser based utility on Windows computers by entering the device name in the Address field Refer to Device name under Router IP on page 16 A login screen will appear Non Windows 7 users will see a similar screen 1 In the User name field enter admin 2 InthePasswordfield enterthepasswordcreatedbythe setup software If you did not run the setup soft...

Page 17: ...ou are connected to the Internet through a DSL line check with your ISP to see if they use PPPoE If they do you will have to enable PPPoE Internet Connection Type PPPoE Username and Password Enter the Username and Password provided by your ISP Service Name If provided by your ISP enter the Service Name Connect on Demand or Keep Alive Choose one of these options Connect on Demand or Keep Alive The ...

Page 18: ... by your ISP Username and Password Enter the username and password provided by your ISP Connect on Demand or Keep Alive Refer to Connect on Demand or Keep Alive on page 15 for details Optional Settings Some of these settings may be required by your ISP Verify these settings with your ISP before making any changes Optional Settings Host Name and Domain Name These fields allow you to supply a host a...

Page 19: ... a list of DHCP clients with the following information Client Name Interface IP Address and MAC Address DHCP Reservation Select Clients from DHCP Table Click the Select check box to reserve a client s IP address Then click Add Clients Manually Adding Client To manually assign an IP address enter the client s name in the Enter Client Name field Enter the IP address you want it to have in the Assign...

Page 20: ...s org or www TZO com If you do not want to use this feature keep the default setting Disabled DDNS DDNS Service If your DDNS service is provided by DynDNS org then select DynDNS org from the drop down menu If your DDNS service is provided by TZO then select TZO com The features available on the DDNS screen will vary depending on which DDNS service provider you use DynDNS org Setup DDNS DynDNS User...

Page 21: ...u are using Click Save Settings to apply your changes or click Cancel Changes to clear your changes Setup Advanced Routing This screen is used to set up the Valet s advanced functions Operating Mode allows you to select the type s of advanced functions you use Dynamic Routing automatically adjusts how packets travel on your network Static Routing sets up a fixed route to another network destinatio...

Page 22: ... View To manually configure your wireless network select Manual Proceed to the Basic Wireless Settings section To use Wi Fi Protected Setup select Wi Fi Protected Setup Proceed to the Wi Fi Protected Setup section Basic Wireless Settings Manual Wireless Basic Wireless Settings Manual Setup Network Mode From the drop down menu select the wireless standards running on your network Mixed Use this opt...

Page 23: ...client device has been configured click OK Then refer back to your client device or its documentation for further instructions 6 Enter the Valet s PIN on your client device Use this method if your client device asks for the Valet s PIN number a Enter the PIN number listed on this screen It is also listed on the label on the bottom of the Valet b After the client device has been configured click OK...

Page 24: ...twork changes the default passphrase Click Save Settings to apply your changes or click Cancel Changes to clear your changes WPA Personal NOTE If you select WPA Personal as your Security Mode each device in your wireless network MUST use WPA Personal and the same passphrase Security Mode WPA Personal Passphrase Enter a Passphrase of 8 63 characters The setup software that you use to install your V...

Page 25: ... to the Valet NOTE If you select WPA Enterprise as your Security Mode each device in your wireless network MUST use WPA Enterprise and the same shared key WPA Enterprise RADIUS Server Enter the IP address of the RADIUS server RADIUS Port Enter the port number of the RADIUS server The default is 1812 Shared Key Enter the key shared between the Valet and the server Click Save Settings to apply your ...

Page 26: ...enable wireless security or confirm that you understand the risks but still wish to proceed without wireless security Wireless Wireless MAC Filter The Wireless MAC Filter option allows you to block or grant access to your network based on the device s MAC address Each device on your network has a unique MAC address that was assigned to it by the manufacturer Wireless Wireless MAC Filter Wireless M...

Page 27: ...thentication Select Shared Key to only use Shared Key authentication Basic Rate The Basic Rate setting is not actually one rate of transmission but a series of rates at which the Valet can transmit The Valet will advertise its Basic Rate to the other wireless devices in your network so they know which rates will be used The Valet will also advertise that it will automatically select the best rate ...

Page 28: ...ic on the Valet s local network Security Firewall Firewall SPI Firewall Protection To use firewall protection keep the default selection Enabled To turn off firewall protection select Disabled Internet Filter Filter Anonymous Internet Requests This feature makes it more difficult for outside users to work their way into your network This feature is selected by default Deselect the feature to allow...

Page 29: ...forwarding you should assign static IP addresses to the designated servers use the DHCP Reservation feature on the Basic Setup screen refer to DHCP Reservation on page 17 for more details Applications and Gaming Single Port Forwarding Single Port Forwarding Common applications are available for the first five entries Select the appropriate application Then enter the IP address of the server that s...

Page 30: ...ation either TCP or UDP or Both To IP Address For each application enter the IP address of the PC running the specific application If you assigned a static IP address to the PC then you can click DHCP Reservation on the Basic Setup screen to look up its static IP address refer to DHCP Reservation on page 17 for more details Enabled Select Enabled to enable port forwarding for the applications you ...

Page 31: ...ient Table DMZ DHCP Client Table DHCP Client Table The DHCP Client Table lists computers and other devices that have been assigned IP addresses by the Valet The list can be sorted by Client Name Interface IP Address MAC Address and Expired Time how much time is left for the current IP address To select a DHCP client click Select To retrieve the most up to date information click Refresh To exit thi...

Page 32: ...you want to prioritize you can enter their MAC address using this option Proceed to the instructions for your selection Applications Applications Select the appropriate application If you select Add a New Application follow the Add a New Application instructions Priority Select the appropriate priority High Medium Normal or Low Click Add to save your changes Your new entry will appear in the Summa...

Page 33: ...y your changes or click Cancel Changes to clear your changes Administration Management The Administration Management screen allows the network sadministratortomanagespecificValetfunctions for access and security Administration Management Management Router Access To ensure the Valet s security you will be asked for your password when you access the Valet s browser based utility The default is admin...

Page 34: ...ature Otherwise select Disabled Allow Users to Disable Internet Access Select Enabled if you want to be able to prohibit any and all Internet connections Otherwise keep the default setting Disabled Backup and Restore Backup Configurations To back up the Valet s configuration settings click this button and follow the on screen instructions Restore Configurations To restore the Valet s configuration...

Page 35: ...ance of a connection IP or URL Address Enter the address of the computer device or website whose connection you wish to test Start to Traceroute To run the test click this button The Traceroute Test screen will show if the test was successful Click Close to return to the Diagnostics screen Diagnostics Traceroute Administration Factory Defaults The Administration Factory Defaults screen allows you ...

Page 36: ...ile click this button and follow the on screen instructions WARNING Do not interrupt the upgrade process You should not turn off the power or press the reset button during the upgrade process Doing so may render the Valet unusable Status Router The Router screen displays information about the Valet and its current settings Status Router Router Information Firmware Version This is the version numbe...

Page 37: ...omputers and other devices that have been assigned IP addresses by the Valet The list can be sorted by Client Name Interface IP Address MAC Address and Expired Time how much time is left for the current IP address To remove a DHCP client click Delete To retrieve the most up to date information click Refresh To exit this screen and return to the Local Network screen click Close Status Wireless Netw...

Page 38: ... does not replace your modem You still need your DSL modem in order to use the Valet Connect the telephone line to the DSL modem and then insert the Easy Setup Key into your computer Click Connect and follow the on screen instructions When you double click the web browser you are prompted for a username and password If you want to get rid of the prompt follow these instructions Launch the web brow...

Page 39: ...Noncondensing Storage Humidity 5 to 90 Noncondensing Specifications are subject to change without notice Model Name Valet Plus Model Description Wireless N Hotspot Model Number M20 Standards IEEE 802 11n 802 11g 802 11b 802 3u 802 3ab Ports Internet Gigabit Ethernet 1 4 Power Buttons Reset Wi Fi Protected Setup LEDs Power Internet Wireless Wi Fi Protected Setup Ethernet 1 4 Cabling Type CAT 5 Ante...

Page 40: ...Plus logos are trademarks or registered trademarks of Cisco and or its affiliates in the United States and certain other countries All other trademarks mentioned in this document or website are the property of their respective owners 2010 Cisco and or its affiliates All rights reserved ...

Reviews: