background image

 Odin Quick Start Guide 

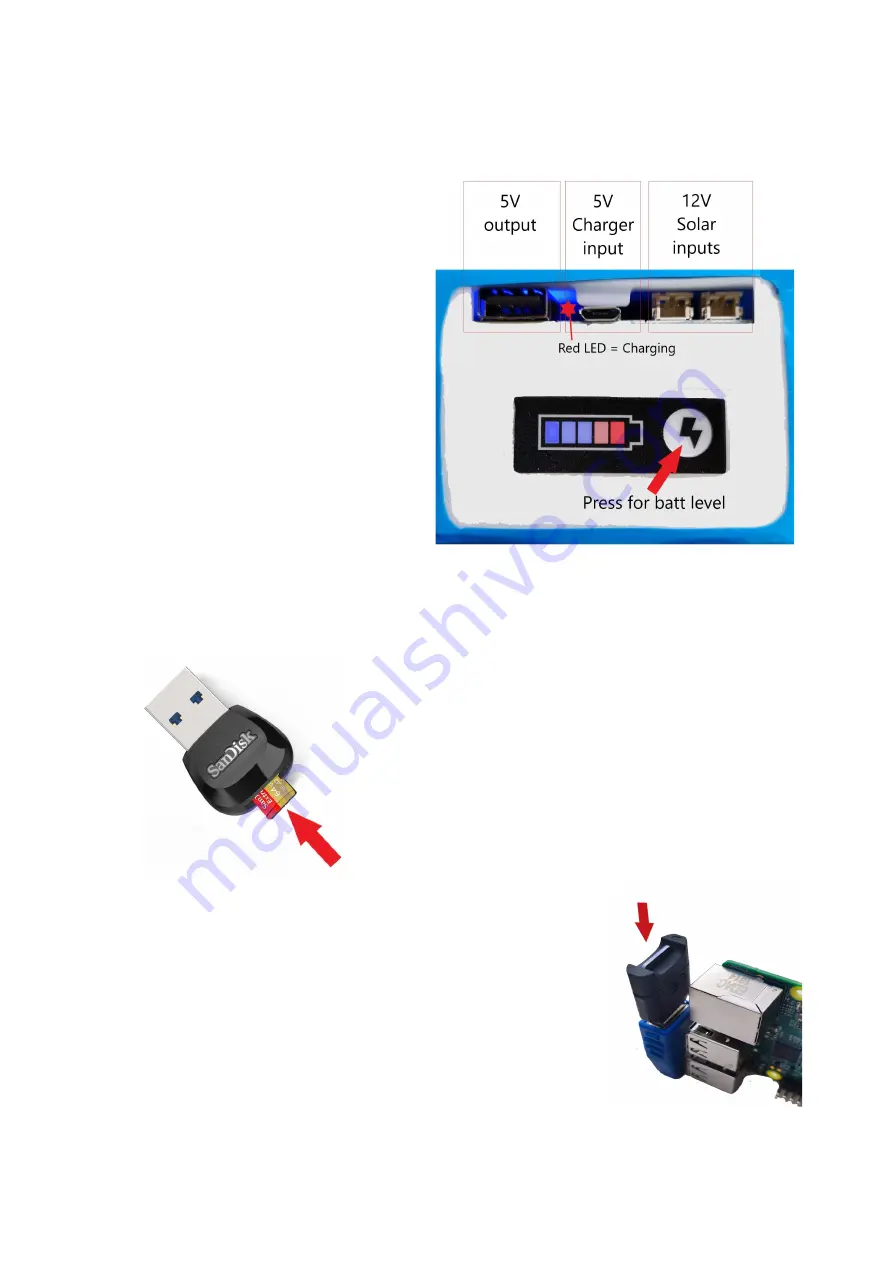
 1.   Fully charge the battery before use 

 (This can take up to 24hrs). Any 5V 
 micro USB power supply can be used. 

 A blue LED light on the charge board 
 indicates the battery is full. A red LED 
 light means the battery is still charging. 
 You can also press the charge level 
 button on the battery to quickly assess 
 the battery level. 

 2.   If you are using a solar panel, connect 

 it and you will see a red LED light 
 appear behind the 12V solar 
 connectors. If the light turns blue the 
 battery is fully charged. NOTE - The 
 brightness of the red charge LED will 
 depend on how much light your panel is receiving. 

 3.   Insert a micro SD card into the supplied USB thumb 

 drive. Any size card may be used, but a minimum 128GB or 
 256GB card is recommended due to the reasonably large 
 image file sizes created. 

 SD Cards must be in the “ExFAT” format. IMPORTANT - Only 

 use quality branded, faster “U3” (or higher) cards. “High 
 endurance” cards are also recommended if possible. 

 4.   Insert your SD card thumb drive into the blue USB port on the 

 rear of the main board. Alternatively, you may insert the thumb 
 drive directly into any of the 4 USB ports on the rear of the main 
 board.  (Please take care not to accidentally insert the thumb 
 drive into the ethernet port). 

 Chronosys © 2022                                                                                                             Page  1  of 4 

Summary of Contents for Odin

Page 1: ...ness of the red charge LED will depend on how much light your panel is receiving 3 Insert a micro SD card into the supplied USB thumb drive Any size card may be used but a minimum 128GB or 256GB card is recommended due to the reasonably large image file sizes created SD Cards must be in the ExFAT format IMPORTANT Only use quality branded faster U3 or higher cards High endurance cards are also recom...

Page 2: ...t boot to the setup state toggle the switch back down and then back up to enter setup mode Make sure you don t toggle the switch too quickly 7 Go to your laptop tablet or mobile device to find the Odin network listed under the available WiFi networks The Odin network might take approx 30 secs to appear 8 Sign in to the network and make sure you allow any requested permissions by your device The def...

Page 3: ...available storage space 10 You may now enter your desired interval image and schedule settings IMPORTANT Remember to hit the Save settings button to save your settings to Odin Double check your settings are correct in the Current Schedule section If you are happy to proceed toggle the rear switch to the Run position to start recording The sequence that MUST be followed to ensure your time lapse is...

Page 4: ...best results from the camera When installing the solar panel please ensure you direct the panel in a SOUTH facing direction for the northern hemisphere A 30 deg angle is optimal for year round efficiency Try to place the panel in direct sun and avoid any broken light from trees or foliage If using the Odin camera for many months make sure you return to check the camera as often as possible About 2 m...

Reviews: