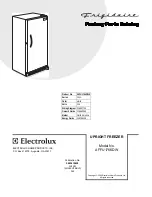
background image

Customer Care Department  •  The


Group Ltd.  •  Harby Road  •  Langar  •  Nottinghamshire  •  NG13 9HY

T :

 01949 862 012   

F :

 01949 862 003   

E :

 [email protected]   

W :

 www.cda.eu

FW482 integrated in column 

freezer 

Manual for Installation, Use and Maintenance

Summary of Contents for FW482

Page 1: ... Department The Group Ltd Harby Road Langar Nottinghamshire NG13 9HY T 01949 862 012 F 01949 862 003 E customer care cda eu W www cda eu FW482 integrated in column freezer Manual for Installation Use and Maintenance ...

Page 2: ...n or instructions on how to use the appliance by someone who is responsible for their safety Under no circumstances should any external covers be removed for servicing or maintenance except by suitably qualified personnel Appliance information Please enter the details on the appliance rating plate below for reference to assist CDA Customer Care in the event of a fault with your appliance and to re...

Page 3: ... its working life the product must not be disposed of as urban waste It must be taken to a special local authority differentiated waste collection centre or to a dealer providing this service Disposing of a household appliance separately avoids possible negative consequences for the environment and health deriving from inappropriate disposal and enables the constituent materials to be recovered to...

Page 4: ...or other accidents do not place a microwave oven on top of the refrigerator or use any electric appliance inside the refrigerator Do not allow children to play with or near the appliance The internal surface of freezer compartment is very cold when the appliance is running Do not touch the surface especially with wet hands Do not splash water onto the appliance Keep it away from places of high hum...

Page 5: ...lution of bicarbonate of soda and warm water and then thoroughly drying the interior The freezer may have an odour to it at first use This will disappear as the appliance cools Please note The appliance will work continuously until it comes down to the correct temperature If the appliance is switched off you should allow five minutes before switching it on again to prevent unnecessary damage to th...

Page 6: ...lity of the food after thawing Wrap food before putting into the freezer To stop the wrapping sticking together ensure it is dry Label the food before freezing with information including type of food and dates of storage and expiry Once food is thawed it must not be refrozen unless it has been completely cooked Only defrost as much food as is required to prevent wastage Bottled or canned drinks sh...

Page 7: ...thermostat can be set between 1 least cold and 5 coldest When introducing large amounts of fresh food into the freezer turn the thermostat dial to position 5 After 24 hours return the thermostat dial to its usual position fig 1 4 5 3 2 1 ...

Page 8: ...rosted First remove the freezer drawers To speed up the process place a bowl of warm water in the base of the freezer compartment Once defrosting is complete dry the inside of the freezer compartment with a sponge or clean cloth The freezer should be cleaned using a solution of bicarbonate of soda and lukewarm water Do not use abrasive products or detergents After washing rinse and dry thoroughly ...

Page 9: ...ture of the room is adequate 10 C or above The appliance is working but not very well The appliance is not overloaded The thermostat is set to an appropriate temperature The door is closing properly The cooling system at the rear of the appliance is clean and free of dust and not touching the rear wall There is enough ventilation at the side and rear walls The temperature of the room is adequate 1...

Page 10: ...mm and depth of 550mm the diagram below shows the product dimensions and aperture required Note also the arrows on the diagram show ventilation requirements In the diagram a plinth vent is fitted to allow free air into the cabinet This is not necessary where there is already a free air supply into the run of units provided by a vent in another unit or side of the run 90 ...

Page 11: ...asure from the underside surface of kitchen unit to the top of next unit door Fig 4 Fitting the decor door bracket Substract C from B and put the fixing bracket 2 in place using this measurement for vertical position and place to the centre for horizontal position Secure the fixing bracket 2 using screws 1 Fig 5 Fitting the decor door Place the decor door onto the appliance door by inserting adjus...

Page 12: ...slots on the fixing bracket for other directions Lock the screws into place as shown in 4 Fig 7 Fitting the decor door base fixings With the appliance door open remove the screws at the bottom of the appliance door Locate the decor door base fixings 3 and screw the fixings to the appliance door and the decor door Fig 8 Fitting the decorative cover Fit the decorative cover 4 on the decor door fixin...

Page 13: ... mm gap between the cabinet door and fix it Never cover over the ventilation slots Once installed the plinth must not block the ventilation slots in the appliance This may require cutting the plinth down Failure to ensure adequate ventilation may invalidate the warranty fig 9 min 25mm ...

Page 14: ...plate carefully to gain access to the hinge screws 3 Loosen the hinge fixing screws 1 and remove the door 4 Remove the door fixing screws 2 5 Remove the cover caps 3 6 Relocate the hinges as shown 7 Refit the door to the hinges Do not turn the door upside down 8 Insert the cover caps 3 on the opposite side in the exposed holes 9 Refit the hinge screw cover plate 2 fig 10 ...

Page 15: ...nd fuse 2 Fit replacement 13A fuse ASTA approved to BS 1362 type into the fuse cover 3 Replace fuse cover Important Do not use the appliance without the fuse cover in position How to connect an alternative plug If the fitted plug is not suitable for your socket outlet then it should be cut off and disposed of safely to prevent the risk of electric shock A suitable alternative plug of at least 13 A...

Page 16: ... coloured BLUE must be connected to the terminal which is marked with the letter N or coloured BLACK The wire which is coloured BROWN must be connected to the terminal which is marked with the letter L or coloured RED If in doubt regarding the electrical connection of this appliance consult a qualified electrician Do not shorten the supply cable the appliance may require removing for servicing N B...

Page 17: ...17 ...

Page 18: ...18 ...

Page 19: ...19 ...

Page 20: ...act our Customer Care Department or for Service on the details below Customer Care Department The Group Ltd Harby Road Langar Nottinghamshire NG13 9HY T 01949 862 012 F 01949 862 003 E service cda eu W www cda eu ...

Reviews: