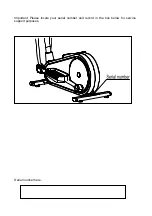
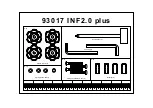
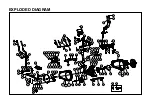
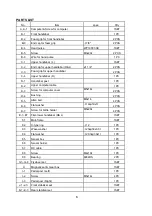
background image


Casall

 INF 2.0 PLUS 


CROSSTRAINER


93017 


Summary of Contents for INF 2.0 PLUS

Page 1: ...1 Casall INF 2 0 PLUS CROSSTRAINER 93017 ...

Page 2: ...2 Important Please locate your serial number and record in the box below for service support purposes Serial number here ...

Page 3: ... M3x25L 8 Allen bolt M8x12L 8 Allen Bolt M7 P1 0 30L 2 P 1 Flat washer Ø7x1t 2 P 2 Metal cover 1 P 3 Spring washer Ø7x2t 2 P 4 P 5 P 6 P 8 P 10 Steel washer 2 P 11 Flat washer Ø8xØ25x2t 2 P 12 P 13 P 15 P 14 Allen bolt M8x16L 4 P 7 Nut M8 2 P 9 93017 INF2 0 plus Wave washer Ø20xØ30x0 3t ...

Page 4: ...4 Knob M6 P1 0 4 Spring washer Ø6 4 Carrage bolt M6 P1 0 40L 4 P 16 Bushing 4 P 18 P 17 P 19 Allen Key 2 Box Spanner 1 93017 INF2 0 plus ...

Page 5: ...5 EXPLODED DIAGRAM H 8 ...

Page 6: ...Upper computer cable 1PC D 3 Screw for computer cover M5x14L 2PCS D 4 Bushing 2PCS D 5 Allen bolt M8x16 4PCS D 6 Flat washer φ12xφ19x1t 4PCS D 7 Screw for bottle holder M5x20L 4PCS E 1 E7 First lower handlebar R L 1SET F 1 Main frame 1SET F 2 C type ring φ12 1PC F 3 Wave washer φ20xφ30x0 3t 1PC F 4 Flat washer φ20 3xφ30x1t 1PC F 5 Sensor box 1PC F 6 Sensor holder 1PC F 7 DC cable 1PC F 8 Screw M4x...

Page 7: ... for chain cover M5x16L 6PCS M 14 Left chain cover 1PC M 15 Right chain cover 1PC M 16 Cap for chain cover screw holes Oval 5PC M 17 Cap for chain cover screw holes Round 4PC M 18 Cover for handlebar post 1PC M 19 Axle for first lower handlebar 1PC N Adaptor 1PC P 1 P 19 Bolts nuts pack 1SET Q 1 Shaft 1PC Q 2 Bushing φ20 5xφ25x7 5mmL 1PC Q 3 Hexagonal screws M8xP1 25x12Lx5t 3PCS Q 4 Big pulley 1PC...

Page 8: ... of the M8x16 Allen bolt D 5 and Flat Washer D 6 from the Main Frame F 1 2 Take the Handlebar post D 1 and pass it through the Handlebar post cover M 18 3 Hold the Handlebar Post D 1 and connect the Lower Computer Cable H 14 and the Upper Computer Cable D 2 4 Slide the Handlebar Post D 1 into the Main Frame then fix with four sets of M8x16 Allen bolt D 5 and Flat Washers D 6 M8 16L 4 1 K 1 4 1 Ø12...

Page 9: ...nd pulse wire pt B 6 then attach the Computer A 1 to the Computer bracket with the enclosed Screws A 2 STEP 4 1 Remove the pre installed Screws D 3 on the handlebar post first 2 Attach the Rear cover M 2 using two of Screws P 6 and one of Screws D 3 3 Attach the Front cover M 1 using Screws D 3 4 Remove the pre installed Screws D 7 on the handlebar post and then assemble the Bottle holder M 3 by S...

Page 10: ... I 1 I 3 using two Allen bolt P 14 four Flat washers pt P 15 and two Nylon nuts P 9 Figure A 2 Attach the Pedal post I 1 I 3 onto the Crank connation set using one of Nylon nuts S 4 Flat washers S 3 and Plastic washers S 8 Figure B 3 Connect the Right rear cover upper pt M 8 and Right rear cover lower pt M 7 to the Left pedal post I 1 using screw P 5 Figure C 4 Connect the Left rear cover upper M ...

Page 11: ... 9 onto the Pedal post I 3 with 2 Knobs P 16 2 Spring washers P 18 2 Bushings P 19 and 2 Carriage bolts P 17 4 Assemble the Left pedal M 6 onto the Pedal post 3 with 2 Knob P 16 2 Spring washers P 18 2 Bushings P 19 and 2 Carriage bolts P 17 STEP 8 Slide the Upper handlebar post C 1 C 4 R L into the Lower handlebar E 1 and then fix with the eight Allen bolts P 8 M5 14 M3 25L M6 P1 0 40L M6 4 2 4 1...

Page 12: ...12 STEP 9 Connect the adaptor N to the DC hole located on the back of the chain cover Fit hi way App INSTRUCTION MANUAL 比例25 400 System plug connection socket Hand pulse socket ...

Page 13: ... comparison of different exercise sessions which can not be used in medical treatment PULSE User may set up target pulse from 0 30 to 230 and computer buzzer will beep when actual heart rate is over the target value during workout WATTS Display current workout watts Display range 0 999 MANUAL Manual mode workout BEGINNER 4 PROGRAM selection ADVANCE 4 PROGRAM selection SPORTY 4 PROGRAM selection CA...

Page 14: ...nual Mode Press START in main menu may start workout in manual mode 1 Use UP or DOWN Encoder to select workout program choose Manual and press MODE ENTER to get into 2 Use UP or DOWN Encoder to set TIME Drawing 8 DISTANCE Drawing 9 CALORIES Drawing 10 PULSE Drawing 11 and press MODE ENTER to confirm 3 Press START STOP keys to start workout Use UP or DOWN Encoder to adjust load level Load level dis...

Page 15: ...orkout Use UP or DOWN Encoder to adjust load level 5 Press START STOP key to pause workout Use RESET to reverse to main menu Drawing 13 Advance Mode 1 Use UP or DOWN Encoder to select workout program choose Advance mode and press MODE ENTER to get into 2 Use UP or DOWN Encoder to select Advance program 1 4 Drawing 14 and press MODE ENTER to get into 3 Use UP or DOWN Encoder to set TIME 4 Press STA...

Page 16: ...m choose H R C and press MODE ENTER to get into 2 Use UP or DOWN Encoder to set Age Drawing 16 3 Use UP or DOWN Encoder to select 55 Drawing 17 75 90 or TAG TARGET H R default 100 4 Use UP or DOWN Encoder to set workout TIME 5 Press START STOP key to start or stop workout Use RESET to reverse to main menu Drawing 16 Drawing 17 Watt Mode 1 Use UP or DOWN Encoder to select workout program choose WAT...

Page 17: ...inutes without pedaling or pulse input console will enter into power saving mode Press any key may wake the console up 2 When computer act abnormal please plug out the adaptor and plug in again Fit Hi Way APP The console has been built in 4 0 Bluetooth module for APP function User can connect console to tablet or smart phone for APP function through Bluetooth First search letters Fit Hi Way App on...

Page 18: ...again 3 If console operation or display abnormally please Power off and restart it The manual will be updated from time to time the consumer can get the newest version by scanning the QR code or link to the website as below https drive google com drive folders 0B_a5atcMnWbpbWwyMll0VDFqNzQ Fit Hi Way INSTRUCTION Attention All preset data will be lost when unplug the power adaptor from the machine ...

Reviews: