CARVIN 973224 Series, User Manual
The CARVIN 973224 Series user manual is a comprehensive guide to understanding and operating your product. Download the manual for free from manualshive.com to access troubleshooting tips, installation instructions, and maintenance recommendations. Ensure you make the most of your CARVIN 973224 Series with this essential manual.
Share
Download


Reviews:
No comments
Related manuals for 973224 Series
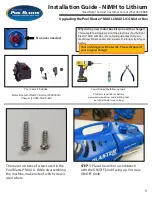
Pool Blaster
Brand: Water Tech Pages: 6

CASTEL
Brand: Taiga-Zone Pages: 20

MX 8 PRO
Brand: Zodiac Pages: 17

VIPOOL SOLUBLOC 2V
Brand: ACIS Pages: 10

Dolphin Deluxe 4
Brand: Maytronics Pages: 40

Nitro XL NC31XL
Brand: SmartPool Pages: 6

PT9i
Brand: SmartPool Pages: 16

PT7i
Brand: SmartPool Pages: 16

SUND 50
Brand: Nastec Pages: 24

24105008
Brand: NENKO Pages: 2

7026965
Brand: Norsup Pages: 273

EcoStar
Brand: Hayward Pages: 37

Perflex EC40C90 Series
Brand: Hayward Pages: 8

BOBBIN WOUND
Brand: Gemas Pages: 9

Ray-Vac
Brand: Jandy Pages: 16

Silensor
Brand: Davey Pages: 12

Baracuda G3
Brand: Zodiac Pages: 2

Goulds Marlow e-580 Series
Brand: Xylem Pages: 32


