Canon Legria HF G25, Quick Manual
The Canon Legria HF G25 is a high-definition camcorder equipped with advanced features for capturing stunning videos. Ensure seamless operation and explore its full potential with the comprehensive Instruction Manual, available for free download from manualshive.com. Unlock the possibilities of this remarkable device and enhance your videography skills effortlessly.
Share
Download


Reviews:
No comments
Related manuals for Legria HF G25

ZR
Brand: Canon Pages: 85

VEGA WIFI
Brand: Niceboy Pages: 42
IPCAM-WO
Brand: Honeywell Pages: 10

iPCAM-WL
Brand: Honeywell Pages: 2
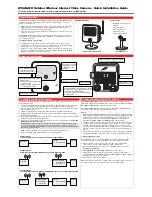
IPCAM-WO
Brand: Honeywell Pages: 2

HMC-70
Brand: Panasonic Pages: 5

HDC-TM700
Brand: Panasonic Pages: 2

HDC-SDT750
Brand: Panasonic Pages: 4

HDC-SDT750
Brand: Panasonic Pages: 4

Mini DV
Brand: Panasonic Pages: 51

Lumix DMC-G5
Brand: Panasonic Pages: 56

Lumix DMC-TZ18
Brand: Panasonic Pages: 63

HDC-HS700
Brand: Panasonic Pages: 2

HDC-HS60
Brand: Panasonic Pages: 2

HX-DC2EB
Brand: Panasonic Pages: 58

HDC-SD90EB
Brand: Panasonic Pages: 59

HM-TA1
Brand: Panasonic Pages: 80

Lumix DMC-ZS8
Brand: Panasonic Pages: 108


