Cambium Networks PTP 820C, Руководство пользователя
PTP 820C - профессиональная беспроводная точка-точка связь от Cambium Networks. Для установки необходимо скачать бесплатное руководство по монтажу и настройке с нашего сайта. Получите детальные инструкции для успешной установки от manualshive.com. Надежное соединение для вашего бизнеса.
Поделиться
Скачать


Отзывы:
Нет отзывов
Похожие инструкции для PTP 820C

Univerge SV8100
Бренд: NEC Страницы: 44

SMART NODE 4950-NCE
Бренд: Patton electronics Страницы: 8

NetLink 2960 RAS
Бренд: Patton electronics Страницы: 2

3101RC
Бренд: Patton electronics Страницы: 2

AD-60
Бренд: Accuphase Страницы: 2

ATLAS 550
Бренд: ADTRAN Страницы: 2

AMB-VDX3H1 Series
Бренд: Acrosser Technology Страницы: 4
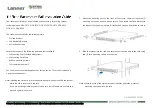
NCA-2510
Бренд: Lanner Страницы: 2

nForce 680I LT SLI
Бренд: Nvidia Страницы: 80

JDR454WV4
Бренд: Justec Страницы: 61

RL78/G1H
Бренд: Renesas Страницы: 941

EOC 1-31
Бренд: axing Страницы: 52

Media Board D/120JCT-LS-EW
Бренд: Dialogic Страницы: 2

RK-10MT
Бренд: Kramer Страницы: 2

LMP-1202M-SFP Series
Бренд: ANTAIRA Страницы: 2

VIP 1000
Бренд: VCS Страницы: 118

NVR16
Бренд: Observint Страницы: 117

ISDN SOHO Router
Бренд: AOpen Страницы: 89


