background image

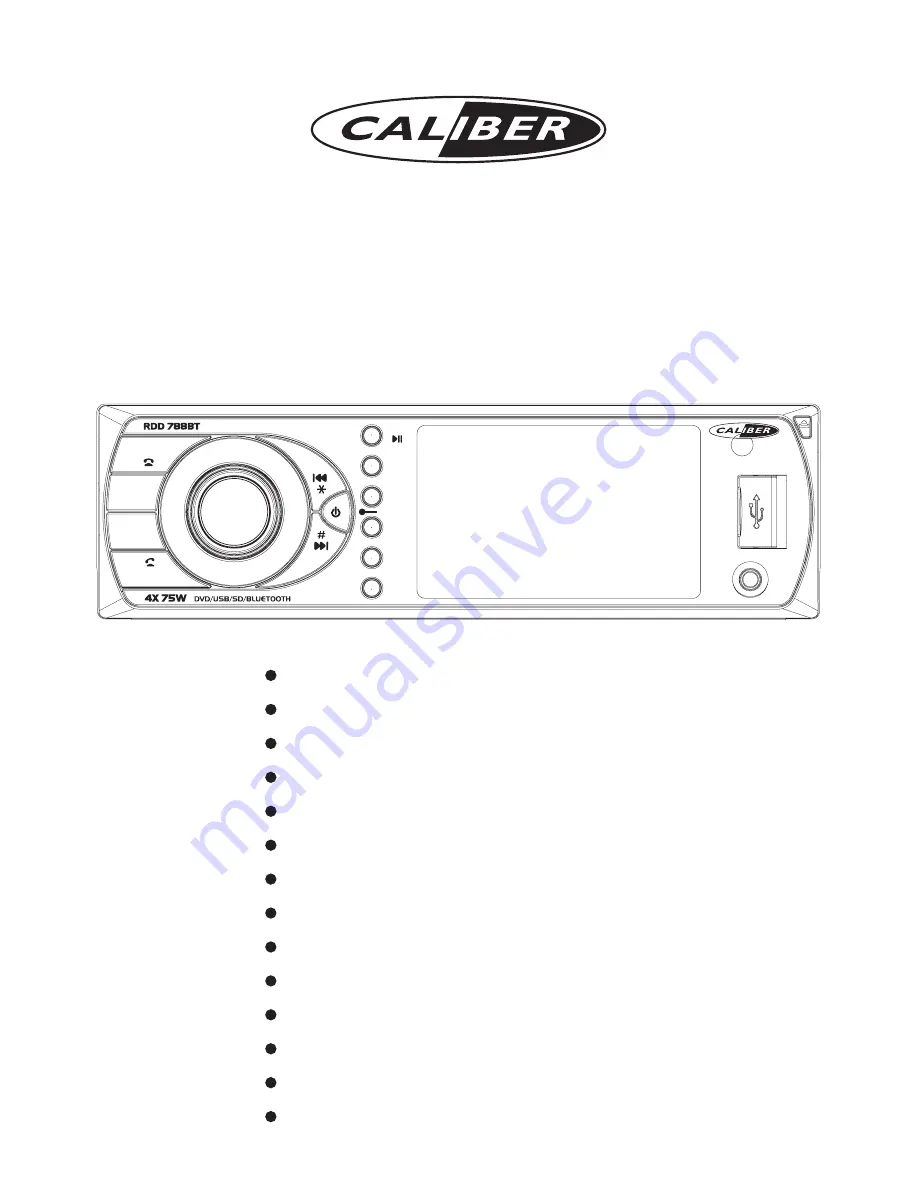
3” Widescreen Digital TFT LCD Display

CAR MULTIMEDIA DVD/VCD/MP3 PLAYER

DVD/VCD/CD/CD-R/CD-RW/MP3/MPEG4 Compatible

Sub-woofer Output Socket

SD/MMC Memory card slot

Front Panel USB Input Port

Remote Control

4 x 75 W High Power Output

FM Stereo Radio

Anti-Shock Mechanism

ISO Connectors for Power Supply and Speaker Outputs

User ’s Manual

RDS (Radio Broadcast System) Function

AV input/ output Socket

Fold Down Detachable Panel

RDD 788BT

BAND

PTY

LOC

1

2

INT

3

RPT

4

RDM

5

STOP

6

GOTO

AV IN

AF/

REG

MODE

7

TA

8

ST

0/MUTE

9/DISP

AS/PS

Built-in Bluetooth hands-free system

Summary of Contents for RDD 788BT

Page 1: ...nput Port Remote Control 4 x 75 W High Power Output FM Stereo Radio Anti Shock Mechanism ISO Connectors for Power Supply and Speaker Outputs User s Manual RDS Radio Broadcast System Function AV input output Socket Fold Down Detachable Panel RDD 788BT BAND PTY LOC 1 2 INT 3 RPT 4 RDM 5 STOP 6 GOTO AV IN AF REG MODE 7 TA 8 ST 0 MUTE 9 DISP AS PS Built in Bluetooth hands free system ...

Page 2: ......

Page 3: ...ns 0 0 Us 0 General perations Radio perations perations 1 perations 1 USB operations 1 SD MMC card operations 1 AV in operations Setup 2 Attachment 2 Trouble hooting 2 Specifications ing the remote control 9 o 10 o 11 RDS Radio Data System Operations 12 AV menu settings 14 Disc o 6 Special disc o 18 Data disc operations 9 9 memory 9 20 22 5 6 s 7 Bluetooth hands free function ...

Page 4: ...orized by Macro vision Corporation Reverse engineering or disassembly is prohibited Region Management Information This Mobile DVD Player is designed and manufactured to respond to the Region Management Information that is recorded on a DVD disc If the Region number described on the DVD disc does not correspond to the Region number of this Mobile DVD Player this Mobile DVD Player cannot play this d...

Page 5: ...where it would be subject to high temperature such as from direct sunlight or from hot air from the heater or where it would be subject to dust dirt or excessive vibration Din Front Rear Mount This unit can be properly installed either from Front conventional DIN Front mount or Rear DIN Rear mount installation utilizing threaded screw Holes at the sides of the unit chassis For details refer to the...

Page 6: ...ot all tabs will be able to make contact so examine which ones will be most effective Bending open the appropriate tabs behind the dashboard to secure the sleeve in place 1 DIN FRONT MOUNT Method A Installing the unit Be sure you test all connections first and then follow these steps to install the unit 1 Make sure the ignition is turned off and then disconnect the cable from the vehicle battery s...

Page 7: ...ut to remove it 5 Insert both of the supplied keys into the slots at the middle left and right sides of the unit then pull the unit out of the dashboard Using the detachable front panel 2 Grasp the right side of the front panel then gently push the front panel towards the left side before pulling it out from the unit 3 Store the front panel in the protective case provided for safe keeping Removing...

Page 8: ... BLUE FRONT 4 ohm REAR 4 ohm Video output socket 2 Yellow RCA connector to rear right output Red RCA connector to front left output White RCA connector to front right output Red FUSE 15A ISO CONNECTOR TO MEMORY B GROUND B ACC B RED YELLOW BLACK Parking brake wire B Pink Black For security reasons it is only possible to view the video display when the pink and black wire is connected to the parking...

Page 9: ... Seek down Previous track fast reverse UP Button Tune up Seek up next track fast forward Numeric 0 Button Preset Station 4 Button RDM Random Numeric 4 Button Preset Station 5 Button STOP Numeric 5 Button Preset Station 6 Button GOTO Numeric 6 Button TA Traffic Announcement Button ST Stereo mono Button PTY Program Type Button LOC DX Button DISP Display Button A V IN Audio Video Input Jack USB Port ...

Page 10: ...20 21 22 Power on off Button MUTE Button DISP Display A B Button RPT Repeat Button ZOOM Zoom in Zoom out Button Cursor Buttons ENTER Button SETUP Button BT MENU Button Tune down Seek down previous track Button Tune up Seek up next track Button TITLE DVD Title Menu PBC Playback Control Button Play Pause Button Preset Station 1 6 Button Numeric 1 6 Button TA Traffic Announcement Button Numeric 7 But...

Page 11: ... press the button to turn off the sound instantly Press the again to return it to the prior sound level MUTE MUTE This unit has the electronic shockproof feature So that if the unit skips due to rough road conditions the music or video will be uninterrupted In power on mode press the button to with USB device inserted SD MMC with SD MMC card inserted During disc USB SD MMC card playback press and ...

Page 12: ...hoose FM STEREO or MONO audio effect In urban settings most stations are strong enough and it should be set in LOCAL mode Switch to DX distant mode to search for stations with weaker signals Press and hold the button on the head unit or briefly press the button on the remote control to choose local reception or DX distant reception mode You can store up to a total of 18 FM radio stations in the me...

Page 13: ...sting stations change their program from normal broadcasting to regional broadcasting for a certain time period When region is on the current listening program remains unchanged When region is off it allows the reception moved to the regional station AF REG Segment AF off Segment AF on Segment AF flashing AF REG TA Traffic Announcement Function TA interruption function Briefly press the button to ...

Page 14: ...s the menu items and submenus shown in the figure below 1 Press the button on the front panel or the remote control to activate AV menu 2 Press to select a menu item SETUP AUDIO PICTURE 3 Press the button on the front panel or the button on the remote control to access your selected menu item 4 the on the or press the or button on the remote control to adjust the item you have selected 5 Repeat st...

Page 15: ...tton on the remote control front panel the button on the front panel or press the or button on the remote control front panel Clock 10 06 Setup Hour Minute Audio Menu Volume level Bass level Treble level Balance Fader Equalization Loudness Sub woofer 1 the button on the front panel or press the or button on the remote control front panel the item you have selected 00 63 7 0 7 7 0 7 L15 L R R15 Thi...

Page 16: ...P3 Information display Folders list Files list Files type Picture Menu Bright Contrast Color Tint Default VOL VOL MENU ENTER 1 the button on the front panel or press the or button on the remote control the item you have selected 0 63 Adjust this setting if the picture is too bright or too dark 0 63 Use this setting to adjust the contrast of the picture 0 63 Use this setting to adjust the color of ...

Page 17: ...ection Fast Forward Fast Reverse Pause Playback Stopping Playback Repeat Playback For CD VCD SVCD For MP3 For DVD REP 1 REP DIR REP CHAPTER REP TITLE REP ALL REP OFF A B A B A B RDM INT REP 1 REP ALL REP OFF REP 1 REP DIR REP ALL REP OFF REP CHAPTER REP TITILE REP ALL REP OFF Note Only one track file is repeated A single folder of tracks files is repeated A chapter is repeated A titel is repeated ...

Page 18: ...ng the audio language during playback In these cases select audio language from the TITLE PBC ENTER For DVD SUB T Notes For DVD AUDIO Note Special disc operations DVD s menu Some VCD SVCD discs which have multiple audio channels you can select the desired audio channel to play by pressing the button Normal stereo left right playback Left audio channel only Mix mono audio left right The function on...

Page 19: ...ormation PROG PLAY CLEAR PROG PLAY CLEAR For VCD CD MP3 JPEG 1 Disc type 2 Playback information TT 1 3 CH 1 1 TRK 9 18 3 Time indication T T C C 4 Audio language or audio channel indication 5 Subtitle language indication 6 View angle indication 7 Mute indication 8 PBC indication only for VCD with PBC 9 Repeat playback indication GOTO Current title Total title Current Chapter Total Chapter Current ...

Page 20: ...menu playing features For some DVD discs the content of TITLE and MENU is same Using the menus Using the number buttons In DVD VCD playing mode or in folder file list display mode press the number buttons to select a title a chapter or a track then press the button to confirm your selection ENTER When you insert a data disc containing audio MP3 movie MPEG4 or picture JPEG files into the disc slot ...

Page 21: ... cause battery burst USB operations Using the SD MMC card Note This disc player features a SD MMC memory card slot When you insert a SD MMC card into the memory card slot the DVD player will read the SD MMC card automatically If you insert a USB stick into the USB port or a disc into the disc slot while reading the SD MMC card the unit will play the file in the USB or track on the disc switch back...

Page 22: ...ation of hands free equipment while driving 1 Pairing 2 CONNECT When mobile phone detect the hands free sytem the CALIBER name of the free hands system will appear on the screen of the mobile phone 3 DIAL CALL 0 9 DEL 4 Caller ID 5 Accepting an incoming call 6 Rejecting an incoming call 7 Terminating a call 8 Call Transfer 9 BT MENU BT MENU 3 1 Dial with the mobile phone directly 3 2 Dial with the...

Page 23: ...input Simultaneously the entered number will be appeared on the LCD display 0 9 Note If a new phone number is saved the old number is deleted Page 21 When you look around the preset phone number or received list or dialed list or missed list you can dial any phone number on the lists by pressing button without entering the phone number again Select auto answer or manual answer the coming phone by ...

Page 24: ...PAL format when the unit is connected to a PAL TV You can also choose AUTO SELECT SETUP ENTER ENTER SETUP NOTE System Setup 1 TV SYSTEM Setup which will sense the type of monitor attached to the output and select NTSC or PAL as need If you know the type of monitor you should choose the type in this menu rather than letting AUTO select do it for you This is because there may be an small undesirable...

Page 25: ...al Controls settings to prevent a young person from changing the settings without permission The factory default password is 0000 If you wish to change it enter 0000 and when prompted enter a different 4 digit number Use this function to restrict the viewing of movies to children of appropriate age levels 1 Press the button to select PASSWORD then press the button 2 The password input mode is now ...

Page 26: ...SH GERMAN SPANISH FRENCH PORTUGUESE ITALIAN RUSSIAN POLISH ENGLISH GERMAN SPANISH FRENCH PORTUGUESE ITALIAN RUSSIAN POLISH 1 AUDIO OUT Change among SPDIF OFF SPDIF RAW and SPDIF PCM 2 KEY Change among b 4 2 0 2 4 When you open the DIGITAL SETUP menu you will see the DIGITAL SETUP screen 1 OP MODE Change among LINE OUT RF REMOD LINE OUT LINE OUT mode with digital dialog normalization RF REMOD RF RE...

Page 27: ...nsorship has occurred Attachment 1 2 3 4 5 6 7 8 Unlock Unlock KID SAFE G PG PG 13 PG R R NC 17 ADULT Playing MP3 discs What is MP3 Corresponding file systems Playing a JPEG disc MP3 MPEG 1 Audio Layer 3 is a compression standard prescribed by the ISO the International Standardization Organization and MPEG which is a joint activity institution of the IEC MP3 files contain compressed audio data MP3...

Page 28: ...aulty please first consult this checklist It may be that something simple has been overlooked Under no circumstances should you try to repair the player yourself as this will void the warranty Only qualified service personnel may remove the cover or service this player If the power supply is connected to the car accessory circuits but the engine is not turned on switch the ignition key to ACC Chec...

Page 29: ...ls Specifications No Sound The Player Does Not Respond to the Remote Control Check the audio connections Aim the remote control directly at the sensor on the front of the player Remove any obstacles which may interfere with the signal path Inspect or replace the remote control battery The disc format is not according to the TV set used PAL NTSC Select the proper setting in the TV SYSTEM menu Check...

Reviews: