C.P.A. 8011012, Assembly And Maintenance Manual
Get the comprehensive Assembly and Maintenance Manual for the C.P.A. 8011012. Ensure optimal operation through correct setup and upkeep. This essential guide is available for free download exclusively at manualshive.com. Don’t miss out on securing your manual today to maintain your product’s performance and longevity.
Share
Download


Reviews:
No comments
Related manuals for 8011012
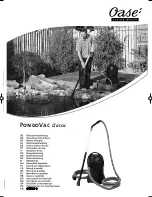
PondoVac Classic
Brand: Oase Pages: 76

White Pool 490
Brand: C.P.A. Pages: 40

Robo H2O
Brand: Goby Pages: 20

D1000
Brand: Dirt Devil Pages: 2

ECO800
Brand: onga Pages: 16

Dolphin Deluxe 4
Brand: Maytronics Pages: 40

YCR-M05
Brand: Iclebo Pages: 20

061206
Brand: Steinbach Pages: 44

APPcontrol
Brand: Steinbach Pages: 60

AquaRite UV LS
Brand: Hayward Pages: 68

COMMANDER II JC5
Brand: Jacuzzi Pages: 18

5310
Brand: 8STREME Pages: 16

poolLUX Plus 1ML-pLX-PL60
Brand: S.R.Smith Pages: 16

Poolquip Lido
Brand: Paramount Pools Pages: 19

Pool Blaster Leaf Demon
Brand: Water Tech Pages: 24

AQUA Master 10
Brand: aqua technix Pages: 24

SINGLE SPEED
Brand: Aqua PRO Pages: 8

049100
Brand: Steinbach Pages: 36


