background image

Instruction Manual

GAS HOB

BSH60BFCHI

BSH60BFCHB

BSH60CIHI

Summary of Contents for BSH60BFCHB

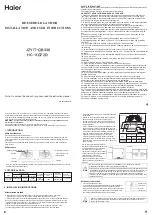
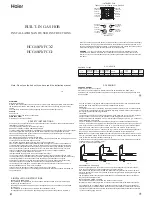
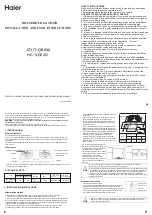
Page 1: ...Instruction Manual GAS HOB BSH60BFCHI BSH60BFCHB BSH60CIHI ...

Page 2: ...re with your instructions Don t worry there s nothing too technical coming up Just simple step by step guidance to get you up and running quickly Sound good Then let s get started Help and Guidance We re here to help you get the most from your enter product name Should you require any guidance a simple solution can often be found online at www bush support com If you still require further assistan...

Page 3: ...Saving Tips 9 Getting to know your gas hob Ready Let s begin 12 Control Panel 13 Installing your gas hob Locating your built in hob 16 Electrical connection of your hob 20 Usage Use of Product 24 Care and Maintenance Cleaning 28 Product support Troubleshooting 34 Help and assistance 35 Declaration of conformance to product standards 36 Disposal 36 Guarantee 37 1 2 3 4 5 6 ...

Page 4: ......

Page 5: ...1 Safety information ...

Page 6: ...parts become hot during use Care should be taken to avoid touching heating elements Keep children less than 8 years of age away unless they are continually supervised WARNING Unattended cooking on a hob with fat or oil can be dangerous and may result in fire NEVER try to extinguish such a fire with water but switch cover the flame with a lid or a fire blanket CAUTION The cooking process has to be ...

Page 7: ...en the compartment door Wait at least 1 minute before attempting to ignite the burner again These instructions are only valid if the correct country symbol appears on the appliance If the symbol does not appear on the appliance refer to the technical instructions which describe how to modify the appliance to match the conditions of use of the country All possible measures have been taken to ensure...

Page 8: ...me heating conditions Never pour water on to flames that are caused by oil instead switch the cooker off and cover the pan with its lid or a fire blanket Always position pans over the centre of the cooking zone and turn the handles to a safe position so they cannot be knocked or grabbed If the product will not be used for a long period of time turn the main control switch off Turn the gas valve of...

Page 9: ...supports to the cooking panels Place a paper between the upper cover and cooking panel cover the upper cover then tape it to the side surfaces of oven Tape cardboard or paper onto the front cover on interior glass of oven as it will be suitable to the trays for the wire grid in your oven not to damage to the oven door during transport Also tape the oven door to the side panels If you do not have t...

Page 10: ......

Page 11: ...Getting to know your gas hob 2 ...

Page 12: ...found in the Troubleshooting section of these instructions Ready Let s begin Please read these instructions carefully They contain important information which will help you get the best from your Gas Hob and ensure safe and correct installation and operation If you require any further assistance our technical experts are happy to help For full details refer to the product support section at the en...

Page 13: ...gas hob You ll be up and running in no time Getting to know your gas hob 13 or online at www bush support com If you still require further assistance call one of our experts on 345 257 7271 1 Gas Burner 2 Control Panel 2 1 ...

Page 14: ......

Page 15: ...3 Installing your gas hob ...

Page 16: ...directly to outside air in which case no permanent ventilation is required For rooms with a volume greater than 10 m 3 no permanent ventilation is required Important Regardless of room size all rooms containing the appliance must have direct access to outside air via an openable window or equivalent Emptying of burned gases from the environment Gas appliances expel burned gas waste to the outside ...

Page 17: ... the appliance ensuring that there is no access to the base of the appliance The appliance can be placed close to other furniture on condition that in the area where the appliance is set up the furniture s height does not exceed the height of the cooktop Installation of the Hob The appliance is supplied with an installation kit including adhesive sealing material fixing brackets and screws Cut the...

Page 18: ...crews B Adjust the position of the brackets depending on the thickness of the worktop and tighten the screws evenly Carefully trim away any excess sealing material C from around the appliance A C B t t 20 mm Gas Connection Assembly of gas supply and leakage check Connect the appliance in accordance with applicable local and international standards and regulations First check what type of gas is in...

Page 19: ...our appliance Any other parts required can be supplied as spare parts During connection always keep the nut on the gas manifold fixed while rotating the counter part Use appropriately sized spanners for a safe connection For surfaces between different components always use the seals provided in the gas conversion kit The seals used during connection should also be approved to be used in gas connec...

Page 20: ...sure that the flame does not die out when passing from the maximum position to the minimum position Create an artificial wind with your hand towards the flame to see if the flames are stable The bypass screw must be loosened for conversion from LPG to NG For conversion from NG to LPG the bypass screw must be tightened Make sure that the appliance is unplugged from the mains electrical supply and t...

Page 21: ...ets and or extension leads The supply cord should be kept away from hot parts of the appliance and must not be bent or compressed Otherwise the cord may be damaged causing a short circuit If the appliance is not connected to the mains with a plug a all pole disconnector switch with at least 3 mm contact spacing must be used in order to meet the safety regulations The fused switch must be easily ac...

Page 22: ......

Page 23: ...Usage 4 ...

Page 24: ... If such a case occurs the device will block the burners gas lines and will avoid any accumulation of unburned gas Wait 90 seconds before re igniting an extinguished gas burner Hob Controls Hob burner The knob has 3 positions off 0 maximum big flame symbol and minimum small flame symbol Ignite the burner with the knob in the maximum position you can then adjust the flame length between the maximum...

Page 25: ...e WARNING Only use flat bottomed pans with thick bases Make sure the bottom of the pan is dry before placing it on the burner The temperature of accessible parts may become high while the appliance is operating It is imperative that children and animals are kept well away from the burners during and after cooking After use the hob remains very hot for a prolonged period of time Do not touch it and...

Page 26: ......

Page 27: ...Care and maintenancee 5 ...

Page 28: ...ry it Wash and rinse the hob burner caps Do not leave them wet Dry them immediately with a dry cloth Make sure you re assemble all parts correctly after cleaning The surfaces of the pan supports may become scratched over time due to use This is not a production fault Do not use a metal sponge for cleaning any part of the hob Make sure no water gets into the burners as this may block the injectors ...

Page 29: ...enance of this appliance should be carried out by an authorised service person or qualified technician only Other Controls Periodically check expiratation date of the gas connection pipe Periodically check the gas connection pipe If a defect is found contact an authorised service provider to have it changed If a defect is found while operating the control knobs of the appliance contact an authoris...

Page 30: ...ob Gas Number of Cooking Zones 4 Heating Technology 1 Gas Size 1 cm Auxiliary Energy Efficiency 1 NA Heating Technology 2 Gas Size 2 Semi Rapid Energy Efficiency 2 59 0 Heating Technology 3 Gas Size 3 cm Semi Rapid Energy Efficiency 3 59 0 Heating Technology 4 Gas Size 4 Rapid Energy Efficiency 4 57 0 Energy Efficiency of Hob 58 3 This hob complies with EN 30 2 1 Energy Efficiency of Hob This hob ...

Page 31: ...G20 20 mbar LPG G30 G31 28 30 37 mbar LARGE BURNER DIA of INJECTOR 1 100mm 115 85 NOMINAL RATING KW 3 3 CONSUMPTION 285 7 l h 218 1 g h MEDIUM BURNER DIA of INJECTOR 1 100mm 97 65 NOMINAL RATING KW 1 75 1 75 CONSUMPTION 166 7 l h 127 2 g h MEDIUM BURNER DIA of INJECTOR 1 100mm 97 65 NOMINAL RATING KW 1 75 1 75 CONSUMPTION 166 7 l h 127 2 g h SMALL BURNER DIA of INJECTOR 1 100mm 72 50 NOMINAL RATIN...

Page 32: ......

Page 33: ...6 Product support ...

Page 34: ...d correctly Check the gas supply and gas pressure LPG cylinder may need replacing Check whether there is power supplied Also check that other kitchen appliances are working Flame colour is orange yellow Burner cap and crown are not assembled correctly Different gas compositions Ensure the burner parts have been placed correctly Due to the design of the burner the flame can appear to be orange yell...

Page 35: ...fficient service please have the following information ready Model Ref Serial number Date of purchase Local call rates applies Lines open 8am 7pm Monday to Saturday and 10am 4pm Sunday Calls to Bush enquiry lines may attract a charge and set up fee from residential lines depending on your call plan tariff Mobile and other providers costs may vary see www bt com pricing for details For Security and...

Page 36: ...tructions which may occur as a result of product improvemenst and development Disposal The symbol on the product or on its packaging indicates that this product may not be treated as household waste Instead it shall be handed over to the applicable collection point for the recycling of electrical and electronic equipment By ensuring this product is disposed of correctly you will help prevent poten...

Page 37: ...e instructions contained in the manual It must be used solely for domestic purposes The guarantee will be rendered invalid if the product is re sold or has been damaged by inexpert repair Specifications are subject to change without notice Bush disclaim any liability for loss or damage arising from the breakdown of the product This guarantee is in addition to and does not diminish your statutory o...

Page 38: ...p is always at hand Product support 38 If you require any technical guidance or find that your product is not operating as intended a simple solution can often be found in the Troubleshooting section of these instructions ...

Page 39: ...52331542 Contact www bush support com Helpline 0345 257 7271 ...

Reviews: