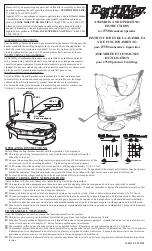
background image

English, Spanish & 

French Manual

English Manual

1018947-C

Call Customer Service, Toll-Free:  877-728-8224

Important:  This manual contains information for the safety 

of persons and property. Read it carefully before 

assembly and operation of the equipment!

Visit us on the web! 

www.brinly.com

A E R A T O R   S P R E A D E R

MODEL:

A S 2 - 4 0 B H 1 - G 

OWNER'S MANUAL

• Assembly

• Installation

• Operation

• Repair Parts

For use with

Lawn/Garden Tractors

Summary of Contents for AS2-40BH-G

Page 1: ...manual contains information for the safety of persons and property Read it carefully before assembly and operation of the equipment Visit us on the web www brinly com A E R A T O R S P R E A D E R MOD...

Page 2: ...PERATION 13 14 MAINTENANCE 15 SERVICE 15 WARRANTY 16 TOOLS REQUIRED FOR ASSEMBLY 1 2 Wrench x2 3 4 Wrench x2 or 10 Adjustable Wrench x2 Hammer Gloves SPECIFICATIONS Recommended Towing Speed 3 mph or l...

Page 3: ...Parts DON T GO BACK TO THE STORE Please call our Customer Service Department Toll Free 877 728 8224 or customerservice brinly com Do not drive close to creeks ditches and public highways Watch out fo...

Page 4: ...20 34 2 31 3 46 46 2 2 42 22 29 40 44 32 47 41 47 28 37 47 41 21 37 32 47 28 34 57 2 13 50 51 2 20 37 47 45 41 31 38 18 55 2 24 2 1 7 8 9 19 52 26 16 17 27 30 11 23 52 58 49 39 46 4 33 36 36 12 23 52...

Page 5: ...e Bolt 1 4 x 1 2 1 35 2M0808P Hex Bolt 1 4 x 1 2 2 36 2M1008P Hex Bolt 5 16 x 1 2 2 38 2M1016P Hex Bolt 5 16 x 1 1 39 B 4785 Lock Nut 1 4 2 43 B 4786 Lock Nut 5 16 2 PARTS English Manual Ref Part Desc...

Page 6: ...2 1 2 x1 B 3861 50 41 Nut Hex Jam 1 2 x2 31M1600P Bolt Hex Head 5 16 x 3 4 x4 2M1012P 31 Bolt Hex Head 1 2 x 3 1 2 x2 B 6517 32 Bolt Hex Head 5 16 x 3 x4 4M1048P 37 Bolt Carriage 5 16 x 1 3 4 x2 11M10...

Page 7: ...2 x2 31M1600P Bolt Hex Head 5 16 x 3 4 x4 2M1012P 31 Bolt Hex Head 1 2 x 3 1 2 x2 B 6517 32 Bolt Hex Head 5 16 x 3 x4 4M1048P 37 Bolt Carriage 5 16 x 1 3 4 x2 11M1028P 42 Hairpin Cotter x1 1019151 51...

Page 8: ...ut 2 4 Repeat this step on the other side of the hopper with the additional tow bar and hardware provided Assembly Step 1 B Hardware Panel 1 45 47 45 47 1 Add a wheel 28 from Step 1 A to the support a...

Page 9: ...bars tightly secure each bolt in place with 5 16 hex lock nuts 2 1 At the end of the tow bars 20 from above insert the Drawbar Pin 50 2 Secure the pin with a Hairpin Cotter 51 NOTE For initial use yo...

Page 10: ...tow bars 20 21 English Manual 3 46 46 2 2 2 HOPPER ASSEMBLY 7 TRANSPORT LOCK BRACKET 3 46 31 1 Add a 5 16 flat washer 46 to each of the hex bolts 31 from hardware panel 4 2 Align the transport lock b...

Page 11: ...t assembly 4 Secure bolts in place with 5 16 hex lock nuts 2 NOTE For the next step use the same side of the hopper as the transport lock 3 added on Step 4 English Manual 1 On one side from an outside...

Page 12: ...by hooking the oval of the upper level over the end of the Lower Lever 55 24 18 31 18 55 1 Slide the small grip 24 over the end of the Upper Lever 18 3 Starting between the lower lever 55 and the hop...

Page 13: ...ry some Ideally the soil should fall apart NOTE If soil is too wet the aerator tines will penetrate too deep and your tractor could lose traction causing lawn damage If soil is too dry the aerator tin...

Page 14: ...al therefore minor setting adjustments may be necessary to compensate for these conditions Determine approximate flow control setting by using the chart below showing type of material to spread Measur...

Page 15: ...your Aerator Spreader sand lightly to remove rust and coat lightly with enamel Apply a drop of lubricating oil to each nylon bearing aerator tine shaft agitator shaft and wheels before each use Be sur...

Page 16: ...iven by any person or entity including a dealer or retailer with respect to any product shall bind Brinly Hardy Co During the period of the warranty the exclusive remedy is repair or replacement of th...

Reviews: