Bosch HDI7032C, Use And Care Manual
The Bosch HDI7032C is a state-of-the-art appliance that requires proper handling to maximize its performance. To ensure you make the most of its features, it's crucial to refer to the comprehensive Use And Care Manual. Easily downloadable for free from manualshive.com, this manual provides step-by-step instructions for seamless operation and maintenance.
Share
Download


Reviews:
No comments
Related manuals for HDI7032C

W10269526A
Brand: Maytag Pages: 16

L 900-4
Brand: B&S Pages: 18

RGB528
Brand: GE Pages: 48

RA824DDWW
Brand: Hotpoint Pages: 2

Drop-In Ceramic Electric Range
Brand: Whirlpool Pages: 8

CEL1110AAH
Brand: Whirlpool Pages: 15

Acros ACE3411KA2
Brand: Whirlpool Pages: 13

AGR5630BD
Brand: Whirlpool Pages: 20

ACE2200
Brand: Whirlpool Pages: 15

ADN 614
Brand: Whirlpool Pages: 20

Admiral mf12120
Brand: Whirlpool Pages: 20

9763000
Brand: Whirlpool Pages: 16

ADN 020/WP
Brand: Whirlpool Pages: 23
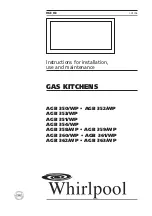
AGB 350/WP
Brand: Whirlpool Pages: 22

9762362A
Brand: Whirlpool Pages: 20

9762358A
Brand: Whirlpool Pages: 20

9762363A
Brand: Whirlpool Pages: 20
CGS365H
Brand: Whirlpool Pages: 32


