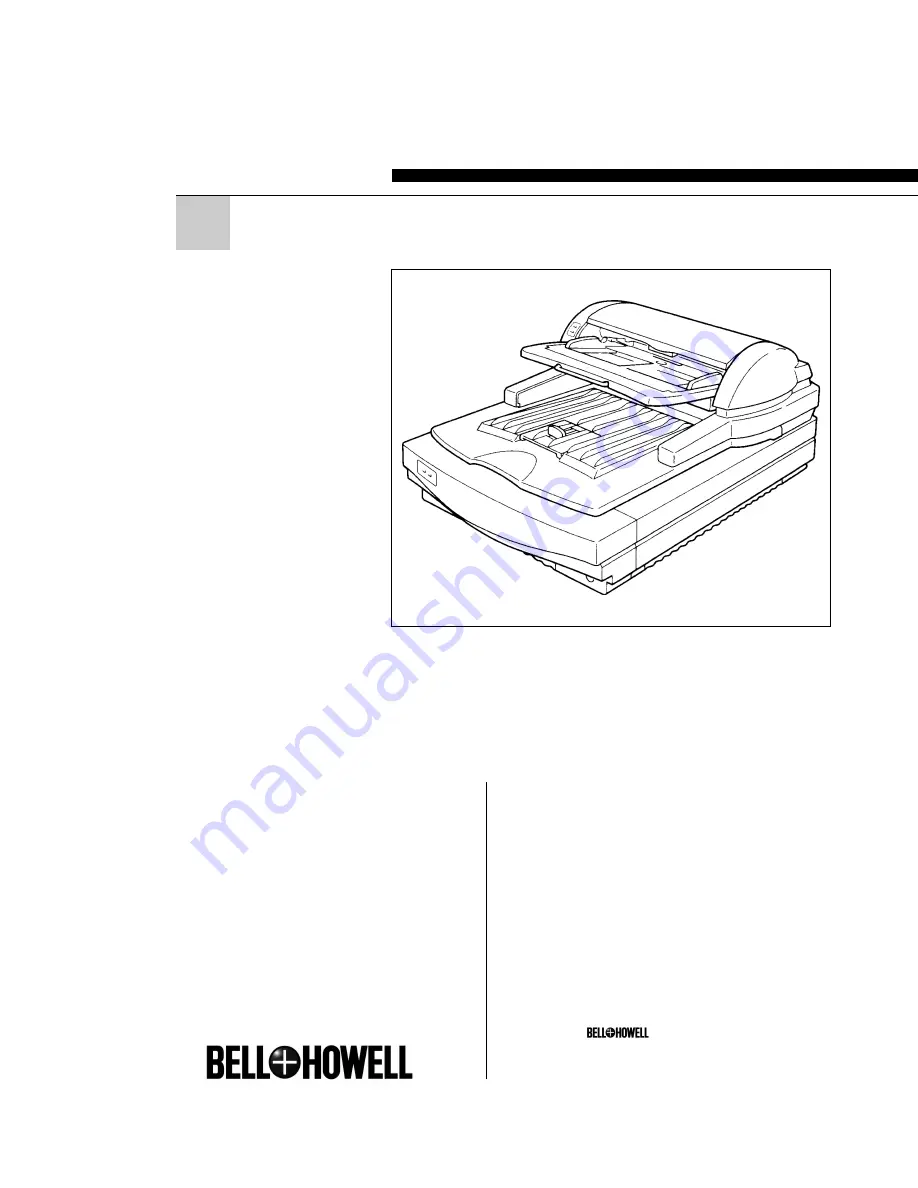
background image

FB SERIES

SCANNERS

S02294A Rev B 02-02

User Manual

Bell & Howell Scanners
3450 West Pratt Avenue • Lincolnwood, IL 60712
847.675.7600 (General)
800.SCAN.494 (Sales)
800.SCAN.495 (Technical Support)
Web Site: www.bhscanners.com

Bell & Howell and                         are trademarks of 
Bell & Howell Company. All other trademarks are 
the property of their respective owners.
© 2002 Bell & Howell

Summary of Contents for S02294A

Page 1: ...0 West Pratt Avenue Lincolnwood IL 60712 847 675 7600 General 800 SCAN 494 Sales 800 SCAN 495 Technical Support Web Site www bhscanners com Bell Howell and are trademarks of Bell Howell Company All other trademarks are the property of their respective owners 2002 Bell Howell ...

Page 2: ...G406 8610 Printed in Japan ...

Page 3: ...ceiving antenna Increase the separation between the equipment and receiver Connect the equipment into an outlet on a circuit different from that to which the receiver is connected Consult the dealer or an experienced radio TV technician for help Warning Changes or modifications not expressly approved by the manufacturer could void the user s authority to operate the equipment Note to users in Cana...

Page 4: ... ii In accordance with IEC 417 this machine uses the following symbol for the main switch means Push ON Push OFF ...

Page 5: ...fit into a grounding type outlet This is a safety feature If you are unable to insert the plug into the outlet contact your electrician to replace your outlet Do not defeat the purpose of the grounding type plug by remov ing its grounding pin This does not apply in countries in which a 2 wire non grounded type of plug is used 9 Do not place this device where the cord will be walked on 10 If an ext...

Page 6: ...n E If the device has been dropped or the cabinet has been damaged F If the device exhibits a distinct change in performance indicating a need for service 14 Make sure that the wall outlet is near the scanner and easily accessible 15 The main plug on this equipment must be used to disconnect main power 16 Use the standard cable attached to this scanner Otherwise use cables that meet the following ...

Page 7: ...d 7 Turning the power on 8 Initializing the scanner 8 3 Indicators 9 4 Placing originals 10 Placing an original on the contact glass 11 Placing originals on the document table 12 5 Cleaning 14 6 Troubleshooting 16 Lamp cover open 16 Lamp error 17 Document feeder cover open 17 Paper jam 18 Paper misfeed 19 Document table error 19 System error 20 Others 20 7 Specifications 21 ...

Page 8: ...raction 28 Section area Multi area settings 29 Auto photo letter 30 Resolution 31 Brightness 32 Contrast 32 Gamma correction 33 Binary filter 34 Parameter download 35 Document size detection 35 Skew detection 35 Semi automatic document feed SADF mode 35 Options 36 Red lamp unit 36 Data compression unit 37 Video interface unit 37 Image processing unit 37 ...

Page 9: ...Image Scanner User s Manual User s Manual English Placing originals Installation Cleaning Trouble shooting Appendix Specifications Indicators Part namess 03_IS430 BODY 97 5 8 5 35 PM Page 1 PageMaker 5 0J ...

Page 10: ...ont view Closing the document feeder Document feeder indicators Document table Exit table Power switch Scanner indicators White sheet Document set origin Contact glass Opening the document feeder 03_IS430 BODY 97 5 8 5 35 PM Page 2 PageMaker 5 0J ...

Page 11: ... 3 Image Scanner User s Manual Rear view SCSI connectors Rotary switch DIP switches Reset switch Power cord socket Part names 03_IS430 BODY 97 5 8 5 35 PM Page 3 PageMaker 5 0J ...

Page 12: ...e Q ty Scanner 1 Power cord 1 Terminator 1 SCSI cable 1 User s manual English 1 User s manual German 1 User s manual French 1 Registration card 1 Terminator Power cord Scanner SCSI cable User s manuals Registration card is attached in the same package The figure of the power cord varies per country 03_IS430 BODY 97 5 8 5 35 PM Page 4 PageMaker 5 0J ...

Page 13: ...Temperature 10 32 C E Humidity 20 80 RH E Space Right more than 20 mm Left more than 20 mm Behind more than 130 mm Front for operation Height more than 720 mm E Flat base E Out of direct sunlight E No vibration E No dust more than 130mm more than 20mm more than 20mm more than 720mm Installation 03_IS430 BODY 97 5 8 5 35 PM Page 5 PageMaker 5 0J ...

Page 14: ...r connected device has such connectors you can use the at tached cable However if you want to connect this scanner with a computer or device that has a different type of connector you have to get a cable or a connector adjuster that fits the device or computer as well as the scanner In that case you must use a SCSI cable that complies with ANSI 2 Note about terminators Generally you need two termi...

Page 15: ...dard follow the steps below to set the ID manually 1 Set DIP switch 3 to the ON positon 2 Turn the rotary switch and set the number to the desired SCSI ID number 3 If you change the SCSI ID while the scan ner is on reset the scanner by turning the power off and on or pushing the reset switch 1 Make sure that the power switch is turned off 2 First insert the power cable into the power cord socket a...

Page 16: ...ush the power switch again Power On Power Off Turning the power on Initializing the scanner ON Original position 1 2 3 4 5 6 7 8 OFF with SCAM ON without SCAM Generally you do not have to initialize the scanner However when you change the SCSI ID or DIP switch settings while the scanner is on you do need to initialize the scanner You can initialize the scanner not only by turning the power off and...

Page 17: ... is on the document feeder Lamp cover open Lamp error Document feeder cover open Paper jam Paper misfeed Document table error System error 3 Indicators Setting the document Meaning On Blinking Off The condition of the scanner is indicated by a combination of the lit indicators on the scanner and the document feeder green amber amber green Error If any of the above errors occur see troubleshooting ...

Page 18: ...e document feeder document feeder mode Placing originals on the contact glass is the only way to scan books magazines and the like You can also scan single sheets this way Using the document feeder is ideal when you have many sheets to scan Place your originals on the document table and they will be fed in and scanned automatically Document feeder mode 03_IS430 BODY 97 5 8 5 36 PM Page 10 PageMake...

Page 19: ...il toner ink ball point pen anything that does not stick to the contact glass Document set origin 2 Put the original face down on the contact glass Place the upper left edge of the origi nal at the document set origin 3 Close the document feeder slowly Caution Keep your fingers away from the hinge when closing the document feeder 1 Open the document feeder Caution Don t press on the contact glass ...

Page 20: ...h Height is less than 12 mm Ex 20lb paper 100 24lb paper 85 E Paper Bond paper PPC paper or art coating paper E Thickness 0 07 0 16 mm E Written material Toner pencil marker ink water sign pen ball point pen or ink that does not adhere to the contact glass and the roller Ink must be dry E Curl Back curl Less than 5 mm Face curl Less than 10 mm If curled flatten it within the above levels E Others ...

Page 21: ...docu ment table until the green indicator of the document feeder lights Procedures 1 When scanning large size originals extend the document table Note If the extention of the document table is pushed down strongly it will come off to prevent it from damaging If it comes off put it back 3 Fan and then square the stack of originals 2 Adjust the exit table stopper according to the size of the origina...

Page 22: ...misfeeds or soil the originals The above mentioned parts must always be kept clean Before scanning clean the contact glass the white sheet and the platen by wiping them with adry soft cloth Contact glass White sheet Caution Don t press on the contact glass strongly otherwise it might break Keep your fingers away from the hinge when closing the document feeder Platen 03_IS430 BODY 97 5 8 5 36 PM Pa...

Page 23: ...cument feeder cover and clean the feed roller by wiping it with a damp cloth Caution Clean the roller after scanning an original written with material that doesn t stick well to the sheet such as pencil lead Otherwise the next original may be soiled Cleaning 03_IS430 BODY 97 5 8 5 36 PM Page 15 PageMaker 5 0J ...

Page 24: ...ot solved by the measures given below contact your service representative for assistance Lamp cover open This indicates that the lamp cover is not closed 6 Troubleshooting Scanner Document feeder Green Amber Green Amber Blinking Blinking Off On Corrective action 1 Open the document feeder 2 Remove the lamp cover and then rein stall it correctly 03_IS430 BODY 97 5 8 5 36 PM Page 16 PageMaker 5 0J ...

Page 25: ...t the CCD does not sense light from the lamp The lamp may be burned out or the connector may be disconnected Corrective action Remove the lamp connector and then rein stall it correctly refering to page 36 If the error is not solved the lamp may be burned out Call your service representative to buy a new lamp Refer to page 36 to replace it Corrective action Close the document feeder and or the doc...

Page 26: ... you can t see the document see steps 4 to 6 2 Pull out the jammed paper 3 Place the original again refering to Original condition and Procedure on page 12 and 13 4 Open the document feeder If you can t see the document contact your service representative 5 Pull out the original gently 6 Place the original again refering to Original condition and Procedure on page 12 and 13 03_IS430 BODY 97 5 8 5 ...

Page 27: ...dition and Procedure on page 12 and 13 Document table error This indicates that the document table is not in the correct posititon Scanner Document feeder Green Amber Green Amber On Off Blinking Blinking Corrective action Open the document feeder cover and then close it Paper misfeed This indicates that the document feeder fails to feed the originals Trouble shooting 03_IS430 BODY 97 5 8 5 36 PM P...

Page 28: ... ter power is on Originals are not fed normally Scanned image is abnormal Corrective action Plug the power cord in Turn on the power Connect it securely Reset the computer Correct the SCSI ID Correct the DIP switches setting Clean the roller Place originals which match the document con ditions Clean the contact glass Clean the roller Refer P 7 P 8 P 6 P 7 P 8 P 15 P 12 P 14 P 15 System error Scann...

Page 29: ...r portrait by 200 dpi binary with the document feeder Scanning speed depends on the system environment Interface SCSI 2 Video interface with the optional video interface unit Power AC 120V 60Hz 220 240 V 50 Hz Power consumption Standby 65 W max without optional units Processing 83 W max without optional units Dimension 450 mm W 670 mm D 282 mm H 17 7 W 26 4 D 11 1 H Weight Approximately 25 kg 7 Sp...

Page 30: ...ase refer to your software manual for details The following functions are described Prescan Scan Scanning composition Binary scanning Threshold Halftone scanning Multi value scanning Area extraction Section area Multi area settings Auto photo letter Resolution Brightness Contrast Gamma correction Binary filter Parameter download Document size detection Skew detection Semi automatic document feed S...

Page 31: ...sed instead of DPI The higher the resolution the finer the detail Scan Function Scanning a selected area with all desired settings Usage Enter settings such as the scan area scanning composition resolution and so on and then scan using Scan Determine the value of the settings based on the original and the output device screen printer etc Even if you scan an image at high resolution you cannot outp...

Page 32: ... 16 64 or 256 levels Usage Use binary scanning to scan images with no gray shading such as text or line art Use halftone scanning to scan an image with gray shading such as a photograph to be printed or displayed on a monochrome device such as a laser printer Use multi value scanning to scan an image with gray shading such as a photograph to be printed or displayed on a gray scale device Refer to ...

Page 33: ...nary composition when scanning binary images such as text and line draw ings black and white images without any gray areas You can select one of following two methods to set the threshold value in binary scanning manual threshold or dynamic threshold Manual threshold A whole image is binalized using a specified threshold The threshold can be set between 1 and 255 When scanning a light image set th...

Page 34: ... terns of black and white dots Usage Use halftone scanning when scaning an image with gray shadings such as a photo graph to be printed or displayed on a monochrome device such as a laser printer Halftoning saves memory so it is convenient for filing a large amount of image data This scanner has eleven halftoning methods ten dithering methods and one error diffusion method Original 03_IS430 BODY 9...

Page 35: ... bit data represents 256 different shades of gray Note that the multi value scanning uses more memory and disk space For example 8 bit scanning needs 8 times space more than binary 1 bit scanning of the same scan area Usage Uses multi value scanning to scan an image with gray shading such as a photo graph to be printed or displayed on a gray scale device Select 4 bit 6 bit or 8 bit according to th...

Page 36: ... from a page define a rectangle over the photograph as shown below The position of the area is decided by setting the X and Y co ordinates of the left upper corner of the rectangle The size is decided by setting the vertical and hori zontal lengths which can be set separately d Scanned image Defined area Scanned this area only 03_IS430 BODY 97 5 8 5 36 PM Page 28 PageMaker 5 0J ...

Page 37: ...ect mode Reset the areas after decreasing the number of areas or their sizes Usage When scanning an original which includes binary images and halftone images you can scan each image with its own composition method in one scanning Original Example settings 1 Set binary composition for the whole scannable area 2 Set halftone composition for this area 3 Set halftone composition for this area 4 Set ha...

Page 38: ...one mode Note This function is available only when the optional image processing unit is installed in the scanner If binary areas and halftone areas are not separated clearly segmentation may not be achieved Usage Scanning of an original that includes binary images such as letters and halftone images such as photographs Scanned image Scanned in binary composition Scanned in half tone composition 0...

Page 39: ...ing time than a low resolution im age Note If the resolution is set at more than 400 dpi the maximum scanning width is less than 304 mm Usage Generally setting the scanning resolution at the resolution of your output device results in high quality imaging A lower resolution means lower quality and a higher resolution is a waste of memory However if you change the scale of your image modify the res...

Page 40: ...he setting and shades of gray appear Conversely if a lighter image becomes pure white decrease the setting Contrast Function To adjust the contrast value between 1 and 255 At a high contrast setting the scanner emphasizes black and white leaving few middle gray shades At a low contrast setting the scanner emphasizes the middle gray shades at the expense of black and white Usage If you want a sharp...

Page 41: ... Smooth Weakens contrast to soften an image Linear Outputs an image as scanned User defined Your own gamma correction curve is loaded into the scanner Usage Select one of them depending on your original and output device If you want to correct an image finely select the User defined setting to load your own correction curve Smooth Linear Sharp Normal Appendix 03_IS430 BODY 97 5 8 5 37 PM Page 33 P...

Page 42: ...rs at following cases Noise elimination Use this filter when scaninng a document which is copied several times Black dots in a white area and white dots in a black area will be eliminated Edge extraction Use this filter if you need outlines of an image for design etc Thickening black lines Use this filter when scanning thin lines or characters Smoothing If edges of a scanned image are uneven scan ...

Page 43: ...t angle the document is skewed and to send the skew angle to the host computer Semi automatic document feed SADF mode In this mode originals which are set on the feeder one at a time are automatically fed into the document feeder and scanned one at a time Book mode feeding direction Note E Top and right areas shadow areas of the right figures of an original must be white If these areas are col ore...

Page 44: ...t up while sliding it to the left Caution Do not touch the middle of the lamp unit Hold the green parts only 8 To attach the red lamp unit go backwards through the previous steps You can use the optional red lamp unit to skip the OCR red images Replace the lamp unit with the optional red lamp unit as follows Warning E Never change the lamp unit with the scanner plugged in E The lamp becomes very h...

Page 45: ...rocessing unit The optional image processing unit adds the following image processing functions Dynamic threshold The scanned image is automatically binalized by an appropriate threshold The scanner dis criminates a background color and decides the threshold to use Auto photo letter The scanner automatically detects letter areas and photo areas of the original The letter areas are scanned in binar...

Reviews: