

Driving
Check the regulations affecting the use of hands-free devices where you drive. Only use the Headset when and where it
is safe to do so.
Driving
Check the regulations affecting the use of hands-free devices where you drive. Only use the Headset when and where it is safe
to do so.
Driving
Check the regulations affecting the use of hands-free devices where you drive. Only use the Headset when and where it is safe to do so.
Driving
Check the regulations affecting the use of hands-free devices where you drive. Only use the Headset when and where it is safe to do so.
Driving
Check the regulations affecting the use of hands-free devices where you drive. Only use the Headset when and where it is safe to do so.
Driving
Check the regulations affecting the use of hands-free devices where you drive. Only use the Headset when and where it is safe to do so.
Es
It
Nl
De
Fr
En
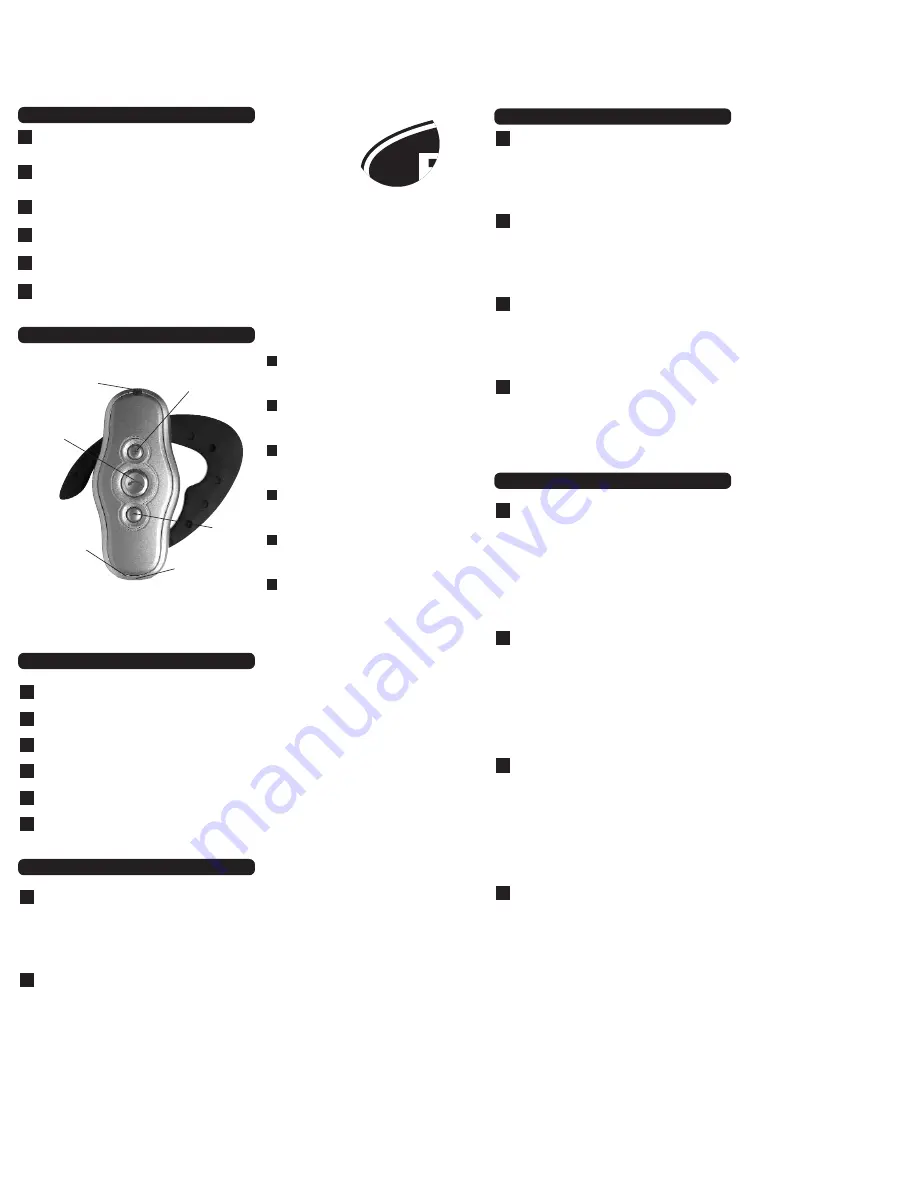
Keypad
• One push button to switch the Headset on/off, to select PAIRING
mode, or to initiate or answer a call
• Two switches to control receive-volume
Keypad
• One push button to switch the Headset on/off, to select PAIRING
mode, or to initiate or answer a call
• Two switches to control receive-volume
Keypad
• One push button to switch the Headset on/off, to select PAIRING
mode, or to initiate or answer a call
• Two switches to control receive-volume
Keypad
• One push button to switch the Headset on/off, to select PAIRING
mode, or to initiate or answer a call
• Two switches to control receive-volume
Keypad
• One push button to switch the Headset on/off, to select PAIRING
mode, or to initiate or answer a call
• Two switches to control receive-volume
Keypad
• One push button to switch the Headset on/off, to select PAIRING
mode, or to initiate or answer a call
• Two switches to control receive-volume
It
Es
Nl
De
Fr
En
LED indicator
LED indicator
LED indicator
LED indicator
LED indicator
LED indicator
Main multifunction button
Main multifunction button
Main multifunction button
Main multifunction button
Main multifunction button
Main multifunction button
Volume -
Volume -
Volume -
Volume -
Volume -
Volume -
Charging connector
Charging connector
Charging connector
Charging connector
Charging connector
Charging connector
Microphone
Microphone
Microphone
Microphone
Microphone
Microphone
Shown configured for wearing on the right ear /
Shown configured for wearing on the
right ear
/ Shown configured for wearing on the right ear /
Shown configured for wearing
on the right ear
/ Shown configured for wearing on the right ear /
Shown configured for
wearing on the right ear
In order to make operation easier, the Headset generates several sounds:
Switch-on tone / Switch-off tone / Pairing tone / Reset tone / Confirmation tone / Error tone / Alert tone / Mute tone / Ring tone
In order to make operation easier, the Headset generates several sounds:
Switch-on tone / Switch-off tone / Pairing tone / Reset tone / Confirmation tone / Error tone / Alert tone / Mute tone / Ring tone
In order to make operation easier, the Headset generates several sounds:
Switch-on tone / Switch-off tone / Pairing tone / Reset tone / Confirmation tone / Error tone / Alert tone / Mute tone / Ring tone
In order to make operation easier, the Headset generates several sounds:
Switch-on tone / Switch-off tone / Pairing tone / Reset tone / Confirmation tone / Error tone / Alert tone / Mute tone / Ring tone
In order to make operation easier, the Headset generates several sounds:
Switch-on tone / Switch-off tone / Pairing tone / Reset tone / Confirmation tone / Error tone / Alert tone / Mute tone / Ring tone
In order to make operation easier, the Headset generates several sounds:
Switch-on tone / Switch-off tone / Pairing tone / Reset tone / Confirmation tone / Error tone / Alert tone / Mute tone / Ring tone
It
Es
Nl
De
Fr
En
Wearing the Headset
•
The Headset can be worn on either ear, by changing the orientation of the ear hook.
•
To remove the ear hook, carefully lever it from the back of the Headset by hand.
•
The ear hook can be replaced either way up. Note the indentation in the center to properly orient the ear hook on the Headset.
•
With the user controls facing the user and the LED at the top, the closed loop of the ear hook should “point” right for operation on the right ear, and
left for the left ear.
•
To place on the ear, hold the Headset in the hand and push the open end of the hook slightly away from the Headset body.
It
Es
Nl
De
Wearing the Headset
•
The Headset can be worn on either ear, by changing the orientation of the ear hook.
•
To remove the ear hook, carefully lever it from the back of the Headset by hand.
•
The ear hook can be replaced either way up. Note the indentation in the center to properly orient the ear hook on the Headset.
•
With the user controls facing the user and the LED at the top, the closed loop of the ear hook should “point” right for operation on the right ear, and
left for the left ear.
•
To place on the ear, hold the Headset in the hand and push the open end of the hook slightly away from the Headset body.
Fr
En
PIN Code: The PIN code for the Headset is preset to 1234. It will be needed for pairing.
Before the Headset can communicate, it must be paired to the companion device it will be used with, such as a mobile phone. This is to ensure the Headset
only communicates with the device chosen by the user and not any other Bluetooth devices in range.
Pairing information is stored by the Headset and can be changed at any time.
The exact process to pair the Headset will also depend on the device it is paired with. The user manual for that device will give instructions on how to do
this. In all cases, the Headset will need to be put into PAIRING mode, which is described here:
1. If the Headset is on, switch it off.
2. Press and hold the main button.
3. When the short tone is heard, keep the button pressed until the pairing melody is generated.
4. The LED will alternately flash red/green.
5. Follow instructions for the companion device to pair to the Headset.
6. When prompted on the companion device, enter the PIN code for the Headset.
7. When paired, the Headset will give a short confirmation tone and switch to STANDBY, ready for operation.
Nl
De
Fr
En
II.
Controls and Functions
II.
Controls and Functions / Sounds
I. Important Information for Safe Use
III. Operation
III. Operation (continued)
IV. Preparing the Headset for Use—Pairing


