The
Outdoor Illuminated Pushbutton
Timer (3 wire) is part of the Elkay family of
switches, timers and detectors which save
energy and increase convenience in and
around your home, garden or premises.
Rating at 240V ac
•
All load types 16A
•
Time Delay: 2 min - 2 hrs
•
Time cancellation functions
•
Re-trigger function
•
Blue Locator ring
•
IP66
Usage
The outdoor pushbutton sensor is a general purpose
time control. Applications for suitable use include
lighting, heating and ventilation. The timers can
be used independently or as a master unit when
using Activator trigger switches.
Mounting and Installation
IMPORTANT
Please note that it is essential
that the Live in, switch Live Out and Neutral wires
are identifi ed prior to commencing installation.
Turn off mains supply for installation. Your Elkay unit
is compatible with a single gang, 25mm deep,
British Standard accessory plate. Please ensure
that the top and bottom lugs are removed,
if fi tted, from metal wall boxes prior to fi tting.
Ensure that there is adequate space for wiring.
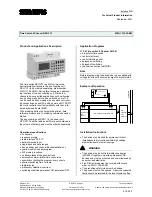
Step 1
– Place the Live In wire into the left hand
position of the connector, the switched Live Out
wire into the second from left position of the
connector and neutral into right hand position of
connector (see diagram 1).
Step 2
– Set the timing as per timing table
(see diagram 2). The black square illustrates where
the dip switch should be situated. For example:
10min 1 = OFF, 2 = ON, 3 = OFF, 4 = OFF
Step 3
– Re-apply mains supply. The blue locator ring
will light up around the touch pad. Your light source or
appliance, will now be switched off . Please refer to
operation section.
Outdoor Installation
Outdoor Unit can only be used in conjunction with
the surface mount box supplied. Take the surface
mount box and remove the knock out section.
It is recommend the hole is cut with a 20mm hole
saw for cleanest eff ect. If required and to ensure
IP66 waterproof rating, please use a suitable M20
cable gland use appropriate sealing washers.
Mount the surface mount box on a secure surface
using the mounting pack supplied. Place screw
cover seals over the mounting screws. It is essential
that the correct IP 66 rated connections are made
to keep the integrity of the IP rated back box
maintained. Mount timer unit onto surface mount
box using the four screws at all four corners ensuring
even connection with the seal-Place screw cover
seals over left and right screw cavities. Clip on front
fascia plate.
Continued overleaf...
–
OUTDOOR
ILLUMINATED
PUSHBUTTON
TIMER
550A-1
3 wire
Instruction Guide
BROOK DESIGN HARDWARE LTD
B
D
H
B
D
H
BROOK DESIGN
HARDWARE LTD
B
D
H
BROOK DESIGN
HARDWARE LTD
BDH
BROOK DESIGN
HARDWARE LTD
B
D
H