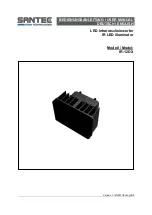
background image

Faceplate
Chevron Cover
Red/Green Diffuser

Enclosure
Backplate
Wire Nuts

Junction Box

(Building Utility)

VEX SERIES

INSTALLATION INSTRUCTIONS

800.533.3948 • www.barronltg.com 

10070040 Rev 6 - 11/18

Back Mounting

1. Remove faceplate and set aside.
2. Drill 3/8” hole into the center of the backplate (5). Drill 1/4” inch holes 

    into the oblong holes on backplate (5) that correspond to junction box 

    (7) being used.
3. Feed transformer leads through center hole of backplate.  
4. Make electrical connections: see 

Electrical Connection

 section. 

5. Feed excess wire into the junction box and secure backplate (5) 

    to the junction box (7) using screws (supplied by others).

6. For units without a battery door: connect the battery terminals 

    before securing the faceplate to the housing.
7. Remove diffuser (3) from inside of the faceplate (1) in order 

    to remove snap-in chevrons (2) as required. Store unused 

    chevron covers in a safe place. Then snap the faceplate (1) 

    to the housing (4).
8. For units with a battery door: after securing the faceplate 

    to the housing open the battery door and connect the battery 

    terminals. Close door and push the test button to confirm. 

    Allow to charge for 24 hours before the 90 minute test. Then 

    follow 

Self-test/Self-diagnostics testing

 section.

1

IMPORTANT SAFEGUARDS

READ AND FOLLOW ALL SAFETY INSTRUCTIONS.

   When using electrical equipment, basic safety precautions should always be followed including the following:

DISCONNECT AC POWER SUPPLY BEFORE SERVICING.

•  Installation and servicing of this equipment should be performed by qualified service personnel

•  Ensure that the electrical wiring conforms to the National Electrical Code NEC® and local regulations if applicable.

•  Do not mount near gas or electrical heaters.

•  Equipment should be mounted in locations and at heights where it will not be readily subjected to tampering by    

   unauthorized personnel.

•  For 2CI operation - ensure that both AC power and auxiliary power are not simultaneously live. 

•  The use of accessory equipment not recommended by the manufacturer may cause an unsafe condition.     


•  Any modification or use of non-original components will void the warranty and product liability.

•  Do not use this equipment for other than intended use.

SAVE THESE INSTRUCTIONS!

Battery Door

Summary of Contents for EXITRONIX VEX Series

Page 1: ... housing open the battery door and connect the battery terminals Close door and push the test button to confirm Allow to charge for 24 hours before the 90 minute test Then follow Self test Self diagnostics testing section 1 IMPORTANT SAFEGUARDS READ AND FOLLOW ALL SAFETY INSTRUCTIONS When using electrical equipment basic safety precautions should always be followed including the following DISCONNE...

Page 2: ...or and connect the battery terminals Close door and push the test button to confirm Allow to charge for 24 hours before the 90 minute test Then follow Self test Self diagnostics testing section End Mounting 1 Attach sign to canopy 7 by inserting canopy into sign then slide to the top to lock 2 Feed transformer leads through the side hole of the housing 4 making sure to secure the wires into wire g...

Page 3: ...ions see Electrical Connection section 4 All electrical connections should be made inside the VEPA junction box 5 Fasten VEPA to canopy using 8 32 x machine screws Electrical Connections All electrical connections should be made inside junction box Make electrical connections as follows 120V AC 277V AC White Common White Common Black 120V Orange 277V Green Ground Green Ground Note Cap unused leads...

Page 4: ...de requirements after AC power has been supplied for a minimum of 24 hours c Self testing with a 30 minute discharge once every 180 days after AC power has been supplied for a minimum of 24 hours d Self testing with a 90 minute discharge once every 365 days conforming to NFPA code requirements after AC power has been supplied for a minimum of 24 hours 3 Fault Indication 3 Battery Recharge Failure ...

Page 5: ...at the unit is in testing mode GREEN RED FLASHING indicates that the battery is charging RED STEADY and BLINKING would indicate a fault or a service alert The LED indicator would be off when the unit is in emergency mode Refer to Fault Indication section for more details 2 Self Diagnostic Service The self diagnostic function is factory preset without any field adjustment The automatic self diagnos...

Page 6: ... the table below 5 Operation During an electrical power failure the unit will transfer into emergency mode and stay illuminated for a minimum of 90 minutes To test the unit the battery needs to be charged initially for 24 hours before depressing the test button to do manual test On pressing the test button the unit will transfer into a simulated emergency mode with the LED indicator flashing or bl...

Reviews: