background image

www

.auna-multimedi

a.com

Belle Epoque 1912


Retr

o-Platt

enspieler

Retr

o Recor

d Play

er

Platine vinyle r

étr

o

Tocadisco r

etr

o

Gir

adischi r

étr

o

10034402

Summary of Contents for 10034402

Page 1: ...w w w a u n a m u l t i m e d i a c o m Belle Epoque 1912 Retro Plattenspieler Retro Record Player Platine vinyle rétro Tocadisco retro Giradischi rétro 10034402 ...

Page 2: ......

Page 3: ...geschwindigkeiten 33 45 78 RPM Plattengröße 17 5 25 30 cm Abspielbare CD Formate CD CD R CD RW MP3 Abspielbare Dateiformate von USB MP3 Sehr geehrter Kunde wir gratulieren Ihnen zum Erwerb Ihres Gerä tes Lesen Sie die folgenden Hinweise sorgfäl tig durch und befolgen Sie diese um möglichen Schäden vorzubeugen Für Schäden die durch Missachtung der Hinweise und unsachgemäßen Gebrauch entstehen übern...

Page 4: ... mit folgendem Hinweis GEFÄHRLICHE SPANNUNG Das Blitzsymbol mit Pfeilspitze im gleichseitigen Dreieck soll den Benutzer auf das Vorhandensein einer nicht isolierten gefährlichen Spannung im Gehäuse des Produkts aufmerksam machen die von ausreichender Größe sein kann um eine Gefahr eines Stromschlags für Personen darzustellen Das Dreieck mit dem Ausrufezeichen und folgendem Hinweis ACHTUNG Das Ausr...

Page 5: ...Techniker oder dem Gerätehersteller durchgeführt werden Zur Reinigung des Gerätes beachten Sie bitte die Empfehlungen des Hinweises Das Netzkabel sollte abgezogen werden wenn Sie es über einen längeren Zeitraum nicht benutzen Das Gerät ist von einer qualifizierten Person zu reparieren wenn a das Netzkabel beschädigt ist b Gegenstände in das Gerät gefallen sind oder eine Flüssigkeit in das Gerät ei...

Page 6: ... Batterieentsorgung ist zu achten Das Gerät muss in in gemäßigten Klimazonen eingesetzt werden Explosionsgefahr durch unsachgemäßen Batteriewechsel Batterien nur durch den gleichen oder gleichwertigen Typ ersetzen Der Hauptstecker muss leicht zugänglich bleiben Die Belüftung darf nicht dadurch behindert werden dass die Belüftungsöffnung mit Gegenständen wie Zeitungen Tischdecken Vorhängen usw abge...

Page 7: ...7 DE GERÄTEÜBERSICHT 1 Staubschutzhülle 2 Abdeckmechanismus 3 Drehtisch 4 Lautsprecher 5 Tonarm 6 Holzbein ...

Page 8: ...YE PAUSE 14 STOPP TASTE 15 DN F R 16 UP F F F 17 REC DEL AUFNAHME TASTE LÖSCHEN TASTE 18 CD FACH ÖFFNEN SCHLIEßEN TASTE 19 LAUTSTÄRKEREGLER STANDBY 20 POWER LED 21 DAB MENÜ TASTE 22 DAB INFO TASTE 23 DAB SCAN TASTE 24 DAB VOREINSTELLUNGSTASTE 25 DAB EINGABE 26 LCD ANZEIGE 27 TUNING TASTE PLAY MODUS 28 FM DAB ANTENNENANLAGE 29 AC KABEL 30 EIN AUS SCHALTER ...

Page 9: ...9 DE Plattenspieler 31 Adapter 32 Plattenteller Pausenschalter 33 Tonarmhalterung 34 Autostopp ein aus 35 33 45 78 U min Drehzahlwahlschalter 36 Tonarm 37 Plattenteller 38 Line out ...

Page 10: ...ßen 3 Aufnahme 4 Löschen 5 Modus 6 Stopp 7 Wiederholen Lautstärke 8 Programm Lautstärke 9 Wiedergabe Pause 10 DAB Scan 11 Info 12 Titel zurück schneller Rücklauf 13 Titel vor schneller Vorlauf 14 Tastenfeld 15 10 16 Eingabe 17 Menü 18 EQ 19 Einstellungen 20 Timer ...

Page 11: ...SB PHONO AUX IN um die gewünschte Funktion auszuwählen 3 Beginnen Sie mit der Einstellung der Lautstärke indem Sie den Lautstärkeregler verwenden 4 Wenn Sie fertig sind drücken Sie erneut die Taste POWER um das System auszuschalten Die Stromanzeige erlischt Anmerkung Das Gerät entspricht dem ERP2 Standard das Gerät wechselt in den Standby Modus wenn das Gerät innerhalb von 15 Minuten nicht mehr be...

Page 12: ...and mit einer Transportschraube gesichert Drehen Sie die Transportschraube mit einer Münze oder einem Schraubendreher im Uhrzeigersinn Dadurch kann der Drehtisch schweben Entfernen Sie die durchsichtige Nadelbdeckung vom Tonkopf indem Sie sie in Pfeilrichtung verschieben Bitte achten Sie während des Betriebs auf die Nadel da eine Beschädigung der Nadel nicht von der Garantie abgedeckt ist Entferne...

Page 13: ...wählen 3 DRC Wählen Sie diese Option um zwischen DRC niedrig DRC hoch und DRC Aus zu wählen 4 Prune Wählen Sie diese Option um das Bereinigen von Stationen ein oder auszuschalten DAB Sender speichern Sie können maximal 20 voreingestellte Radiosender speichern 1 Drücken und halten Sie PRESET 24 19 auf der Fernbedienung PRESET STORE wird auf dem Display angezeigt Drücken Sie SKIP 16 15 12 13 auf der...

Page 14: ...nder oder nur der starken Sender zu wählen 2 Audio Einstellung Wählen Sie diese Option um zwischen dem Erzwingen von Mono Audio oder dem Aktivieren von Stereo Sound zu wählen FM Sender speichern Siehe DAB PRESET Anleitungen FM Info Drücken Sie wiederholt INFO 22 18 auf der Fernbedienung um die folgenden Informationen anzuzeigen ART DES PROGRAMMS FREQUENZ AUDIO DATUM UHRZEIT CD BETRIEB 1 Drücken Si...

Page 15: ...ewegen Sie den Tonarm auf die Kante der Schallplatte Der Plattenspieler startet automatisch Verwenden Sie den Queuehebel um den Tonarm sanft auf die Schallplatte abzusenken 7 Stellen Sie den Lautstärkeregler auf den gewünschten Pegel ein 8 Wenn der Tonarm das Ende der Aufnahme erreicht kehrt er automatisch zur Tonarmlehne zurück und der Plattenspieler stoppt 9 Drücken Sie erneut auf POWER um das S...

Page 16: ...enung für 2 Sekunden lang drücken um den Wiedergabemodus zwischen CD und USB zu wechseln Wiedergabe im MP3 Modus 1 Drücken Sie die Taste PLAY PAUSE um die Wiedergabe des ausgewählten Titels zu starten oder zu unterbrechen 2 Während der Wiedergabe des Songs werden die Song und Ordnernummer des ausgewählten Tracks im Display angezeigt 3 Sie können die Wiedergabe jederzeit durch Drücken der STOP Tast...

Page 17: ...ufnahme die STOP Taste drücken 3 Aufnahme von Schallplatte Stecken Sie den USB Stick in die USB Buchse Drücken Sie dann die Taste PHONO AUX IN Spielen Sie die Schallplatte ab und drücken Sie die RECORD Taste zweimal um die Aufnahme zu starten Drücken Sie die STOP Taste um die Aufnahme zu stoppen 4 AUX IN recording Stecken Sie den USB Stick in die USB Buchse Schließen Sie das externe Audiogerät an ...

Page 18: ...rtlichen Regelungen und entsorgen Sie Altgeräte nicht über den Hausmüll Durch die regelkonforme Entsorgung der Altgeräte werden Umwelt und die Gesundheit Ihrer Mitmenschen vor möglichen negativen Konsequenzen geschützt Materialrecycling hilft den Verbrauch von Rohstoffen zu verringern Konformitätserklärung Hersteller Chal Tec GmbH Wallstraße 16 10179 Berlin Dieses Produkt entspricht den folgenden ...

Page 19: ...ead this manual carefully and take care of the following hints to avoid damages Any failure caused by ignoring the items and cautions men tioned in the instruction manual are not covered by our warranty and any liability Scan the QR code to get access to the latest user manual and other information about the product TECHNICAL DATA Item number 10034402 Power input 230 V 50 60 Hz RMS power 2x2 5W Tu...

Page 20: ...lash with arrowhead symbol within the equilateral triangle is intended to alert the user to the presence of uninsulated dangerous voltage within the product s enclosure that may be of sufficient magnitude to constitute a risk of electric shock to persons Triangle with exclamation point plus explanation as follows ATTENTION The exclamation point within the equilateral triangle is intended to alert ...

Page 21: ... be unplugged when not using for a long period of time Device shall be repaired by a qualified person when a the power cord is damaged b objects have fallen into the apparatus or a liquid has been spilled into device c device was exposes to the rain d device does not work correctly without notable exterior change e device is broken The user shall not try to maintain device beyond that which is des...

Page 22: ...spaper table cloths curtain etc No naked flame sources such as lighted candles should be placed on the apparatus Attention should be drawn to the environmental aspects of battery disposal The use of apparatus in moderate climates Danger of explosion if battery is incorrectly replaced Replace only with the same or equivalent type The main plug shall remain readily operable ...

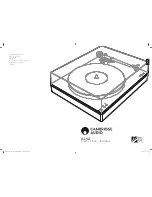
Page 23: ...23 EN OVERVIEW 1 Dust cover 2 Cover mechanism 3 Turntable 4 Speakers 5 Tone arm 6 Wood leg ...

Page 24: ...door 13 Play pause 14 Stop button 15 Dn f r 16 Up f f 17 Rec del record button delete button 18 CD door open close button 19 Volume knob power stanby 20 Power led 21 DAB menu button 22 DAB info button 23 DAB scan button 24 DAB preset button 25 DAB enter 26 LCD display 27 Tuning botton play Mode 28 FM DAB antenna 29 AC cord 30 On off switch ...

Page 25: ...25 EN Turntable 31 Adaptor 32 Turntable pause switch 33 PICK UP HOLDER 34 AUTO STOP ON OFF 35 33 45 78 RPM speed selector 36 Tone arm 37 Turntable 38 LINE OUT ...

Page 26: ...on 4 Delete button5 Mode button 5 Stop button 6 Mode button 7 Repeat button vol 8 Program button vol 9 Play pause button 10 DAB scan button 11 Info 12 Skip button fast forward button 13 Skip button rewind button 14 Numeric keyboard 15 10 16 Enter 17 Menu 18 EQ 19 Preset 20 Timer ...

Page 27: ...lector buttons DAB FM CD USB PHONO AUX IN to select the desired function 3 Start to adjust the volume by using the volume control button 4 When finished listening press POWER again to turn off the system The power indicator goes off Remark The unit is comply with ERP2 the unit will turn to Standby mode if there is no operation on the unit after 15 mins please press POWER button 2 times if you want...

Page 28: ...has been secured for shipment with a transit screw Use a coin or a Iscrewdriver to turn the transit screw clockwise This will allow the turntable to float Remove the opaque white plastic stylus cover from the phonograph stylus by sliding it in the direction of the arrow Please pay attention to the stylus during operation because stylus damage is not covered by the warranty Remove the the twist tie...

Page 29: ...m a maximum of 20 preset radio stations 1 Press and hold PRESET 24 19 on remote PRESET STORE will appear on display Press SKIP 16 15 12 13 on remote to select the preset number Press ENTER 9 16 on remote to confirm 2 Press PRESET 24 19 on remote to navigate through the presets DAB INFO 1 Repeatedly press INFO 22 18 on remote to see the following information NAME KBPS DATE TIME FM MODE Press functi...

Page 30: ...CD USB button to enter CD mode the and DISC icon will be shown on the screen The unit can play CD CD R and CD RW Press the OP CL button top open the CD drawer 2 Place your disc in the CD drawer with the label side facing up 3 Press the OP CL button again to close the CD drawer Playback will automatically start from the first track 4 MP3 icon will be shown if MP3 file is detected in the disc ...

Page 31: ...rpm adapter on the centre spindle 4 Place your record on the the centre spindle 5 Raise the cue lever to lift the tone arm of its rest Move the tone arm to the edge of the record The turntable starts automatically Use the cue lever to gently lower the tone arm onto the record 6 Adjust the volume control to the desired level 7 When the tone arm reaches the end of the record it automatically returns...

Page 32: ...conds to change the playing mode between CD and USB Playing in MP3 Mode CD USB 1 Press PLAY PAUSE button to start or pause playback selected track 2 While playing the song the song number and folder number of the selected track will be shown in the display 3 You can stop the playback at any time by pressing the STOP button TRACK SKIP AND HIGH SPEED TRACK SEARCH IN CD USB MODE During CD USB playbac...

Page 33: ...ng will fail if pressing STOP button during recording 3 Vinyl recording Insert USB flash drive into the USB socket Then press PHONO AUX IN button Play the vinyl and press RECORD button twice to start recording Press STOP button to stop recording 4 AUX IN recording Insert USB flash drive into the USB socket Connect the external audio device into the AUX jack on the rear panel Then press PHONO AUX I...

Page 34: ...012 19 EU this symbol on the product or on its packaging indicates that this product may not be treated as household waste Instead it should be taken to the appropriate collection point for the recycling of electrical and electronic equipment By ensuring this product is disposed of correctly you will help prevent potential negative consequences for the environment and human health which could othe...

Page 35: ...sses de lecture 33 45 78 RPM Dimensions des disques 17 5 25 30 cm Formats de CD compatibles CD CD R CD RW MP3 Formats de fichiers USB compatibles MP3 Chère cliente cher client Toutes nos félicitations pour l acquisition de ce nouvel appareil Veuillez lire attentivement et respecter les instructions de ce mode d emploi afin d éviter d éventuels dommages Nous ne saurions être tenus pour responsables...

Page 36: ...u triangle contenant un éclair TENSION DANGEREUSE L éclair avec la flèche à l intérieur du triangle équilatéral est destiné à alerter l utilisateur de la présence de tension dangereuse non isolée à l intérieur du boîtier d une magnitude suffisante pour constituer un risque de choc électrique aux personnes Signification du triangle avec un point d exclamation ATTENTION le point d exclamation point ...

Page 37: ...r nettoyer l appareil veuillez respecter les consignes Le cordon d alimentation doit être débranché si vous n utilisez pas l appareil pendant une longue période L appareil doit être réparé par une personne qualifiée si a Le câble secteur est endommagé b Des objets sont tombés dans l appareil ou un liquide a pénétré dans l appareil c L appareil a été exposé à la pluie d L appareil ne fonctionne pas...

Page 38: ...oit pas être obstruée en bloquant l ouverture de ventilation avec des objets tels que des journaux des nappes des rideaux etc Il ne doit y avoir aucune flamme nue telle qu une bougie allumée sur l appareil Les aspects environnementaux de la mise au rebut des piles doivent être pris en compte L appareil doit être utilisé dans les climats tempérés Risque d explosion en cas de remplacement incorrect ...

Page 39: ...39 FR APERÇU DE L APPAREIL 1 Couvercle de protection 2 Mécanisme du couvercle 3 Platine 4 Enceinte 5 Bras de lecture 6 Pied en bois ...

Page 40: ...AYE PAUSE 14 TOUCHE STOP 15 DN F R 16 UP F F F 17 REC DEL ENREGISTREMENT EFFACER 18 OUVERTURE FERMETURE DU LECTEUR CD 19 VOLUME VEILLE 20 VOYANT DE MARCHE LED 21 TOUCHE DE MENU DAB 22 TOUCHE INFO DAB 23 TOUCHE SCAN DAB 24 TOUCHE DE PRÉRÉGLAGE DAB 25 ENTRÉE DAB 26 ÉCRAN LCD 27 TOUCHE TUNING MODE PLAY 28 ANTENNE FM DAB 29 CÂBLE AC 30 BOUTON DE MARCHE ARRÊT ...

Page 41: ... FR Platine 31 Adaptateur 32 Mise en pause de la platine 33 Support de bras de lecture 34 Autostop marche arrêt 35 Sélecteur de vitesse de rotation 33 45 78 T min 36 Bras de lecture 37 Platine 38 Line out ...

Page 42: ... lecteur CD 3 Enregistrement 4 Effacer 5 Mode 6 Stop 7 Répétition Volume 8 Programme Volume 9 Lecture Pause 10 Scan DAB 11 Info 12 Titre précédent retour rapide 13 Titre suivant avance rapide 14 Clavier 15 10 16 Entrée 17 Menu 18 EQ 19 Paramètres 20 Minuterie ...

Page 43: ...s de sélection de fonctions DAB FM CD USB TAPE PHONO AUX IN pour sélectionner la fonction souhaitée 3 Réglez le volume en utilisant le bouton de volume 4 Une fois terminé appuyez à nouveau sur la touche POWER pour éteindre le système Le voyant d alimentation s éteint Remarque L appareil étant conforme à la norme ERP2 l appareil passe en mode veille s il ne fonctionne plus dans les 15 minutes Appuy...

Page 44: ...t dans le sens des aiguilles d une montre avec une pièce de monnaie ou un tournevis Cela libère la platine et la fait flotter Retirez le capuchon transparent de l aiguille de la tête de lecture en le déplaçant dans le sens de la flèche Faites attention pendant la manœuvre car les dommages causés à l aiguille ne sont pas couverts par la garantie Retirez la bande utilisée pour fixer le bras de lectu...

Page 45: ... 3 DRC sélectionnez cette option pour basculer entre DRC bas DRC haut et DRC désactivé 4 Suppression sélectionnez cette option pour activer ou désactiver la filtration des stations Mémorisation des stations DAB Vous pouvez mettre en mémoire 20 stations favorites au maximum 1 Appuyez sur PRESET 24 19 sur la télécommande et maintenez la touche PRESET STORE apparaît à l écran Appuyez sur SKIP 16 15 1...

Page 46: ...t des stations puissantes 2 Réglage audio Sélectionnez cette option pour choisir entre forcer l audio mono ou activer le son stéréo Mémorisation des stations FM Voir les indications pour les favoris DAB Info FM Appuyez plusieurs fois sur INFO 22 18 sur la télécommande pour afficher les informations suivantes TYPE DE PROGRAMME FRÉQUENCE AUDIO DATE HEURE UTILISATION DU CD 1 Appuyez sur la touche CD ...

Page 47: ...cture de son support Déplacez le bras de lecture jusqu au bord du disque La platine démarre automatiquement Utilisez le levier pour abaisser doucement le bras de lecture sur le disque 7 Ajustez le volume au niveau souhaité 8 Lorsque le bras de lecture atteint la fin de l enregistrement il revient automatiquement sur son support et la platine s arrête 9 Appuyez de nouveau sur POWER pour éteindre le...

Page 48: ...sur la touche PLAY PAUSE de la télécommande pendant 2 secondes pour basculer entre les modes de lecture CD et USB Lecture en mode MP3 1 Appuyez sur la touche PLAY PAUSE pour démarrer ou arrêter la lecture du titre sélectionné 2 Pendant la lecture du titre les numéros de titre et de dossier du titre sélectionné sont affichés 3 Vous pouvez arrêter la lecture à tout moment en appuyant sur la touche S...

Page 49: ...yez sur la touche STOP pendant l enregistrement 3 Enregistrement d un disque vinyle Insérez la clé USB dans la prise USB Appuyez ensuite sur la touche PHONO AUX IN Jouez l enregistrement et appuyez deux fois sur la touche RECORD pour commencer l enregistrement Appuyez sur la touche STOP pour arrêter l enregistrement 4 Enregistrement par AUX IN Insérez la clé USB dans la prise USB Connectez le péri...

Page 50: ...t électroniques Respectez les et ne jetez pas les appareils usagés avec les ordures ménagères La mise en rebut correcte du produit usagé permet de préserver l environnement et la santé Le recyclage des matériaux contribue à la préservation des ressources naturelles Déclaration de conformité Fabricant Chal Tec GmbH Wallstraße 16 10179 Berlin Ce produit est conforme aux directives européennes suivan...

Page 51: ...ducción 33 45 78 RPM tamaño del disco 17 5 25 30 cm Formatos de CD reproducibles CD CD R CD RW MP3 Formatos de archivo reproducibles desde USB MP3 Estimado cliente Le felicitamos por la adquisición de este produc to Lea atentamente el siguiente manual y siga cuidadosamente las instrucciones de uso con el fin de evitar posibles daños La empresa no se responsabiliza de los daños ocasionados por un u...

Page 52: ...ligroso El símbolo de relámpago con punta de flecha dentro de un triángulo equilátero tiene por objeto alertar al usuario de la presencia de un voltaje peligroso no aislado dentro de la carcasa del producto que puede ser de magnitud suficiente para constituir un riesgo de descarga eléctrica para las personas El triángulo con el signo de exclamación PRECAUCIÓN El signo de exclamación dentro del tri...

Page 53: ...ar el dispositivo siga las recomendaciones de la nota El cable de alimentación debe desconectarse cuando no se utilice durante un período de tiempo prolongado El aparato debe ser reparado por una persona cualificada si a el cable de alimentación está dañado b han caído objetos en el aparato o ha penetrado líquido en el aparato c el producto ha estado expuesto a la lluvia d la unidad no funciona co...

Page 54: ...d debe utilizarse en climas templados Peligro de explosión debido a una sustitución incorrecta de la pila Reemplace las pilas sólo con pilas del mismo tipo o de tipo equivalente El enchufe principal debe permanecer fácilmente accesible No obstruya la ventilación cubriendo la abertura de ventilación con objetos como periódicos manteles cortinas etc No coloque llamas abiertas como velas encendidas s...

Page 55: ...55 ES VISTA GENERAL DEL APARATO 1 Tapa antipolvo 2 Mecanismo de cobertura 3 Tocadiscos 4 Altoparlantes 5 Brazo de tono 6 Pata de palo ...

Page 56: ... DE PARADA 15 DN F R 16 UP F F F 17 REC DEL TECLA DE GRABAR ELIMINAR 18 BOTÓN ABRIR CERRAR BANDEJA DE CD 19 CONTROL DE VOLUMEN 20 LED DE ALIMENTACIÓN 21 BOTÓN DEL MENÚ DAB 22 BOTÓN DE INFORMACIÓN DAB 23 BOTÓN DE ESCANEO DAB 24 BOTÓN DE PREAJUSTE DE DAB 25 ENTRADA DAB 26 PANTALLA LCD 27 TECLA DE SINTONÍA MODO DE REPRODUCCIÓN 28 SISTEMA DE ANTENAS FM DAB 29 CABLE DE CA 30 INTERRUPTOR DE ENCENDIDO AP...

Page 57: ...scos 31 Adaptador 32 Interruptor de pausa del tocadiscos 33 Soporte del cartucho 34 Auto stop encendido apagado 35 Interruptor de selector de velocidad 33 45 78 rpm 36 Brazo de tono 37 Giradiscos 38 Línea de salida ...

Page 58: ...eja para CD 3 Grabar 4 Borrar 5 Modo 6 Parar 7 Repetir Volumen 8 Programa Volumen 9 Reproducir Pausar 10 Escaneo DAB 11 Información 12 Vuelta atrás rebobinar el título 13 Título adelante avance rápido 14 Teclado 15 10 16 Entrar 17 Menú 18 EQ 19 Ajustes 20 Cronómetro ...

Page 59: ...botones de función DAB FM CD USB TAPE PHONO AUX IN para seleccionar la función deseada 3 Comience a ajustar el volumen utilizando el control de volumen 4 Cuando termine pulse el botón POWER de nuevo para apagar el sistema El indicador de encendido se apaga Nota El dispositivo cumple con el estándar ERP2 el dispositivo cambia al modo de espera si el dispositivo no es operado en 15 minutos Por favor...

Page 60: ...porte Gire el tornillo de transporte en el sentido de las agujas del reloj con una moneda o un destornillador Esto permitirá que el giradiscos flote Retire la cubierta transparente de la aguja de la cabeza del sonido moviéndola en la dirección de la flecha Por favor preste atención a la aguja durante la operación ya que el daño a la aguja no está cubierto por la garantía Retire la cinta transporta...

Page 61: ...uencia DAB 3 DRC Seleccione esta opción para seleccionar entre DRC Low DRC High y DRC Off 4 Prune Seleccione esta opción para activar o desactivar la limpieza de la estación Guardar el transmisor DAB Puede almacenar hasta 20 emisoras de radio preestablecidas 1 Pulse y mantenga pulsado PRESET 24 19 en el mando a distancia En el display aparece PRESET STORE Pulse SKIP 16 15 12 13 en el mando a dista...

Page 62: ...las estaciones fuertes 2 Ajuste de audio Seleccione esta opción para elegir entre forzar el audio mono o activar el sonido estéreo Guardar emisoras FM Consulte las instrucciones de PRESET DAB Información FM Pulse INFO 22 18 en el mando a distancia repetidamente para visualizar la siguiente información TIPO DE PROGRAMA FRECUENCIA AUDIO FECHA HORA MODO CD 1 Pulse el botón CD USB para entrar en el mo...

Page 63: ...r el brazo tóner de su soporte Mueva el antebrazo al borde del registro La plataforma giratoria se iniciará automáticamente Utilice la palanca de taco para bajar suavemente el tono en el registro 7 Ajuste el control de volumen al nivel deseado 8 Cuando el tono llega al final de la grabación regresa automáticamente al reposabrazos y la plataforma giratoria se detiene 9 Pulse POWER de nuevo para apa...

Page 64: ...ncia durante 2 segundos para cambiar el modo de reproducción entre CD y USB Reproducción en el modo MP3 1 Pulse la tecla PLAY PAUSE para iniciar o pausar la reproducción de la pista seleccionada 2 Durante la reproducción de la canción se mostrará el número de canción y carpeta de la pista seleccionada 3 Puede detener la reproducción en cualquier momento pulsando el botón STOP Durante la reproducci...

Page 65: ...siona el botón STOP durante la grabación 3 Grabación de disco Inserte el lápiz USB en la toma USB A continuación pulse el botón PHONO AUX IN Reproduzca la grabación y pulse el botón RECORD dos veces para iniciar la grabación Pulse el botón STOP para detener la grabación 4 Grabación AUX IN Inserte el lápiz USB en la toma USB Conecte el dispositivo de audio externo a la toma AUX del panel trasero A ...

Page 66: ...aparatos viejos al cubo de la basura doméstica Una retirada de aparatos conforme a las leyes contribuye a proteger el medio ambiente y a las personas a su alrededor frente a posibles consecuencias perjudiciales para la salud El reciclaje ayuda a reducir el consumo de materias primas Declaración de conformidad Fabricante Chal Tec GmbH Wallstraße 16 10179 Berlín Alemania Este producto cumple con las...

Page 67: ...nsioni dischi 17 5 25 30 cm Formati CD riproducibili CD CD R CD RW MP3 Formati file riproducibili da USB MP3 Gentile Cliente La ringraziamo per aver acquistato il dispositivo La preghiamo di leggere attentamente le segu enti istruzioni per l uso e di seguirle per evitare possibili danni tecnici Non ci assumiamo alcuna responsabilità per danni scaturiti da una mancata osservazione delle avvertenze ...

Page 68: ...la seguente avvertenza TENSIONE PERICOLOSA il simbolo del lampo con la punta a freccia all interno del triangolo serve a indicare all utente la presenza di una tensione pericolosa non isolata nell alloggiamento del prodotto che è di forza sufficiente a rappresentare un pericolo di folgorazione per persone Il triangolo con il punto esclamativo e la seguente avvertenza ATTENZIONE il punto esclamativ...

Page 69: ...duttore del dispositivo Per pulire il dispositivo rispettare le indicazioni fornite Scollegare il cavo se il dispositivo non viene utilizzato per lunghi periodi Il dispositivo deve essere riparato da una persona qualificata se a Il cavo di alimentazione è danneggiato b Sono caduti oggetti nel dispositivo o è penetrata umidità al suo interno c Il dispositivo è stato esposto a pioggia d Il dispositi...

Page 70: ...tacolare la ventilazione Non coprire le aperture di ventilazione con oggetti come giornali tovaglie tende ecc Non poggiare fiamme libere sul dispositivo come ad es candele accese Quando si procede allo smaltimento delle batterie tenere in considerazioni gli aspetti ecologici Il dispositivo deve essere utilizzato in zone climatiche temperate Pericolo di esplosione dovuto a un errata sostituzione de...

Page 71: ...71 IT DESCRIZIONE DEL DISPOSITIVO 1 Copertura protezione polvere 2 Meccanismo copertura 3 Piatto rotante 4 Altoparlanti 5 Braccio del pickup 6 Gambe in legno ...

Page 72: ...E TELECOMANDO 12 VANO CD 13 PLAY PAUSE 14 STOP 15 DN F R 16 UP F F F 17 REC DEL registrare cancellare 18 APRIRE CHIUDERE VANO CD 19 VOLUME STANDBY 20 POWER LED 21 MENU DAB 22 INFO DAB 23 SCAN DAB 24 IMPOSTAZIONI PREDEFINITE DAB 25 IMMISSIONE DAB 26 SCHERMO LCD 27 TUNING MODALITÀ PLY 28 ANTENNE FM DAB 29 CAVO AC 30 ON OFF ...

Page 73: ... 31 Adattatore 32 Interruttore per mettere in pausa il piatto 33 Supporto del braccio del pickup 34 Stop automatico on off 35 Selezione velocità 33 45 78 giri minuto 36 Braccio del pickup 37 Piatto girevole 38 Line out ...

Page 74: ...egistrare 4 Cancellare 5 Modalità 6 Stop 7 Ripetere Volume 8 Programma Volume 9 Play Pausa 10 Scan DAB 11 Info 12 Titolo precedente Indietro veloce 13 Titolo successivo Avanti veloce 14 Pannello tasti 15 10 16 Inserire 17 Menu 18 EQ 19 Impostazioni 20 Timer ...

Page 75: ...llumina 2 Premere il tasto di selezione delle funzioni DAB FM CD USB TAPE PHONO AUX IN per scegliere la funzione desiderata 3 Iniziare a regolare il volume con l apposita manopola 4 Finito l utilizzo premere di nuovo POWER per spegnere il dispositivo L indicazione di alimentazione si spegne Nota il dispositivo è conforme allo standard ERP2 e passa in standby se non viene utilizzato entro 15 minuti...

Page 76: ... spedizione Girare la vite di trasporto in senso orario con una moneta o un cacciavite Il piatto è ora in grado di muoversi Togliere la copertura trasparente della puntina spostandola in direzione della freccia Durante l utilizzo fare attenzione alla puntina dato che i danni alla puntina non sono coperti dalla garanzia Togliere il nastro di trasporto utilizzato per fissare il braccio del pickup du...

Page 77: ... manualmente la frequenza DAB 3 DRC selezionare questa opzione per scegliere tra DRC basso DRC alto e DRC off 4 Prune selezionare questa opzione per accendere o spegnere la regolazione delle emittenti Salvare emittenti DAB Possono essere salvate fino a 20 emittenti predefinite 1 Tenere premuto PRESET 24 19 sul telecomando Sul display compare PRESET STORE Premere SKIP 16 15 12 13 sul telecomando pe...

Page 78: ...ne di tutte le emittenti o la scansione delle emittenti con segnale intenso 2 Impostazione audio selezionare questa opzione per forzare Mono Audio o attivare Stereo Sound Salvare emittenti FM V le istruzioni DAB PRESET Info FM Premere ripetutamente INFO 22 18 sul telecomando per mostrare le seguenti informazioni TIPO DI PROGRAMMA FREQUENZA AUDIO DATA ORA CD 1 Premere CD USB per passare in modalità...

Page 79: ...sul piatto 6 Sollevare la leva in modo che il braccio del pickup si muova dal suo supporto Muovere il braccio del pickup verso il bordo del disco e utilizzare di nuovo la leva per abbassarlo delicatamente sul disco 7 Impostare il volume 8 Quando il braccio del pickup raggiunge la fine del disco torna automaticamente al supporto e il giradischi si ferma 9 Premere POWER per spegnere il dispositivo L...

Page 80: ...nello di controllo o PLAY PAUSA sul telecomando per 2 secondi Riproduzione in modalità MP3 1 Premere PLAY PAUSA per avviare o interrompere la riproduzione del titolo selezionato 2 Durante la riproduzione del brano i numeri di canzone e cartella selezionate vengono mostrati sul display 3 Premendo STOP è possibile arrestare la riproduzione in ogni momento Durante la riproduzione CD USB premere ripet...

Page 81: ...e fallisce se si preme STOP durante la procedura 3 Registrazione di vinili Inserire il supporto USB nell apposito ingresso Premere PHONO AUX IN Riprodurre il vinile e premere due volte RECORD per avviare la registrazione Premere STOP per arrestare la registrazione 4 Registrazione AUX IN Inserire il supporto USB nell apposito ingresso Collegare il dispositivo esterno alla connessione AUX sul retro ...

Page 82: ... smaltire i vecchi dispositivi con i rifiuti domestici Grazie al corretto smaltimento dei vecchi dispositivi si tutela il pianeta e la salute delle persone da possibili conseguenze negative Il riciclo di materiali aiuta a diminuire il consumo di materie prime Dichiarazione di conformità Produttore Chal Tec GmbH Wallstraße 16 10179 Berlino Germania Questo prodotto è conforme alle seguenti direttive...

Page 83: ......

Page 84: ......

Reviews: