Audiovox D1817PK - DVD Player - 8, Instruction Manual
The Audiovox D1817PK is an 8" portable DVD player, perfect for on-the-go entertainment. This product comes with a comprehensive Instruction Manual that provides detailed guidance for optimal use. You can easily download the manual for free from our website, ensuring a seamless user experience.
Share
Download


Reviews:
No comments
Related manuals for D1817PK - DVD Player - 8

SLS232C - PORT. COMPACT DISC
Brand: Panasonic Pages: 8

Diga DMR-EZ47VEB
Brand: Panasonic Pages: 2

AJ-HPM200
Brand: Panasonic Pages: 2
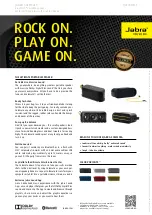
SOLEMATE MAX
Brand: Jabra Pages: 2

PMA505622
Brand: Powermate Pages: 12

GS 5.6A
Brand: Wacker Neuson Pages: 42

THE V-CLIP PRO
Brand: Visual Land Pages: 10

ESL 2805
Brand: QUAD Pages: 20

M-20CD
Brand: Monacor Pages: 25

SP-GG350
Brand: STEELE PRODUCTS Pages: 56

QT06030GNSNR
Brand: Generac Power Systems Pages: 72

NVR-472U
Brand: Nevir Pages: 21

Xemio-861
Brand: LENCO Pages: 143

LMD-6708Y
Brand: Axion Pages: 25

G900X/G950
Brand: Denon Pages: 35

24082
Brand: ELCOS Pages: 36

DVD619
Brand: Philips Pages: 55

DVD 22
Brand: Harman Kardon Pages: 61


