Preface
Thank you for buying the Speed Wi-Fi HOME L01 (simply called “the product” from here on).
Before using the product, be sure to read the “Quick Start Guide” (this manual) and “Notes on usage” to ensure correct use. After
reading, store the manuals in a safe place for future reference.
Packaged items
Before start using the product, make sure that you have all the following packaged with the product.
●
Speed Wi-Fi HOME L01
main unit
●
Speed Wi-Fi HOME
AC adapter
●
Ethernet cable
(sample)
● 保証書(本体)
(Warranty)
(for main unit) (Japanese)
● 無線
LAN
初期設定
(Wireless LAN
Initialization) sticker (Japanese)
● はじめてガイド
(Quick Start Guide) (Japanese)
● ご利用にあたっての注意事項
(Notes on usage) (Japanese)
●
AC
アダプタ取扱説明書/保証書
(Manual/Warranty for AC adapter) (Japanese)
* Keep the included accessories including warranty at hand
.
About Instruction Manual
■
Instruction manual
In the “Quick Start Guide” (this manual), the basic operations and settings for using the product are explained.
■
“
取扱説明書 詳細版
(Full instruction manual)” (Japanese)
“
取扱説明書 詳細版
(Full instruction manual)” (Japanese) which describes the detailed explanations for various functions is available
on the au homepage.
http://www.au.kddi.com/support/mobile/guide/manual/
•
PDF file of “
取扱説明書 詳細版
(Full instruction manual)” (Japanese) is also stored in the product.
To view, connect the product and a PC, etc. via wireless LAN (Wi-Fi
®
) or Ethernet cable (sample)
→
Activate a web browser
→
Enter
“http://speedwifi.home ” in the address field
→
In “
言語
(Language)” list, select “English”
→
Login
→
“Help”
→
“Please refer to the
manual”.
*For instructions on how to log in, refer to “Activating Speed Wi-Fi HOME setting tool” in this manual.
•
In this manual, descriptions are written on the assumption that you are skilled in basic operations of Windows PC/Mac or each game
console. For operations of PC or each game console, refer to the manual of the PC or the game console.
•
Illustrations and screen shown in this manual may look different from the actual ones. In some cases minor details or a part of a
screen may be omitted.
•
In this manual, “au Micro IC Card (LTE)” is referred to as “au IC card”.
Using the product
•
Before using the product, be sure to read the “Safety Precautions (Observe Strictly)” of “Notes on usage” to ensure correct use.
•
Before you assume that the product is malfunctioning, check for possible remedies in “Troubleshooting” in this manual.
•
During communication, keep farther than 20 cm away from your body without any metals between them.
•
Communication is not possible even inside the service area in places where the signal does not reach (e.g. tunnels and basements).
Also, communication is sometimes not possible in poor reception areas. Communication is sometimes interrupted if you move into a
poor reception areas during communications.
•
Since the product uses radio waves, the possibility of communication intercepts by third parties cannot be eliminated (Though
WiMAX 2+ and LTE system has highly secure confidential communication features).
•
This product is designed for use in Japan only and cannot be used in any other country.
•
Since the product is a radio station under the Radio Law, you may be asked to temporarily submit the product for inspection in
accordance with the Radio Law.
•
The IMEI information of the product is automatically sent to KDDI CORPORATION for maintenance and monitoring operational status.
•
The Company is not liable for any damages arising from earthquakes, lightning, storms, floods or other natural disasters, as well as
fires, actions by third parties, other accidents, intentional, mistaken, or incorrect use by the customer, or use under other unusual
conditions outside the responsibility of the Company.
•
The Company is not liable for any incidental damages (change/disappearance of described content, loss of business income,
disruption of business, etc.) arising from use of or inability to use the product.
•
The Company is not liable for any damages arising from failure to observe the described content of the “Instruction Manual”.
•
The Company is not liable for any damages arising, for example, from malfunction caused by combination with connected devices or
software not related to the Company.
•
Settings etc. may sometimes be altered or lost due to faults, repair or other handling of the product. The Company is not liable for any
damage or lost income resulting from the alteration or loss of these data.
•
It is recommended you keep a copy of important data on your computer’s hard disk, etc. Whatever the cause of the defect or
malfunction may be, the Company assumes no responsibility for alteration or loss of saved data.
•
You can use the product under the WiMAX 2+ network environment. However, UQ Communications Inc., is not liable for the quality of
the product.
•
Contents registered in the product might be altered or lost in an accident, fault, repair or mishandling. Be sure to keep a copy of
important contents. Note that Company assumes no responsibility for any damages or lost profits resulting from altered or lost
contents.
•
Do not discard the product together with general garbage. Please cooperate in the collection of the product (including optional
accessories) when it is no longer needed to protect the environment and effectively use resources. Old products are collected at au
shops and other places.
* “The Company” as appears in the manual refers to the following companies:
Sold by: KDDI CORPORATION·OKINAWA CELLULAR TELEPHONE COMPANY
Imported by: HUAWEI Technologies Japan K.K.
Manufactured by: HUAWEI TECHNOLOGIES CO., LTD
* Reproduction of the content of this manual in part or in whole is prohibited.
* The content of this manual is subject to change without notice.
* Every effort has been made in the preparation of this manual. Should you notice any unclear points, omissions, etc., feel free to
contact us.
Factory default settings
■ 無線
LAN
初期設定
(Wireless LAN Initialization) sticker (Japanese)
For connecting the product with wireless LAN (Wi-Fi
®
) devices such as PC or game console (wireless LAN (Wi-Fi
®
)
devices), entering the SSID1 network name (SSID) and security key (password) is required. For connecting to
wireless LAN (Wi-Fi
®
) devices, see “Connecting with wireless LAN (Wi-Fi
®
) using Easy settings” in this manual.
The SSID1 network name (SSID) and security key (password) are printed on the
無線
LAN
初期設定
(Wireless LAN Initialization) sticker (Japanese) (by default).
The sticker is needed to connect the product and wireless LAN (Wi-Fi
®
) devices
by default or when you reset the product. Keep it for example by attaching
on the right section and refer if it is necessary. You can also check the SSID1
network name (SSID) and security key (password) on the bottom of the main
unit.*
1
*1 To check SSID2 information, select “Settings” in Speed Wi-Fi HOME setting
tool
→
”LAN settings”
→
In the menu of ”Security Settings 2.4GHz” or ”Security
Settings 5GHz”, turn “SSID2 Module” to “On”
→
”Apply”
→
”OK”
→
”Continue”.
Paste the
無線
LAN
初期設定
(Wireless LAN Initialization)
sticker (Japanese) to this
position in the included
“
はじめてガイド
(Quick Start
Guide)” (Japanese) and
store it in a safe place.
■
To initialize the settings (reset)
With the power of the product turned on, press Reset button for over approximately two seconds with a fine-tipped
object to initialize the settings.
* If you reset the product, your settings will be all cleared. Please be careful to use this function.
Before using the product
You can perform data communication via WiMAX 2+ or LTE system with the product. Select the following
communication modes to use.
•
High Speed Mode : Connects to WiMAX 2+ network
•
High Speed Plus Area Mode : Connects to WiMAX 2+ network or LTE network
What you can do with Speed WI-FI HOME L01
You can connect wireless LAN (Wi-Fi
®
) devices such as PCs or game consoles up to 40 devices at the same time (up
to 20 for 2.4 GHz/5 GHz respectively) via wireless LAN (Wi-Fi
®
) function or connect a PC using included Ethernet
cable (sample). Also the data communication via Internet connection using WiMAX 2+ or LTE system is available
(best effort*
1
) from connected devices through the product.
*1: Communication speed may not reach the maximum value depending on connection environment. Also, with some devices or
game consoles etc., communication or online matchup games may not be operated correctly.
* The product automatically determines most suitable network at that time to connect.
■
Connecting via wireless LAN (Wi-Fi
®
)
How to connect PCs or game consoles, etc. via
wireless LAN (Wi-Fi
®
) is described in this manual.
■
Connecting via Ethernet cable (sample)
*You can use the wireless LAN (Wi-Fi
®
) connection and
LAN connection at the same time. Up to 42 devices in
total can be connected.
Mode/Update indicator
Color and pattern
Status
Lights in green
High Speed Mode
Lights in yellow
High Speed Plus Area Mode
Blinks in yellow (quick)
Error in switching the communication mode
* It blinks three time in yellow, and then returns to the LED indication (light in green or yellow) for
the previous communication mode.
Lights in red
Update detected
Blinks in red (slow)
Updating
Blinks in red (quick)
Software is not detected while updating/Failed to download
* It blinks three time in red, and then returns to the previous LED indication.
Status indicator
Color and pattern
Status
Off
Power off
Lights in green
Power on/WAN IP address acquired/Connected normally
Blinks in green (quick)
Establishing WPS connection (2.4 GHz band)
Blinks in green (slow)
Establishing WPS connection (5 GHz band)
Lights in yellow
Activate system/Connect to WAN
Blinks in yellow (slow)
Exceeded the amount of specified data communication limit
* Setting is required to receive notification of amount of data communication.
Lights in red
Out of service area/au IC card is not inserted/Abnormity in au IC card/Connection error by PIN
lock etc.
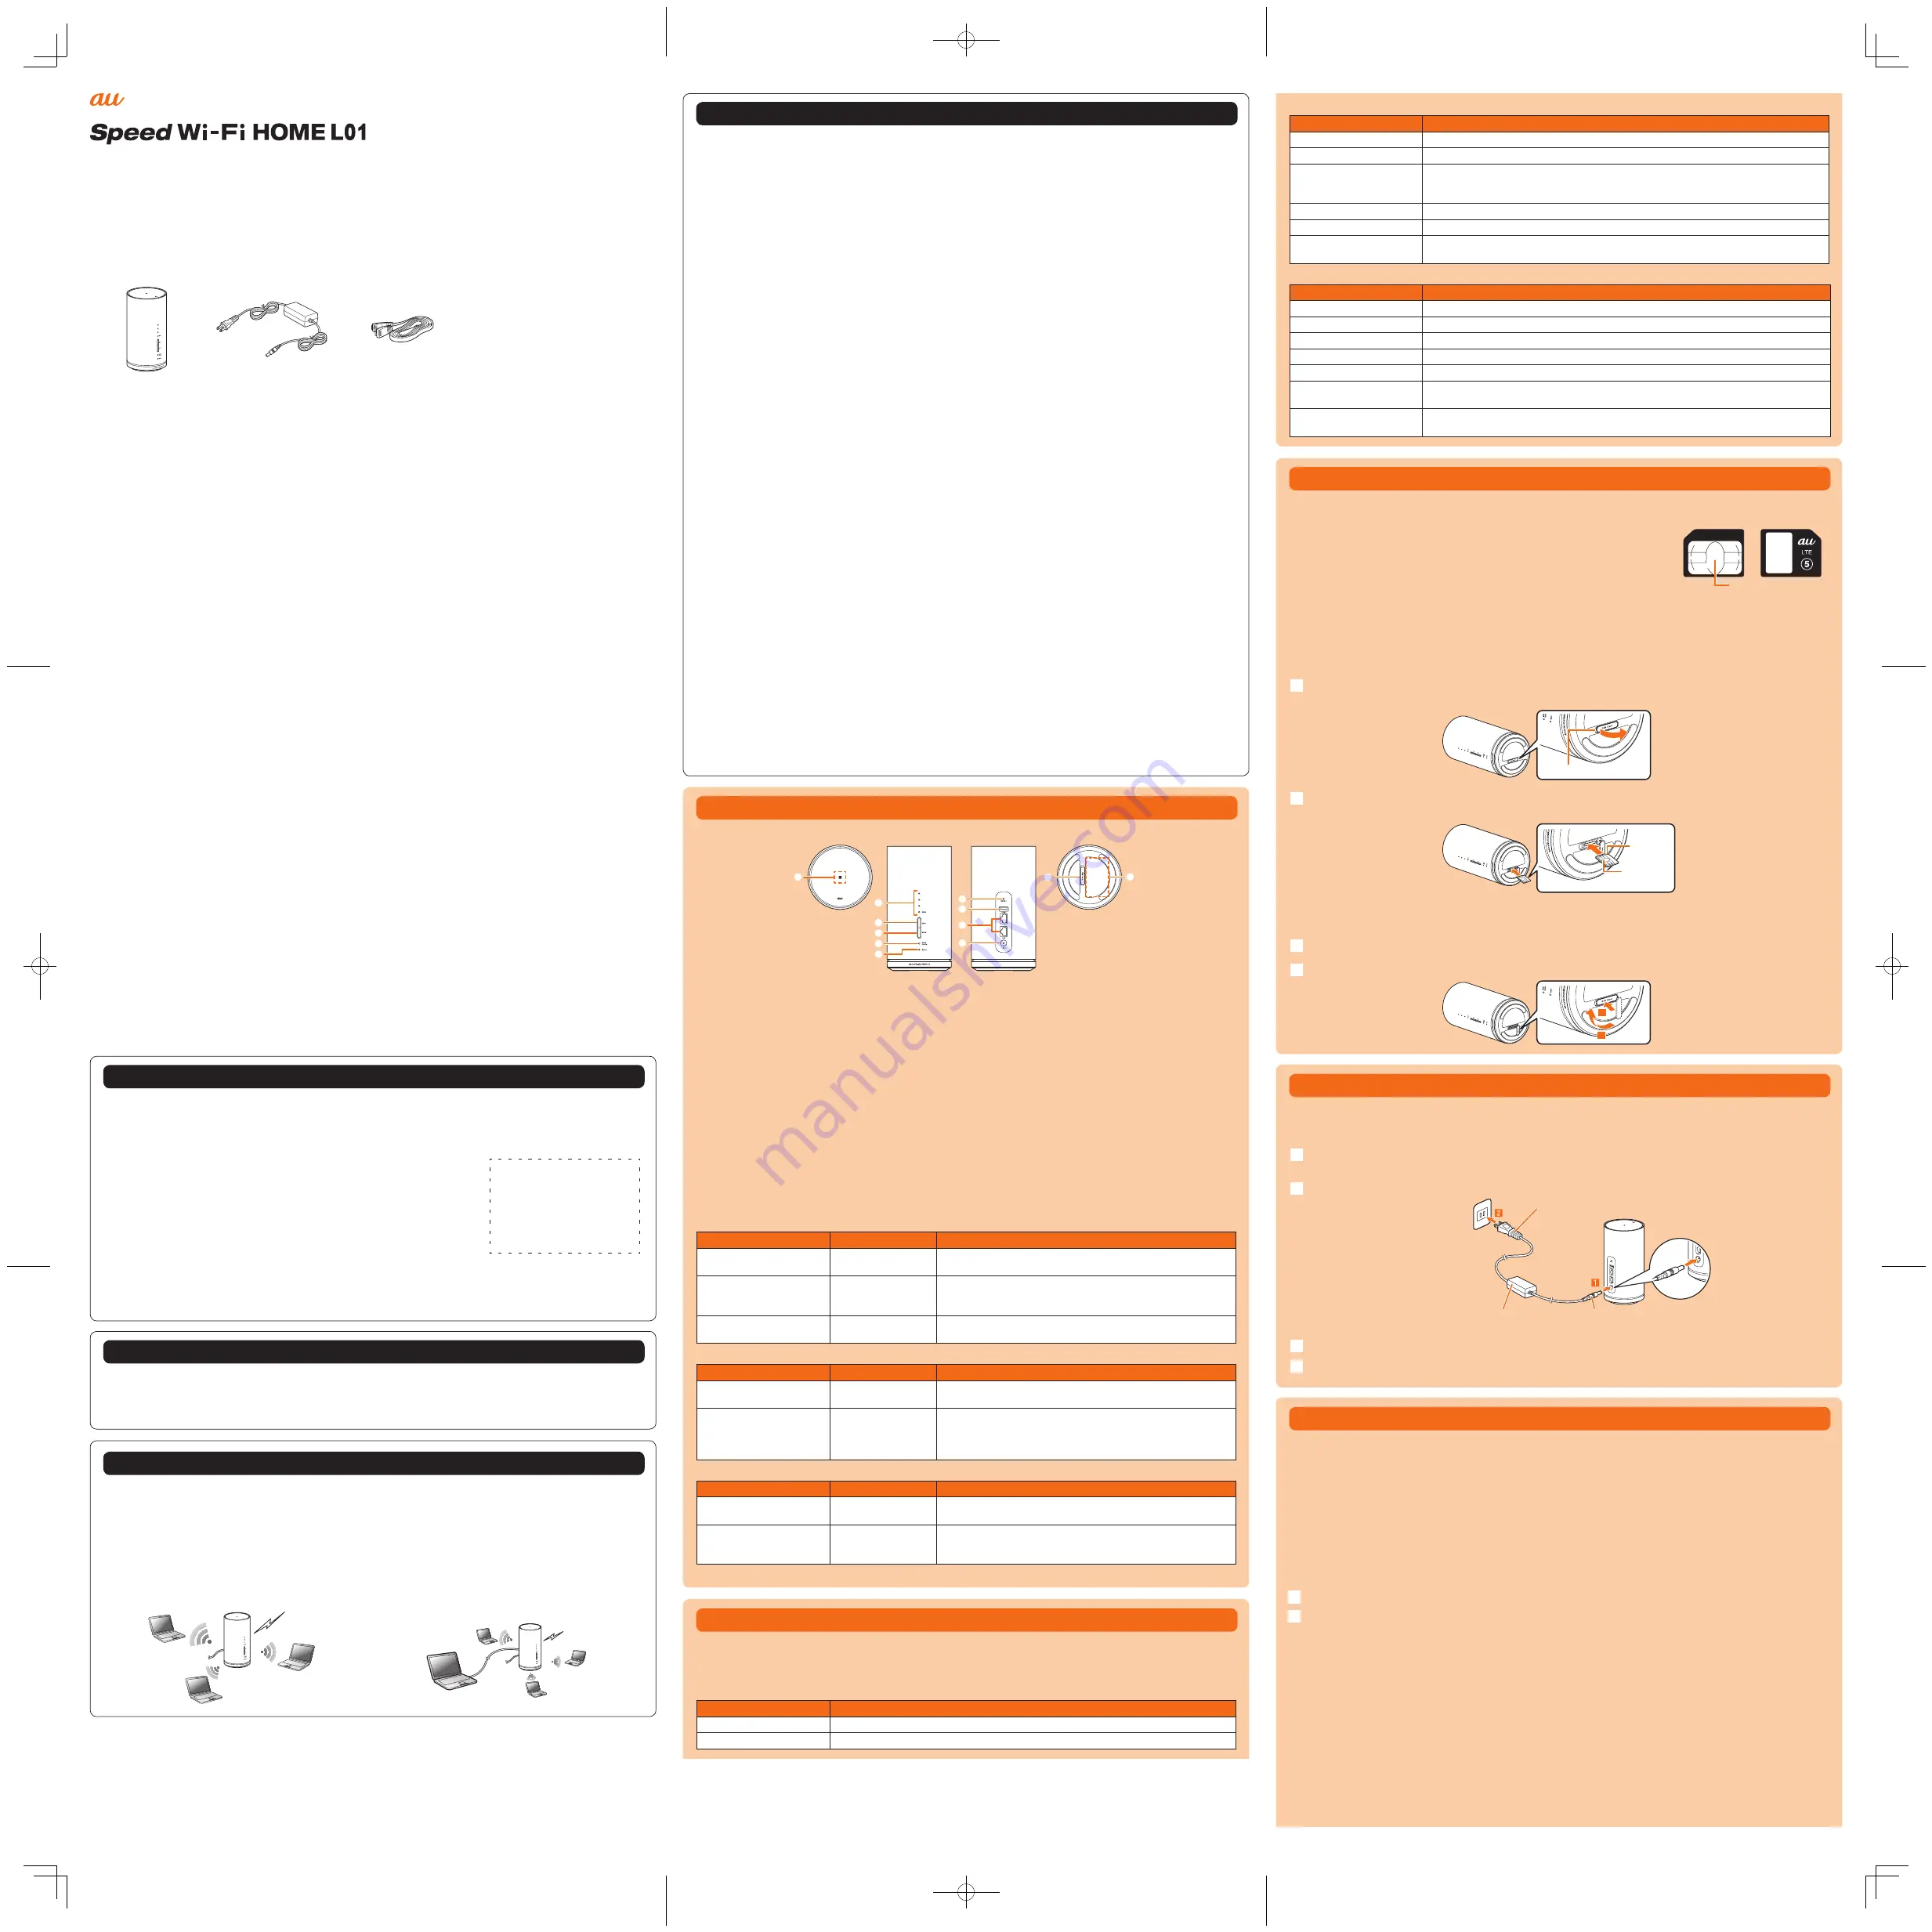
Attaching au IC card
Your phone number etc. is recorded in the au IC card.
The product is compatible with au Micro IC Card (LTE).
* Do not insert IC card with a conversion adapter.
* Although the phone number is stored to the au IC card as customer information,
phone call etc. is not available with the product.
* Note the following points, otherwise handling the au IC card may cause
malfunction or damage.
IC (metal) part
(Front)
(Back)
au Micro IC Card (LTE)
・
Do not touch the IC (metal) part of the au IC card
・
Insert in the correct direction.
・
Do not force to attach or remove.
Before attaching the au IC card, make sure to turn the product off. au IC card is not recognized on the product if it
is attached when the product turned on.
Open the Micro IC Card slot cover
Put your finger (nail) on the concave part on the side of the cover and pull in the direction of the arrow.
Concave part
Insert au IC card into the Micro IC Card slot
With the IC (metal) part facing up, confirm the orientation with the notch shown, then insert until it clicks.
Notch
IC (metal)
part
•
For removing, slowly push the au IC card all the way inside until it clicks, and then put it back touching with your finger.
Keep your finger on the au IC card because it pops out a little. After that, slowly pull out the au IC card straight from the
slot. Be careful not to pull out forcedly while the card is in locked state.
Align the Micro IC Card slot cover with the Micro IC Card slot
Press the Micro IC Card slot cover lightly
3
4
Quick Start Guide
Turning the power on/off
The product has no power button. To power on, connect the Speed Wi-Fi HOME AC adapter to the product and
then connect the power plug to an outlet.
■
Turning the power on
Connect the DC plug of Speed Wi-Fi HOME AC adapter to the power terminal of the product
Insert it straight all the way.
Insert the power plug of Speed Wi-Fi HOME AC adapter into an AC 100V outlet
Power plug
Speed Wi-Fi HOME AC adapter
DC plug
■
Turning the power off
Remove the power plug of Speed Wi-Fi HOME AC adapter from the outlet
Pull out the DC plug of Speed Wi-Fi HOME AC adapter straight from the product
Operating Environment for Wireless LAN (Wi-Fi
®
)/LAN Connection
The operating environment for wireless LAN (Wi-Fi
®
) connection/LAN connection with the product are as follows (as
of December 2016).
■
Compatible devices
PC, iPhone, iPod touch, iPad, iPad mini, smartphone, game console, etc. compatible with IEEE802.11a/b/g/n/
ac wireless LAN (Wi-Fi
®
) standards
Windows PC/Mac with LAN port
■
Compatible OS (PCs)
Windows Vista (32-bit/64-bit)
Windows 7 (32-bit/64-bit)
Windows 8 (32-bit/64-bit)
Windows 8.1 (32-bit/64-bit)
Windows 10 (32-bit/64-bit)
Mac OS X 10.5 (32-bit/64-bit)
Mac OS X 10.6 (32-bit/64-bit)
Mac OS X 10.7 (32-bit/64-bit)
Mac OS X 10.8 (64-bit)
Mac OS X 10.9 (64-bit)
Mac OS X 10.10 (64-bit)
Mac OS X 10.11 (64-bit)
macOS Sierra 10.12 (64-bit)
For each OS, Japanese version/English version is supported.
■
Memory
Windows Vista: 1 GB or more is recommended (512 MB or more is required)
Windows 7: 1 GB or more is required (32-bit), 2 GB or more is required (64-bit)
Windows8/8.1: 2 GB or more is required
Windows10: 1 GB ore more is required (32-bit), 2 GB or more is required (64-bit)
Mac: 512 MB or more is recommended (256 or more is required)
■
Hard Disk
100 MB or more is recommended (50 MB or more free space ire required)
Windows 8/8.1: 2 GB or more free space is required
Windows 10: 16 GB or more free space is required (32-bit), 20 GB or more free space is required (64-bit)
■
Screen resolution
1024 x 768 or more is recommended
■
LAN port
10BASE-T, 100BASE-TX, 1000BASE-T
■
Compatible browser (for Speed Wi-Fi HOME setting tool)
Microsoft Internet Explorer 8.0 - 11.0
Microsoft Edge
Safari 6.0 - 9.0
Firefox 24.0 - 44
Chrome 10 - 48
Opera 11 - 35
iOS 6.0 - 10.0 standard browser (compatible with Speed Wi-Fi HOME setting tool for smartphone)
Android 4.1, 4.2, 4.3, 4.4, 5.0, 5.1, 6.0, 7.0 standard browser/Chrome (compatible with Speed Wi-Fi HOME
setting tool for smartphone)
Use outside these environments may affect performance. Also, even if an operating environment is applicable,
the product may not work properly depending on your using environment (PC, connected peripheral devices,
applications, etc.). Operation may not be performed properly depending on web browser settings such as proxy or
security in Internet options.
* For PC support, OS version upgrade information, etc., see corresponding manufacturer’s manual and follow the
instructions.
Names and functions of parts
①
②
③
④
⑦
⑧
⑩
⑪
⑨
⑤
⑥
Top
Front
Back
Bottom
⑫
①
NFC scanning area
Use NFC function to establish a wireless LAN (Wi-Fi
®
)
connection.
②
Signal indicator
Indicate reception strength of WiMAX 2+ or LTE signal.
③
WPS button
Use this button to connect WPS compatible devices
via wireless LAN (Wi-Fi
®
).
④
Mode button
Switch communication modes.
⑤
Mode/Update indicator
Indicate the communication mode or update
notification.
⑥
Status indicator
Indicate the status of the product.
⑦
Reset button
Reset to the factory default.
⑧
USB connection terminal (for extension)
Not usable
⑨
LAN connection terminal
Used for connecting a PC etc. via Ethernet cable
(sample).
⑩
Power terminal
Connect Speed Wi-Fi HOME AC adapter.
⑪
Micro IC Card slot
Attach au IC card.
⑫
Label
Check SSID, security key (password), IMEI, etc. Do
not remove it.
■
Button operations
WPS button
Operation
Function
Description
Press (within approximately
one second)
Turn on LED indicators LED indicator indicates the status of the product with the lighting
color and pattern.
Press and hold for
approximately one to five
seconds
WPS connection
(2.4 GHz band)
Connects to 2.4 GHz compatible device by WPS. Status indicator
blinks rapidly in green.
Press and hold for over
approximately five seconds
WPS connection
(5 GHz band)
Connects to 5 GHz compatible device by WPS. Status indicator
flashes slowly in green.
Mode button
Operation
Function
Description
Press (within approximately
one second)
Turn on LED indicators LED indicator indicates the status of the product with the lighting
color and pattern.
Press and hold for over
approximately one second
Switch communication
modes
Switches between High Speed Mode and High Speed Plus Area
Mode.
* Note that additional given charge is incurred when switching to
High Speed Plus Area Mode.
Reset button
Operation
Function
Description
Press (within approximately
one second)
Turn on LED indicators LED indicator indicates the status of the product with the lighting
color and pattern.
Press and hold for over
approximately two seconds
Reset to the factory
default
With the power of the product turned on, press Reset button with a fine-
tipped object.
Alternatively, you can reset using Speed Wi-Fi HOME setting tool.
* Press and hold the WPS button and Mode button for over approximately one second at the same time to start updating.
LED indicators
The status of the product can be notified with the LED color and the lighting pattern.
•
The LED indicator turns off automatically after the elapse of a certain period of time (except for update notification or error).
Press any button (within approximately one second) to turn on again.
•
You can change the lighting time of indicators.
Signal indicator
Color and pattern
Status
Off
LTE/WiMAX 2+ signal level is 0, out of service area, or au IC card not inserted
Light in green (1 - 4)
LTE/WiMAX 2+ connected (Signal level: 1 - 4)
Connecting via wireless LAN (Wi-Fi
®
)
Connect the product and wireless LAN (Wi-Fi
®
) devices (PCs, game consoles, etc.) via wireless LAN (Wi-Fi
®
) to
perform data communication.
* Use “SSID1 (WPA2/WPA)” of the product.
In this manual, connecting methods with the following wireless LAN (Wi-Fi
®
) devices are explained.
•
Windows PC
•
Mac
•
Nintendo 3DS LL/3DS/DSi LL/DSi
•
Smartphone
•
iPhone/iPod touch/iPad/iPad mini
* Set up to establish wireless LAN (Wi-Fi
®
) connections when the product is connected to each wireless LAN (Wi-Fi
®
)
device for the first time. Once you set up connection, the connection for the device resumes automatically from the
second time (when you set “Connect automatically”, “Save the setting”, etc. on the wireless LAN (Wi-Fi
®
) device).
Power on the product
Turn on wireless LAN (Wi-Fi
®
) function on a wireless LAN (Wi-Fi
®
) device
■
For Windows 10
From “
スタート
(Start)” menu, “
設定
(Settings)”
→
“
ネットワークとインターネット
(Network & Internet)” to turn on
Wi-Fi
■
For Windows 8.1
Swipe from the right end of desktop screen (for mouse operation, point at the upper right of the screen), “
設定
(Settings)”
→
Select the Wi-Fi icon
→
Turn on Wi-Fi
■
For Windows 8
Swipe from the right end of desktop screen (for mouse operation, point at the upper right of the screen), “
設定
(Settings)”
→
“PC
設定の変更
(Change PC settings)”
→
“
ワイヤレス
(Wireless)”
→
Turn on a wireless device
■
For Windows 7
From the “
スタート
(Start)” menu, select “
コントロールパネル
(Control Panel)”, then select “
ネットワークとイン
ターネット
(Network and Internet)”
→
“
ネットワークと共有センター
(Network and Sharing Center)”
→
“
ネットワー
クに接続
(Connect to a network)”
■
For Mac
From the Apple menu, “System preferences...”
→
“Network”
→
“Wi-Fi”
→
“Turn Wi-Fi On”