Atag WIZE, User Manual
The Atag WIZE user manual is your ultimate guide to unlocking the full potential of this innovative product. Available for free download at manualshive.com, this comprehensive manual is your go-to resource for understanding every feature and maximizing your experience with the Atag WIZE.
Share
Download


Reviews:
No comments
Related manuals for WIZE
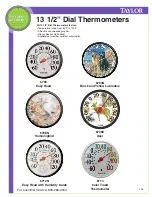
6700
Brand: Taylor Pages: 3

FLUSH ON/OFF THERMOSTAT 2
Brand: QUBINO Pages: 51

MC 785D
Brand: VDH Pages: 20

9725i2
Brand: Robertshaw Pages: 2

REFERENCE THERMAPEN
Brand: ETI Pages: 2

CHOICE RSTAT5
Brand: Sangamo Pages: 4

ProAccurate DTF572
Brand: CDN Pages: 4

T2900SCH
Brand: Venstar Pages: 1

PXA R
Brand: AERMEC Pages: 8

eT210B
Brand: ennoLogic Pages: 16

Comfort Window
Brand: Honeywell Pages: 23

CM921
Brand: Honeywell Pages: 7

CM701
Brand: Honeywell Pages: 2

Chronotherm IV T8602D
Brand: Honeywell Pages: 12

CM721
Brand: Honeywell Pages: 12

CM702
Brand: Honeywell Pages: 7

CM701
Brand: Honeywell Pages: 7

CHRONOTHERM IV T8624D
Brand: Honeywell Pages: 12


