Step 1
Connection to the router
Quick Guide
. . . . . . . . . . . . . . . . . . . . . . . . . . . . . . . . . . . . . . . . . . . . . . . . . . . . . . . . . . . . . . . . . . . . . . . . . . . . . . . . . . . . . . . . . . . . . . . . . . . . . . . . . . . . . . . . . . . . . . . . . . . . . . . . . . . . . . . . . . . . . . . . . . . . . . . . . . . . . . .
Thank you for choosing
Asante Smoke Detector Kit
For first time installation, please make sure that Asante products and
your router are within close proximity to each other. Once configured, they can be
moved to desired locations.
If you have more than one Smoke Detector, it is
very important to add them one at a time.
Insert battery into one unit, claim on
the app and then move on to the next.
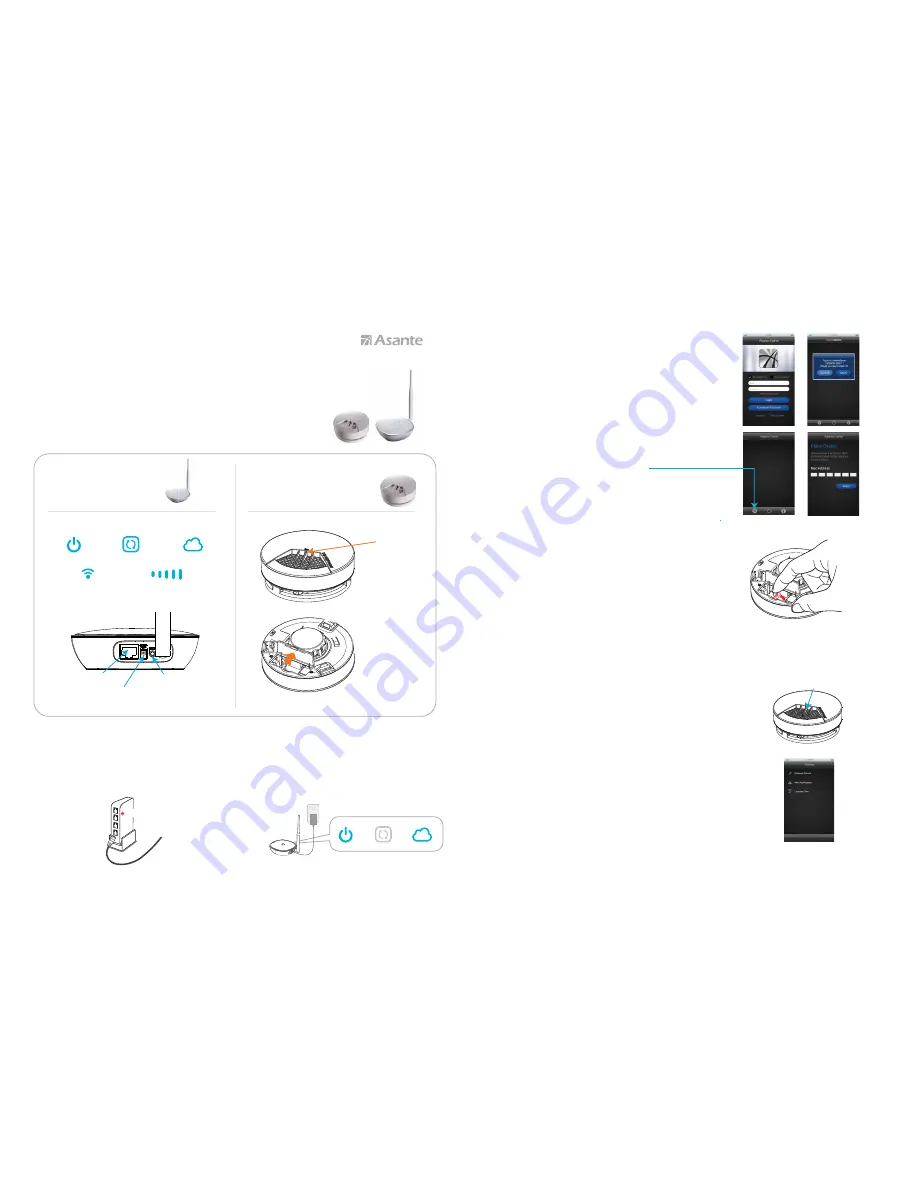
Asante Genie
ports and lights
Asante Smoke Detector
ports and buttons
Using the RJ45 Ethernet cable provided connect
the Asante Genie to a LAN port on your router.
Step 3
Download app and device discovery
Step 2
Power
1. Connect the power to Asante Genie and make sure
power light comes on.
2. Cloud Light comes on usually after 1 to 3 minutes
depending on the internet connection.
*
Connect Smartphone to same WiFi router that Asante Genie
is connected to.
Wireless Pairing Light
WiFi wireless
connectivity light
Signal Strength
Light for Wireless
Test Button
(LED Light)
Test Button
Inserting battery
into Smoke Detetor
Cloud Light
Power
1. Download free app from Apple Store or Google Play
Simply search for Asante Genie
2. Create an account and sign in
3. Claim your first Asante Genie when prompted
* If your Smartphone can not connect to same WiFi router, use the
procedure below to manually add the device.
1. Login to app and click the + sign as shown
2. Enter the MAC address that appears on the back of Asante Genie in
the fields provided and click on apply.
Step 4
Setup of Smoke Detector
Step 5
Location test and mounting instruction
Ethernet port
to connect to your
personal router
Power
Factory default reset button
( hold down for 6 seconds
to reset to default )
Cable/Phone Jack
1. Remove the base from the smoke detector
2. Insert battery into smoke detector and close the lid. Inside the
battery compartment there is a red lever that will be pushed down
when inserting the battery.
3. Claim your first Smoke Detector when prompted in the app.
4. Before installing additional Smoke Detectors, rename the one
that you just installed. This way each Smoke Detector will have
a specific name.
Repeat steps 1-4 for any additional Smoke Detectors you might have.
1. Login to app using your Smartphone and enter the setting page
for Smoke Detector. click on Location Test button as shown
2. Press the test button on the Smoke Detector and make sure you
receive a test response on your app
3. Now move the Smoke Detector to the location that it will be installed
4. Repeat steps 1-3 to make sure Smoke Detector is still within
the communication range. If you received a response on the app,
then you are done. Proceed with mounting of the unit.
5. If you do not get a response from Smoke Detector at the location
that the unit needs to be installed, then consider relocating Asante Genie.
To do this, please see step 7.
To ensure a reliable communication between the Smoke Detector and
Asante Genie, the following steps should be taken. It is a good idea to do
the test holding the Smoke Detector in an upside down position just like
if it was attached to ceiling.
__________________________________________________