background image


1


INTRODUCTION 

 
1-1 Unpacking and Inspection 


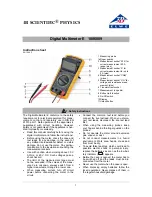
Upon removing your new Clamp Multimeter from its packing, you should have the following items: 
 
1. Clamp Multimeter. 

2. Test lead set  (one black, one red). 

3. Carrying case. 

4. Instruction manual. 
 

1-2 Meter Safety 


Terms as Marked on Equipment 


ATTENTION

 — Refer to manual 


DOUBLEINSULATION 

— Protection Class II 


DANGER

 — Risk of electric shock. 

Summary of Contents for 39MR

Page 1: ...r from its packing you should have the following items 1 Clamp Multimeter 2 Test lead set one black one red 3 Carrying case 4 Instruction manual 1 2 Meter Safety Terms as Marked on Equipment ATTENTION Refer to manual DOUBLEINSULATION Protection Class II DANGER Risk of electric shock ...

Page 2: ...ntrols and connectors 1 Digital Display The digital display has a 3 3 4 digit LCD readout maximum reading 3999 plus auto polarity decimal point AC DC and unit annunciators 2 Input Terminal The black test lead is always connected to the COM input jack and the red test lead is always connected to the V Ω input jack when measuring voltage or resistance COM input terminal Reference input connector V Ω...

Page 3: ...ver is released the jaws will close again 5 Transformer Jaws Designed to pick up the current flowing through the conductor 6 Hand Guard Designed to protect user for safety 7 PEAK HOLD SWITCH To hold the peak measured positive value For negative value zero is displayed 8 DCA ZERO SWITCH Auto compensate the residual magnetism by pressing this key for A only ...

Page 4: ...4 Figure 1 ...

Page 5: ...ge Indication OL or OL indicated Range Autoranging Measuring Rate 2 times per second nominal Position Error 1 of Reading Type Of Sensing Hall effect sensing for AC and DC Low Battery Indication is displayed when the battery voltage drops below the operating voltage Power Requirement Single 9V battery NEDA 1604 JIS 006p or IEC6LF22 Battery Life 40 hours typical Alkaline ...

Page 6: ...t leads battery installed manual and carrying case 2 2 Environmental Conditions Indoor use Maximum Altitude 2000 Meter Installation Category IEC 1010 1000V CAT II 600V CAT III Pollution Degree 2 Temperature Coefficient 0 2 x spec Acc y C 18 C or 28 C Operating Ambient 0ºC to 45ºC below 80 R H Storage Temperature 20ºC to 60ºC below 80 R H ...

Page 7: ...umber of digits at 23ºC 5ºC less than 80 R H 1 Frequency Hz Range Resolution Accuracy Over Voltage Protection 4KHz 1Hz 0 5 rdg 3 dgt 10KHz 10Hz AC DC 2000A for 1 min Min Input Frequency 20Hz Sensitivity 6A r m s for ACA A 3V r m s to 600V r m s for ACV V ...

Page 8: ...gt 50Hz 500Hz 600V 1V 850V rms Additional error according to crest factor CF CF from 2 to 3 1 4 CF from 3 to 4 3 Input impedance 10MΩ 100pF Conversion type True RMS 3 DCV V Range Resolution Accuracy Overload Protection 400V 0 1V 0 7 rdg 2 dgt 1000V 1V 1000V Input impedance 10MΩ ...

Page 9: ...rotection 4KΩ 1Ω 3 3V 600V r m s 40KΩ 10Ω 1 0 rdg 2 dgt Instant Continuity Description Built in buzzer sound when resistance is less than 100Ω 5 DCA A Range Resolution Accuracy Overload Protection 0 400A 0 1A AC 2000A for 1 min 400 600A 1A 600 1000A 1A 1 9 rdg 5 dgt 1 0 rdg 3 dgt ...

Page 10: ...A 0 1A 1 5 rdg 5 dgt 40 400 Hz 400 600A 1A 600 1000A 1A 2 5 rdg 5 dgt 40 200 Hz AC 2000A for 1 min Additional error according to crest factor CF CF from 2 to 3 1 4 CF from 3 to 4 3 Conversion type True RMS 7 Auto Power off The meter will automatically shut itself off after approximately 10 minutes after function changes 8 Peak Hold 3 rdg 10dgt ...

Page 11: ...nstrument in safe condition 3 1 Precautions and Preparations for measurement 1 If the meter is used near equipment that generates electro magnetic inference the display may be unstable or indicate incorrect measurement values 2 Make sure that the battery is properly connected 3 The instrument should only be operated between 0 C 45 C and at less than 80 R H 4 Do not use or store this instrument in ...

Page 12: ...nt A Frequency measurement by clamp on AC current 1 Set the rotary switch to Hz position 2 Open spring loaded clamp by pressing trigger on left side of meter 3 Position clamp around wire or conductor and release clamp trigger make sure that the clamp is entirely closed The clamp must be positioned around only one conductor of a circuit If the clamp is placed around two or more current carrying con...

Page 13: ...uctors to make the measurement 3 3 AC Voltage Measurement 1 Set the rotary switch at V position 2 Connect the black test lead to the COM terminal on the bottom of the meter and the red test lead to the VΩ terminal You can now place the test probes on the conductors to make the measurement To avoid electrical shock hazard or damage to the meter do not attempt to measure voltage that might exceed 85...

Page 14: ... to the meter do not attempt to measure voltage that might exceed 1000V dc between the common input terminal and earth ground 3 5 Resistance Measurement 1 Set the rotary switch at KΩ position 2 Connect the black test lead to the COM terminal on the bottom of the meter and red test lead to the V Ω terminal 3 Verify that the power to the circuit under test is off Connect test leads to the circuit to...

Page 15: ...r lead and close the clamp to go on with measurements same current direction For DC measurement the reading is positive value when the current flows from the upper side to the lower side of the instrument as Fig 2 4 Position clamp around wire or conductor and release clamp trigger make sure that the clamp is entirely closed The clamp must be positioned around only one conductor of a circuit If the...

Page 16: ...rigger on left side of meter 3 Position clamp around wire or conductor and release clamp trigger make sure that the clamp is entirely closed The clamp must be positioned around only one conductor of a circuit If the clamp is placed around two or more current carrying conductors the meter reading will be FALSE ...

Page 17: ...nt do not use abrasives or solvents 4 2 Battery Installation or Replacement The meter is powered by a single 9V battery Use the following procedure to replace the battery 1 Disconnect the test leads and turn the meter off Remove the test leads from the input terminals 2 Turn the meter power off 3 Position the meter face down and remove the two screws of the case bottom 4 Unsnap the case bottom and...

Page 18: ...18 Figure 2 Battery Replacement Or Installation ...

Reviews: