

1)
After unpacking the stands, check to see that all of the required
parts are present in the correct quantity. Each package contains
enough parts, and hardware to assemble two (2) complete
stands, and one Allen head key tool.
2)
Separate the parts so each stand can be assembled separately.
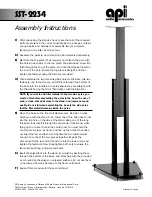
3)
Start with the top plate (6" x 6" square) and attach the pole with
the holes in each side to the top plate. The Allen head screw fits
flush through the top of the plate, and into the threaded insert in
the end of the pole. Ensure the top plate is straight, and then
tighten the fastener using the Allen tool provided.
4)
Then assemble the two remaining side poles to the base. Use two
fasteners, one for each pole, and fit them through the bottom of
the base into the inserts in the poles. Ensure they are straight, with
the thin side facing the front. Then tighten with the Allen tool.
NOTE: If you wish to add filler material to the two side poles, you
must do this before assembling the poles to the base. The use of
sand, or lead shot adds mass to the stand, and improves sound
quality. Be careful when assembling the base to the side poles
that the filler material remains inside the poles.
5)
Place the base on the floor so it stands erect. Decide on what
height you wish the stand to be. Insert one of the Allen head nuts
into the top hole on the side of the stand. Using one of the long
threaded rods, insert it through the other side of the stand, while
lining up the correct hole in the center post. You must hold the
center pole in place by hand, and line up the holes. Once lined
up, insert the rod and then hand tighten the two fasteners just
enough to connect the two pieces together. Repeat the
procedure for the second bolt and rod into the lower hole, and
tighten the fasteners. Now firmly tighten both sets to ensure the
stand is solid, strong, and perpendicular.
6)
Insert the spiked feet into the stand if you wish by inserting them
through the bottom of the base, and attaching with the provided
acorn nuts. Use the spikes on carpeted surfaces, do not use them
on hardwood floors as damage to the floor could result.
7)
Repeat this procedure for the second stand.
Assembly Instructions
SST-2234
Printed in Canada
API Audio Accessories, a Division of Audio Products International Corp.
3641 McNicoll Avenue, Scarborough, Ontario, Canada M1X 1G5
416.321.1800 Fax 416.321.1500


