

SAFETY INSTRUCTIONS
When using an electrical furnishing, basic precau
ti
ons should always be
followed, including the following:
Read all instruc
ti
ons before using (this furnishing).
DANGER
To reduce the risk of electric shock:
1. To reduce the risk of electric shock, always unplug this product
from the electrical outlet before cleaning.
WARNING
to persons:
2. Unplug from outlet before pu
tti
ng on or taking o
ff
parts.
3. Close supervision is necessary when this furnishing is used near
children, invalids or disabled persons.
4. Use this furnishing only for its intended use as described in these
instruc
ti
ons. Do not use a
tt
achments not recommended by the
manufacturer.
5. Never operate this furnishing if it has a damaged cord or plug, if it is
not working properly, if it has been dropped or damaged, or
dropped into water. Return to a service center for examina
ti
on
and repair.
6. Keep the cord away from heated surfaces.
7. Never operate the furnishing with the air openings blocked. Keep
the air openings free of lint, hair, and the like.
8. Never drop or insert any objects into any opening.
9. Do not use outdoors.
10. Do not operate where aerosol (spray) products are being used or
where oxygen is being administered.
11. To disconnect, turn all controls to the o
ff
posi
ti
on, then remove
plug from outlet.
WARNING
12. WARNING: Risk of injury — Keep children away from the furnishing.
13. For loading, always put heavier items towards the center and not
near the edges to help prevent the possibility of the furnishing
ti
pping over.
14a. WARNING: Risk of death or serious injury may occur when
children climb on audio and/or video equipment furniture.
A remote control or toys placed on the furnishing may encourage
a child to climb on the furnishing and as a result the furnishing may
top over onto the child.
14b. WARNING: Risk of death or serious injury may occur. Reloca
ti
ng
audio
and/or
video equipment to furniture not
designed
to support audio and/or video equipment may result in death or
serious injury due to the furnishing collapsing or over turning onto
a child.
SAVE THESE INSTRUCTIONS
SERVICING OF DOUBLE-INSULATED PRODUCTS
In a double-insulated product, two systems of insula
ti
on are provided
instead of grounding. No grounding means is provided on a double-
insulated product, nor is a means for grounding to be added to the
product. Servicing a double-insulated product requires extreme care
and knowledge of the system, and is to be done only by
service
personnel. Replacement parts for a double-insulated product must be
iden
ti
cal to the parts they replace. A double-insulated product
is marked with the words: “DOUBLE INSULATION” or “DOUBLE
INSULATED.” The symbol (square within a square) is also able to be
marked on the product”.
WARNING
15. Warning: Risk of injury — When moving the furnishing from up
to down or vice versa, do not place any parts of the body under the
furnishing and keep underside of furnishing clear of any items that
may obstruct the path.
WARNING
16. Warning: Never a
tt
empt to li
ft
the furnishing alone.
17. This furnishing operates at 24 V DC. The furnishing has a recommended
maximum load capacity of 15kg and is meant to operate under
environmental condi
ti
ons ranging from 5-90% humidity
(non-condensing) and through an ambient temperature of 10 to 35
degrees Celsius.
18. Exceeding these limits can poten
ti
ally damage the furnishing and
void the warranty and/or result in injury to yourself or others.
GETTING STARTED
What’s Included
Your purchase includes:
• 1
Al
ti
zen Worksta
ti
on
• 1
AC/DC Adaptor & Plug
•
And if you have purchased a:
◦
Single Monitor Version: 1 VESA Mount; or
◦
Dual Monitor Version: 1 Dual Bar with 2 VESA Mounts; or
◦
Laptop Version: 1 Laptop Pla
tf
orm
How to Assemble Your Worksta
ti
on
Refer to drawing at the back
1. Open the box and take out the: (1) Base (2) Worksurface
(3) Pillar
(4) Accessories Box. Posi
ti
on the base on the
place the pillar on top and a
tt
ach the pillar onto the base with
the 3
S6
screws provided.
2. Place the now connected pillar and base on its back. Slide the
worksurface underneath the sliding pillar base and a
tt
ach
using 4
S5
screws.
3. Connect the cable connector under the worksurface to the cable
receptacle on the pillar and ensure you hear a “click” sound.
4.
Cover the cable connector by
the small metal plate to the
bite plate using the 2
S4
screws provided.
5.
A
tt
ach the laptop pla
tf
orm onto the sliding mount
of the pillar using 4
S2
screws.
Use 3
S3
screws to a
tt
ach the VESA
bracket onto the sliding mount.
Use 4
S1
screws to a
tt
ach the dual bar into
the sliding mount, use 3
S3
screws to a
tt
ach the VESA bracket onto
each of the plates on the dual bar.
6.
Place the silicon cover over the screws.
A
tt
ach the VESA mount onto the back of
your monitor.
A
tt
ach both VESA mounts onto the back of
both your monitors.
7.
Plug the power adaptor into the DC jack at the back
ofthe
pillar and plug it into your power socket. Turn it on.
Slot your monitor into the VESA
bracket and
ti
ghten the 2 screws underneath.
Slot your monitor into the VESA bracket
and
ti
ghten the 2 screws underneath.
8.
Plug the power adaptor into the DC jack at
the back of the
pillar and plug it into your power socket. Turn it on.
If there’s a need to adjust the distance between
the VESA mounts, loosen the thumbscrews at the top of the VESA
bracket and slide your monitors to the desired posi
ti
on, before
ti
ghtening the screws.
9.
Plug the power adaptor into the DC jack at the
back ofthe
pillar and plug it into your power socket. Turn it on.
Se
tti
ng up Al
ti
zen app on your Mobile Device
iPhone & Android Phone Requirements
iOS (version 8 and above) and Android (version 4.4 and above)
Al
ti
zen app links your Al
ti
zen worksta
ti
on to select mobile devices that
support Bluetooth LE technology. It is available to download for free
from www.al
ti
zen.com or the respec
ti
ve iTunes and Google Play store.
To get started:
1. Download Al
ti
zen app from the iTunes Store or Google Play by
searching for “Al
ti
zen”.
2. Turn on the Bluetooth in the Se
tti
ngs of your phone.
3. Follow the instruc
ti
ons in the app to set up your account.
4. Note that the Al
ti
zen Bluetooth reference should follow the format
"AL xxxxx".
Using Your Worksta
ti
on
1.
You can move your worksta
ti
on either through the control panel
using the “Up”, “Down” or “Pre-Set Height” bu
tt
ons or through the
remote control func
ti
on on Al
ti
zen app.
Light Pre-set
Height
Down
Up
2.
Using the pre-set height
To set the pre-set height for your worksta
ti
on, simply press the up
and down bu
tt
on together on the control panel.
3.
Your worksta
ti
on can detect your presence and this allows it to know
when you’re at your worksta
ti
on and when you’re not. Be careful not to
block the presence sensor opening on the control panel.
4.
Sit-stand reminders
Based on your standing goals, your worksta
ti
on will invite you to shi
ft
posi
ti
ons between si
tti
ng and standing. You will only receive reminders
if you’ve ac
ti
vated the Indicator Light func
ti
on and you are present at
the worksta
ti
on. The reminder is indicated by a so
ft
glowing of the
Al
ti
zen Logo light. To dismiss the reminder, simply press any bu
tt
ons on
the control panel and the light will turn o
ff
. If you don’t respond to the
reminder, the worksta
ti
on will invite you to move again later.
5.
Data tracking
Your worksta
ti
on tracks and displays your ac
ti
vity ove
r ti
me.
Simply sync your phone with your worksta
ti
on to see your progress.
Visualizing your ac
ti
vity helps you set appropriate goals and
mo
ti
vates you towards healthier work habits over
ti
me.
Upda
ti
ng Al
tiz
en
Al
ti
zen may release free updates for your Al
ti
zen Worksta
ti
on.
You can update your Al
ti
zen Worksta
ti
on through the Al
ti
zen app.
Help
Troubleshoo
ti
ng and assistance for your Al
ti
zen Worksta
ti
on can be
found at www.al
ti
zen.com/help-centre/
Return Policy & Warranty
Warranty informa
ti
on and return policy can be found at www.al
ti
zen.com
ALTIZEN GENERAL INFO
& SPECIFICATIONS
Sensors & Motors
Your Al
ti
zen Worksta
ti
on uses integrated sensors that measure your
presence and status in front of the worksta
ti
on. Al
ti
zen also contains a
motor that allows you to move the worksta
ti
on up and down with one
press of a bu
tt
on.
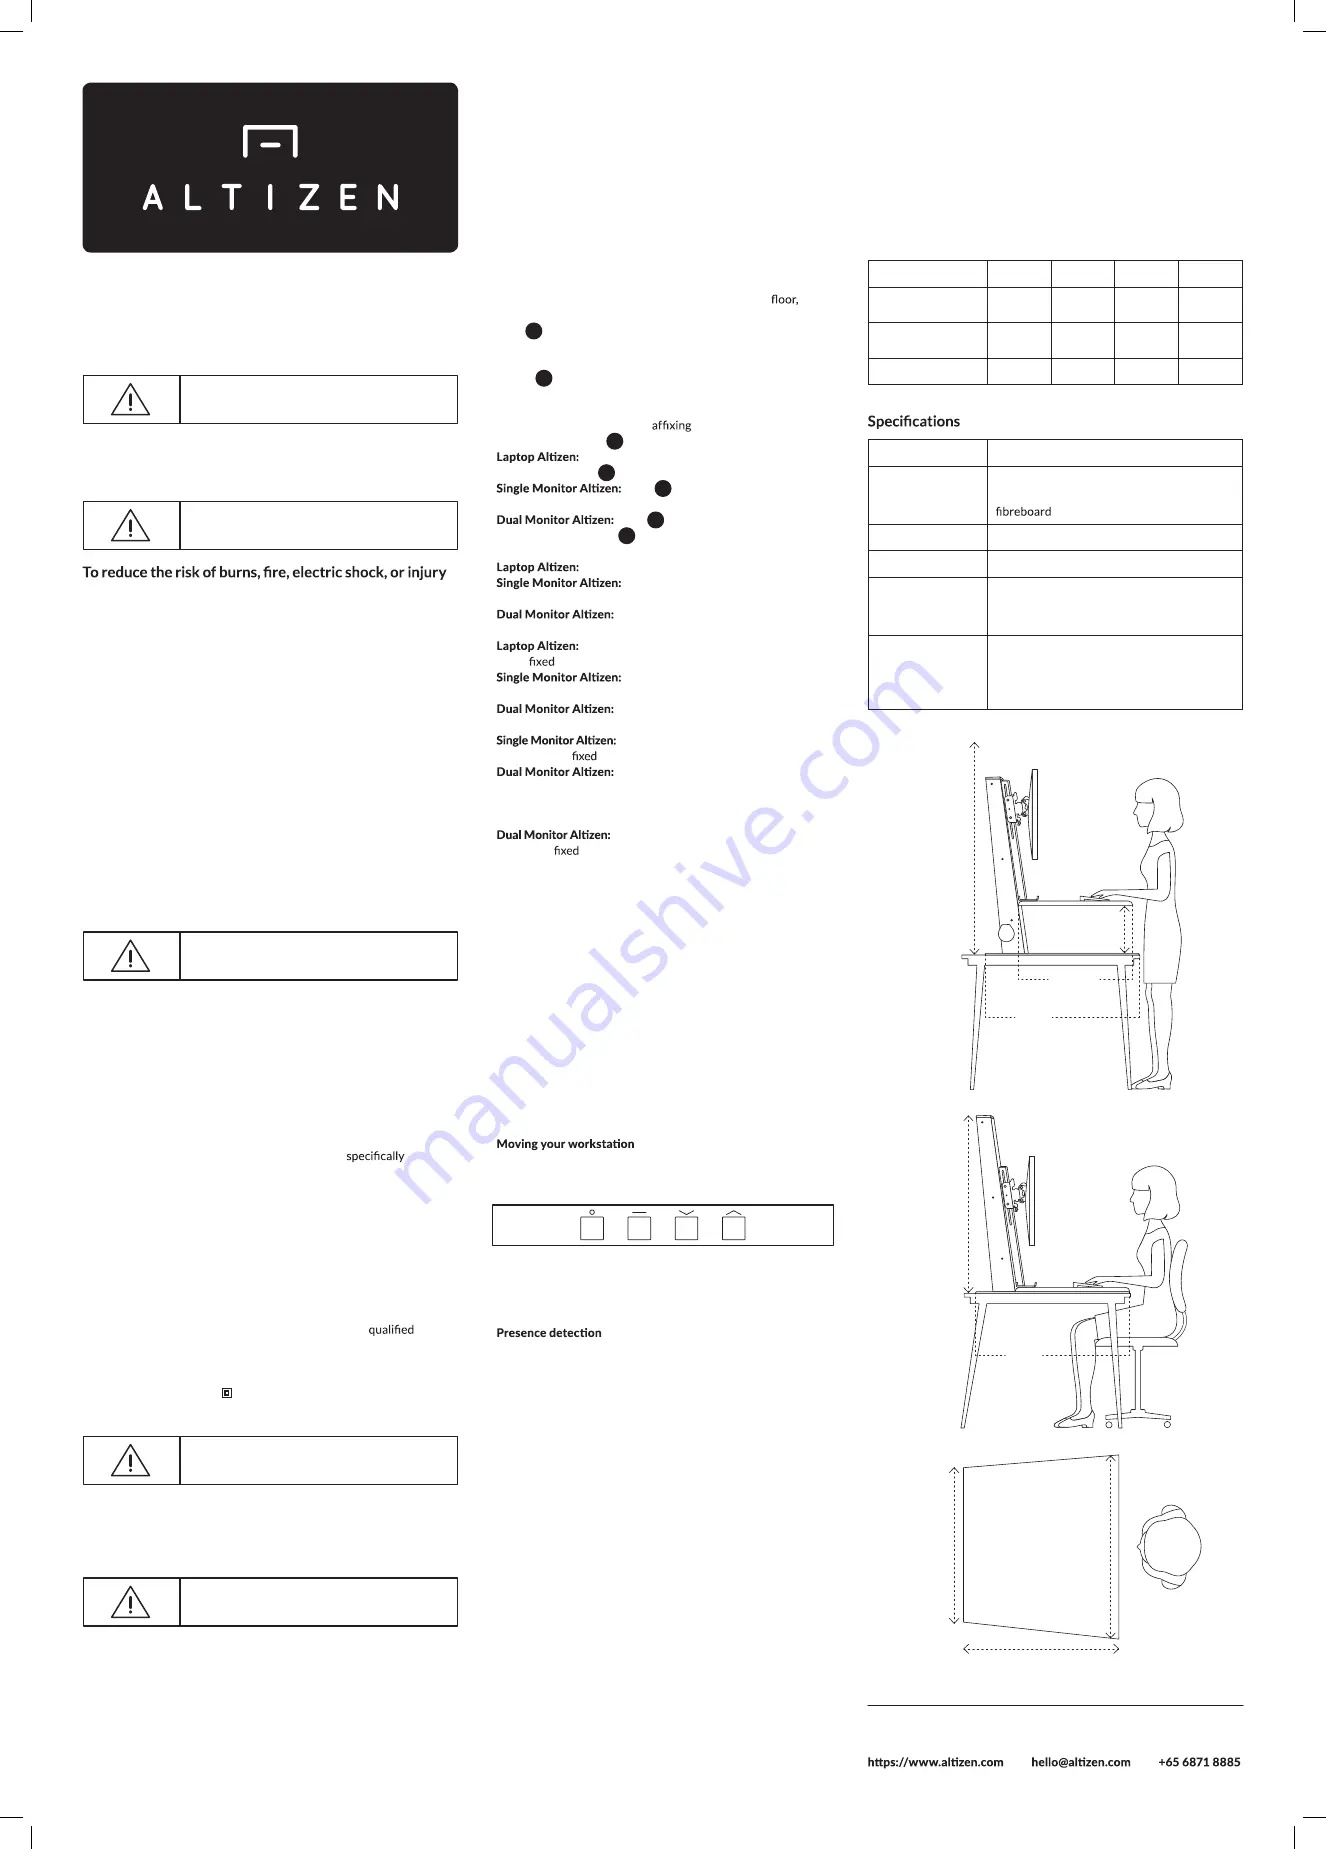
Size & Weight
Version
Height
Depth
Width
Weight
Single Monitor
75cm
62cm
70cm
28kg
Dual Monitor
75cm
62cm
80cm
29kg
Laptop
75cm
62cm
70cm
29kg
Adjustable Height
500mm, electrically actuated
Materials
Structure is made of powder-coated steel
and worksurface is made of medium density
Processor
Microchip Microcontroller
Connec
tiv
ity
Bluetooth Low Energy
Recommended
Maximum Load
Capacity
15kg
Electronics
Line Voltage: Class II, 24VDC / 3A
Opera
ti
ng Temperature: 10 degrees Celsius
to 35 degrees Celsius
Rela
ti
ve Humidity: 5% to 90%, non-condensing
29.5"
(75cm)
24.4"
(62cm)
Max 39"
(99cm)
Max 19.7"
(50cm)
17.7"
(45cm)
24.4"
(62cm)
26"
(66cm)
21"
(53cm)
28"
(70cm)
Thank you for purchasing Al
ti
zen.
If you have any ques
ti
ons, please contact us directly:


