Prospector & Miner Framed Wall Tent
Setup Instructions
1.
Make sure you have a clear area to setup your tent.
2.
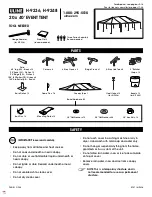
Lay out all of the pieces of the frame and place the angles 3’ apart making an outline of the
frame. There should be three rows of angles with four angles (two end angles and two center
angles) in each row.
3.
Put together the ridge poles, which are marked in
blue
. There are
three ridge poles
– two
eaves and one ridge
a.
Attach three pieces together, forming one long pole.
b.
Slide two center angles onto each ridge pole. The center angles should cover the
junctions of the pole sections.
c.
Attach end angles to either end of the ridgepole.
Center Angles
End Angles
4.
Put together the rafter poles, which are marked in
red
. There are
eight rafter poles
– four for
each side of the tent.
a.
Attach two pieces together, forming one long pole.
b.
Place one end of the rafter pole into the angle on the eave and the other end of the
rafter pole into the angle on the ridge.
Ridge Junction
Eave Junction
5.
Place the wall tent on top of the frame.
a.
Pull out the wall tent cover and lay it along the side of the frame.
b.
Grab the bottom portion of the tent and pull up and over the frame.
c.
Position each angle of the tent so it matches the angles of the frame.
d.
Flip up the side walls above the eaves of the tent for easy installation of the leg poles.