AIC RSC-1C, User Manual
The AIC RSC-1C is a versatile and reliable product, with a user-friendly interface and innovative features. You can easily access the User Manual online for free by visiting manualshive.com, where you can download the manual to learn more about how to utilize this exceptional product.
Share
Download


Reviews:
No comments
Related manuals for RSC-1C

SCXI-1000
Brand: National Instruments Pages: 60

NI cDAQ-9181
Brand: National Instruments Pages: 4

PXI Series
Brand: National Instruments Pages: 11

Eight-slot USB Chassis NI cDAQ-9172
Brand: National Instruments Pages: 84

CompactDAQ cDAQ-9185
Brand: National Instruments Pages: 11

cDAQ-9179
Brand: National Instruments Pages: 108
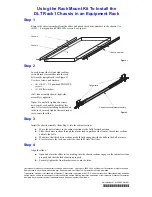
DLT Rack1
Brand: Quantum Pages: 2

BUS-PC(PCI)
Brand: Contec Pages: 34
Supero SC936 Series
Brand: Supermicro Pages: 84

PXI-1036
Brand: National Instruments Pages: 40


