background image

USER GUIDE AND SPECIFICATIONS

NI cDAQ-9172

Contents

Introduction ............................................................................................. 4
Safety Guidelines .................................................................................... 5

Safety Guidelines for Hazardous Voltages ...................................... 5

Related Documentation........................................................................... 6

Device Documentation and Specifications ...................................... 9
Training Courses.............................................................................. 9
Technical Support on the Web......................................................... 9

Installing the Software ............................................................................ 10

Installing NI-DAQmx ...................................................................... 10
Installing Other Software................................................................. 10

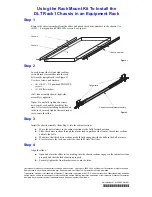
Installing the NI cDAQ-9172.................................................................. 11

Mounting the NI cDAQ-9172.......................................................... 12

NI 9901 Desktop Mounting Kit................................................ 12
NI 9910 DIN-Rail Kit............................................................... 13
NI 9905 Panel Mount Kit ......................................................... 13

Setting Up the NI cDAQ-9172................................................................ 15
Understanding LED Indications.............................................................. 17

Active LED ...................................................................................... 17
Ready LED ...................................................................................... 17

Using the NI cDAQ-9172 ....................................................................... 18

C Series I/O Modules....................................................................... 18

Correlated vs. Static DIO Modules........................................... 19

cDAQ Module Interface .................................................................. 19
USB-STC2 ....................................................................................... 19

AI and AO Sample Timing....................................................... 19
Triggering Modes ..................................................................... 19
Independent Data Streams ........................................................ 19
PFI Signals................................................................................ 20
Flexible Counter/Timers........................................................... 20

ni.com/manuals

De

u

tsch

Français

Summary of Contents for Eight-slot USB Chassis NI cDAQ-9172

Page 1: ...ftware 10 Installing the NI cDAQ 9172 11 Mounting the NI cDAQ 9172 12 NI 9901 Desktop Mounting Kit 12 NI 9910 DIN Rail Kit 13 NI 9905 Panel Mount Kit 13 Setting Up the NI cDAQ 9172 15 Understanding LE...

Page 2: ...the Output Signal 34 Getting Started with AO Applications in Software 34 Digital I O 35 Correlated vs Static DIO Modules 35 Static DIO 36 Digital Waveform Acquisition Correlated Input 36 DI Sample Clo...

Page 3: ...ount Prevention 71 Synchronization Modes 73 Digital Routing and Clock Generation 75 Clock Routing 76 80 MHz Timebase 76 20 MHz Timebase 76 100 kHz Timebase 76 Specifications 77 Analog Input 77 Analog...

Page 4: ...ith C Series I O modules The NI cDAQ 9172 chassis is capable of measuring a broad range of analog and digital I O signals and sensors using a Hi Speed USB 2 0 interface For module specifications refer...

Page 5: ...nt may be hot Touching this component may result in bodily injury Safety Guidelines for Hazardous Voltages If hazardous voltages are connected to the module take the following precautions A hazardous...

Page 6: ...AQ Getting Started Guide describes how to install and use the NI DAQmx driver software for Windows and your data acquisition DAQ device how to confirm the device is operating properly and how to take...

Page 7: ...s palettes menus and tools Help Search the LabVIEW Help LabVIEW Help Topics Specific to NI DAQmx Includes overview information and a tutorial to learn how to take an NI DAQmx measurement in LabVIEW us...

Page 8: ...erence NI DAQmx Library Measurement Studio Microsoft Visual Studio NET Microsoft Visual Studio NET Help NI Measurement Studio Help contains NI DAQmx methods and properties Measurement Studio NI Measur...

Page 9: ...Basic NET Start All Programs National Instruments NI DAQ NI DAQmx NET Reference Help Expand NI Measurement Studio Help NI Measurement Studio NET Class Library Reference to view the function reference...

Page 10: ...hich you can download at ni com manuals offers NI DAQmx users step by step instructions for installing software and hardware configuring channels and tasks and getting started developing an applicatio...

Page 11: ...ters Inches 53 8 mm 2 12 in 46 0 mm 1 81 in 23 7 mm 0 94 in 20 3 mm 0 80 in 25 0 mm 0 98 in 44 1 mm 1 74 in 24 8 mm 0 98 in 23 2 mm 0 91 in 19 1 mm 0 75 in 31 7 mm 1 25 in 58 9 mm 2 32 in 44 1 mm 1 74...

Page 12: ...nce in front of the modules for other types of cabling For more information about mechanical dimensions refer to ni com info and enter the info code cDAQMechanical For more information about cable dim...

Page 13: ...the larger lip of the DIN RAIL positioned up When the DIN Rail kit is properly installed the NI cDAQ 9172 chassis is centered on the DIN Rail Caution Remove the I O modules before removing the chassis...

Page 14: ...allation on the NI cDAQ 9172 chassis Refer to the documentation included with the NI 9905 Panel Mount Kit for more detailed dimensions Figure 5 Panel Mount Dimensions and Installation on the NI cDAQ 9...

Page 15: ...ed Guide Other NI documentation is available from ni com manuals 2 If you are not using any mounting accessories attach the provided rubber standoffs to the back of the NI cDAQ 9172 chassis 3 Make sur...

Page 16: ...ses a DC input jack with a locking ring Use only this connector with the NI cDAQ 9172 chassis Refer to the Specifications section for more information about the connector 9 Secure the power supply and...

Page 17: ...an error If an error occurs refer to ni com support install for troubleshooting information Note When in use the NI cDAQ 9172 chassis may become warm to the touch This is normal Understanding LED Ind...

Page 18: ...mize the cDAQ system to meet your application needs C Series I O modules are hot swappable and automatically detected by the NI cDAQ 9172 chassis I O channels are accessible using the NI DAQmx driver...

Page 19: ...STC2 features independent high speed data streams flexible AI and AO sample timing triggering PFI signals for multi device synchronization flexible counter timers with hardware gating digital wavefor...

Page 20: ...analog input C Series I O module into any slot on the cDAQ chassis The measurement specifications such as number of channels channel configuration sample rate and gain are determined by the type of C...

Page 21: ...art trigger but not a reference trigger is sometimes referred to as a posttriggered acquisition That is samples are measured only after the trigger When you are using an internal sample clock you can...

Page 22: ...number of posttrigger samples samples that occur after the reference trigger desired is the buffer size minus the number of pretrigger samples Once the acquisition begins the NI cDAQ 9172 chassis wri...

Page 23: ...installation from Start All Programs National Instruments NI DAQ NI DAQmx Help To view the LabVIEW Help in version 8 0 or later select Help Search the LabVIEW Help in LabVIEW Alternately to download...

Page 24: ...after installation from Start All Programs National Instruments NI DAQ NI DAQmx Help To view the LabVIEW Help in version 8 0 or later select Help Search the LabVIEW Help in LabVIEW Alternately to dow...

Page 25: ...in the current task Each Convert Clock signals the acquisition of a single channel from that module The Convert Clock rate depends on the module being used the number of channels used on that module...

Page 26: ...ules with different oversample clock frequencies are used in an analog input task the AI Sample Clock Timebase can use any of the available frequencies by default the fastest available is used The sam...

Page 27: ...etes The first point is acquired when the task is committed The second point is acquired after the start trigger Figure 11 Sample Clock Timing Example For example if running an AI task at 1 kHz using...

Page 28: ...generation specifications such as the number of channels channel configuration update rate and output range are determined by the type of C Series I O module used For more information refer to the doc...

Page 29: ...ion to simultaneously update Only one simultaneous update task can run at a time Simultaneous update is not restricted to 16 channels A hardware timed AO task and a simultaneous update AO task cannot...

Page 30: ...eration the entire buffer is downloaded to the FIFO and regenerated from there After the data is downloaded new data cannot be written to the FIFO To use onboard regeneration the entire buffer must fi...

Page 31: ...I terminal AO Sample Clock Timebase Signal The AO Sample Clock Timebase ao SampleClockTimebase signal is divided down to provide a source for ao SampleClock ao SampleClockTimebase can be generated fro...

Page 32: ...s National Instruments NI DAQ NI DAQmx Help To view the LabVIEW Help in version 8 0 or later select Help Search the LabVIEW Help in LabVIEW Alternately to download the LabVIEW Help go to ni com manual...

Page 33: ...igure 13 Figure 13 ao PauseTrigger with the Onboard Clock Source If you are using any signal other than the onboard clock as the source of the sample clock the generation resumes as soon as the pause...

Page 34: ...the output signal These glitches are normal when a DAC switches from one voltage to another it produces glitches due to released charges The largest glitches occur when the most significant bit of th...

Page 35: ...s that change rapidly and are updated by either software timed or hardware timed reads and writes Correlated digital I O modules can perform the following tasks Used in any slot Software timed reads a...

Page 36: ...I O on slots 1 through 4 using correlated digital modules and store the result in the DI waveform acquisition FIFO The NI cDAQ 9172 chassis does not have an independent DI Sample Clock circuit Theref...

Page 37: ...Search the LabVIEW Help in LabVIEW Alternately to download the LabVIEW Help go to ni com manuals Using an External Source You can route the following signals as di SampleClock Any PFI terminal Analog...

Page 38: ...opping a continuous generation continues until you stop the operation There are several different methods of continuous generation that control what data is written These methods are regeneration onbo...

Page 39: ...ask but the rising falling edge detection lines must be in slots 1 through 4 Buffered Change Detection Acquisition A buffer is a temporary storage in computer memory for acquired samples In a buffered...

Page 40: ...es on switches and so on Refer to the NI DAQmx Help for more information The NI DAQmx Help is available after installation from Start All Programs National Instruments NI DAQ NI DAQmx Help Counters Th...

Page 41: ...describe various counter applications Counter 0 Counter 0 Source Counter 0 Timebase Counter 0 Aux Counter 0 HW Arm Counter 0 A Counter 0 B Counter 0 Up_Down Counter 0 Z Counter 0 Gate Counter 0 Inter...

Page 42: ...Counting With single point on demand edge counting the counter counts the number of edges on the Source input after the counter is armed On demand refers to the fact that software can read the counte...

Page 43: ...ter is sampled on each active edge of a sample clock The NI cDAQ 9172 transfers the sampled values to host memory The count values returned are the cumulative counts since the counter armed event That...

Page 44: ...known period to the Source input of the counter The counter counts the number of rising or falling edges on the Source signal while the pulse on the Gate signal is active You can calculate the pulse...

Page 45: ...measurement takes measurements over multiple pulses The counter counts the number of edges on the Source input while the Gate input remains active On each trailing edge of the Gate signal the counter...

Page 46: ...l You can route an internal or external periodic clock signal with a known period to the Source input of the counter The counter counts the number of rising or falling edges occurring on the Source in...

Page 47: ...he Gate input So the first value stored in the hardware save register does not reflect a full period of the Gate input In most applications this first point should be discarded Figure 22 shows an exam...

Page 48: ...urned by the counter Single Semi Period Measurement Single semi period measurement is equivalent to single pulse width measurement Buffered Semi Period Measurement In buffered semi period measurement...

Page 49: ...ne of the following methods depending on your application Method 1 Method 1b Method 2 and Method 3 Method 1 Measure Low Frequency With One Counter This method is good for low frequency signals Use thi...

Page 50: ...own timebase Ft to the Source of the counter The known timebase can be 80MHzTimebase For signals that might be slower than 0 02 Hz use a slower known timebase You can configure the counter to make K 1...

Page 51: ...oute the signal to measure F1 to the Source of the counter Configure the counter for a single pulse width measurement Suppose you measure the width of pulse T to be N periods of F1 Then the frequency...

Page 52: ...gnal of known frequency F2 to the Counter 1 Source input F2 can be 80MHzTimebase For signals that might be slower than 0 02 Hz use a slower known timebase Configure Counter 1 to perform a single pulse...

Page 53: ...improves the accuracy of the measurement A disadvantage of Method 1b is that K 1 measurements are required These measurements take more time and consume some of the available USB bandwidth Method 2 i...

Page 54: ...ement You must arm a counter to begin position measurements Measurements Using Quadrature Encoders The counters can perform measurements of quadrature encoders that use X1 X2 or X4 encoding A quadratu...

Page 55: ...nter increments or decrements on each edge of channel A depending on which channel leads the other Each cycle results in two increments or decrements as shown in Figure 29 Figure 29 X2 Encoding X4 Enc...

Page 56: ...re that channel Z is high during at least a portion of the phase you specify for reload For example in Figure 31 channel Z is never high when channel A is high and channel B is low Thus the reload mus...

Page 57: ...ctive edge occurs on the AUX input the counter counts the number of rising or falling edges on the Source The counter ignores additional edges on the AUX input The counter stops counting upon receivin...

Page 58: ...the Gate signal and an active edge of the AUX signal The counter then stores the count in a hardware save register On the next active edge of the Gate signal the counter begins another measurement Th...

Page 59: ...put rising or falling Figure 35 shows a generation of a pulse with a pulse delay of four and a pulse width of three using the rising edge of Source Figure 35 Single Pulse Generation Single Pulse Gener...

Page 60: ...a delay from the Start Trigger to the beginning of each pulse You also can specify the pulse width The delay and pulse width are measured in terms of a number of active edges of the Source input The...

Page 61: ...falling The counter can begin the pulse train generation as soon as the counter is armed or in response to a hardware Start Trigger You can route the Start Trigger to the Gate input of the counter Yo...

Page 62: ...Frequency Output signal The Frequency Output signal is the Frequency Output Timebase divided by a number you select from 1 to 16 The Frequency Output Timebase can be either the 20 MHz Timebase divide...

Page 63: ...signal This function is equivalent to continuous pulse train generation For information on connecting counter signals refer to the Default Counter Timer Routing section Counter Timing Signals In slot...

Page 64: ...Analog Comparison Event In addition you can route Counter 1 TC or Counter 1 Gate to Counter 0 Source You can also route Counter 0 TC or Counter 0 Gate to Counter 1 Source Table 7 Counter Applications...

Page 65: ...an route the following signals to the Counter n Gate input Any PFI terminal ai ReferenceTrigger ai StartTrigger ai SampleClock ai ConvertClock ao SampleClock di SampleClock do SampleClock Change Detec...

Page 66: ...counting applications Use the A B and Z inputs to each counter when measuring quadrature encoders or measuring two pulse encoders Routing Signals to A B and Z Counter Inputs Each counter has independe...

Page 67: ...ou can also route Counter 0 Internal Output to Counter 1 HW Arm Some of these options may not be available in some driver software Counter n Internal Output and Counter n TC Signals Counter n TC is an...

Page 68: ...s you can configure a start trigger to begin a finite or continuous pulse generation Once a continuous generation triggers the pulses continue to generate until you stop the operation in software For...

Page 69: ...uses an onboard oscillator to generate the filter clock with a 40 MHz frequency For more information refer to the NI DAQmx Help The NI DAQmx Help is available after installation from Start All Progra...

Page 70: ...ounters which simply count the rollovers of this smaller counter Thus the prescaler acts as a frequency divider on the Source and puts out a frequency that is one eighth or one half of what it is acce...

Page 71: ...3 Duplicate Count Prevention Example On the first rising edge of the Gate the current count of seven is stored On the next rising edge of the Gate the counter stores a two because two Source pulses oc...

Page 72: ...ynchronizes both the Source and Gate signals to the 80 MHz Timebase By synchronizing to the timebase the counter detects edges on the Gate even if the Source does not pulse This enables the correct cu...

Page 73: ...he counter value and output to change synchronously with the 80 MHz Timebase In all other cases you should not use duplicate count prevention Enabling Duplicate Count Prevention in NI DAQmx You enable...

Page 74: ...9172 chassis synchronizes signals on the falling edge of the source and counts on the following rising edge of the source as shown in Figure 47 Figure 47 Other Internal Source Mode Table 10 Synchroni...

Page 75: ...e and the acquisition generation sub systems analog input analog output digital I O and the counters The digital routing circuitry uses FIFOs if present in each sub system to ensure efficient data mov...

Page 76: ...clock 20 MHz Timebase The 20 MHz Timebase normally generates many of the AI and AO timing signals The 20 MHz Timebase can function as the Source input to the 32 bit general purpose counter timers The...

Page 77: ...s Timing accuracy2 50 ppm of sample rate Timing resolution2 50 ns Number of channels supported Determined by the C Series I O modules Analog Output Numbers of channels supported In hardware timed tas...

Page 78: ...ndent Finite 0 to 10 MHz Digital output sample clock frequency Streaming from application memory 0 to 8 MHz system dependent Regenerate from FIFO 0 to 10 MHz Finite 0 to 10 MHz Digital output or digit...

Page 79: ...dge separation Position measurements X1 X2 X4 quadrature encoding with Channel Z reloading two pulse encoding Output applications Pulse pulse train with dynamic updates frequency division equivalent t...

Page 80: ...tput function Start Trigger Pause Trigger Sample Clock Sample Clock Timebase Counter timer functions Gate Source HW_Arm Aux A B Z Up_Down Module I O States At power on Module dependent Refer to the do...

Page 81: ...l input digital output counter timer input Physical Characteristics Chassis weight unloaded Approx 840 g 1 lb 13 oz Chassis dimensions unloaded 25 4 cm 8 81 cm 5 89 cm 10 0 in 3 5 in 2 3 in Safety If...

Page 82: ...m altitude 2 000 m Pollution Degree IEC 60664 2 Shock and Vibration To meet these specifications you must panel mount the NI cDAQ 9172 system and affix ferrules to the ends of the terminal lines Opera...

Page 83: ...by model number or product line and click the appropriate link in the Certification column Environmental Management National Instruments is committed to designing and manufacturing products in an env...

Page 84: ...ational Instruments also has offices located around the world to help address your support needs For telephone support in the United States create your service request at ni com support and follow the...

Reviews: