background image

APRO30AGSS

30” All Gas

User Guide

Installation and Service Instructions

U110592 - 01

Summary of Contents for APRO30AGSS

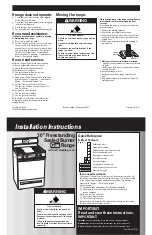
Page 1: ...APRO30AGSS 30 All Gas User Guide Installation and Service Instructions U110592 01 ...

Page 2: ...rom a neighbor s phone Follow the gas supplier s instructions If you cannot reach your gas supplier call the fire department Installation and service must be performed by a qualified installer service agency or the gas supplier WARNING The anti tip device supplied with this range must be installed when the appliance is installed This will reduce risk of tipping of the appliance from abnormal usage...

Page 3: ...ooktop Burners 12 Pan Supports 12 Control Panel and Oven Door 13 6 Troubleshooting 14 7 Installation 16 Regulations 16 For Your Safety 16 Installation Safety Instructions 16 Converting to Propane Gas 16 Location of the Range 16 Positioning the Range 17 Fitting the Anti Tip Bracket 17 Gas Connection 18 Electrical Connection 19 Provide Proper Electrical Supply 19 Range operational checks 20 To Fit a...

Page 4: ...iv ...

Page 5: ...e cooktop The hot air from an oven vent may ignite flammable items and may increase pressure in closed containers which may cause them to burst Many aerosol type spray cans are EXPLOSIVE when exposed to heat and may be highly flammable Avoid their use or storage near an appliance Many plastics will burn and most are damaged by heat Keep plastic items away from parts of the range that may become wa...

Page 6: ...f California to cause cancer or reproductive harm and requires businesses to warn customers of potential exposures to such substances This appliance contains or produces a chemical or chemicals which can cause death or serious illness and which are known to the state of California to cause cancer birth defects or other reproductive harm Users of this appliance are hereby warned that the burning of...

Page 7: ... affect the durability of the enamel and may be cleaned off with a metal polish Ovens n n Take care when opening the door n n Let hot air and steam escape before removing or replacing food n n DO NOT drop or rest objects on the door glass Although the glass is very strong a sharp blow or a falling object might cause the glass surface to crack or break n n Never heat unopened food containers Pressu...

Page 8: ...rmometer whenever possible to prevent overheating fat beyond the smoking point n n Never leave a deep fry pan unattended Always heat fat slowly and watch as it heats Deep fry pans should be only a maximum of one third full of fat Filling the pan too full of fat can cause spill over when food is added If you use a combination of oils or fats in frying stir them together before heating or as the fat...

Page 9: ...cooktop control knob is pressed in sparks will be made at every burner this is normal Do not attempt to disassemble or clean around any burner while another burner is on otherwise an electric shock could result To light a burner push in the selected burner control knob and turn it to the high position as indicated by the symbol Fig 2 2 The igniter should spark and light the gas Keep holding the kn...

Page 10: ...quickly Large pans should be spaced well apart Pans and kettles with concave bases or down turned base rims should not be used Fig 2 5 Simmering aids such as asbestos or mesh mats are NOT recommended Fig 2 6 They will reduce burner performance and could damage the grates Avoid using unstable or misshapen pans that may tilt easily and pans with a very small base diameter e g milk pans single egg po...

Page 11: ...id Fig 2 9 then preheat the broiler for a couple of minutes Once preheated slide the broiler pan and grid with the food in place back into the oven Brown one side of the food and turn to brown the other side During broiling there may be a little smoke given off this is perfectly normal If you open the door to check on the food have it open for as short a time as possible to prevent the control kno...

Page 12: ...ly suitable for multi rack cooking and is a good all round function It may be necessary to reduce the temperature by approximately 25 F 10 C for recipes previously cooked in a conventional oven Thaw Mode This function operates the fan to circulate cold air only Make sure the temperature control is at 0 and that no heat is applied This enables small items such as desserts cream cakes and pieces of ...

Page 13: ...he rack is stopped by the rack stop Lift the front of the rack so the stops clear the supports and then pull forward To refit the rack line up the rack with a slot in the side ladders Lift the front about 15º so the stop in the rack clears the side ladders and push fully back See To Fit and Remove the Oven Shelf on page 21 Oven Light The oven has an oven light Press the switch on the fascia to tur...

Page 14: ... very hot Use all oven modes with the door closed Never use aluminium foil to cover the oven shelves or to line the base of the oven The trapped heat may damage the enamel and cause a fire Always leave a fingers width between dishes on the same shelf This allows the heat to circulate freely around them To reduce fat splashing when you add vegetables to hot fat around a roast dry them thoroughly or...

Page 15: ...h the cooking time 50 60 minutes 25 30 minutes interchange after 15 minutes 25 30 minutes interchange after 15 minutes 10 15 minutes interchange after 15 minutes 40 60 minutes 20 30 minutes Temperature F C 300 150 375 190 300 150 375 190 300 150 375 190 300 150 375 190 300 150 375 190 300 150 375 190 300 150 350 180 350 180 275 140 275 140 300 150 300 150 325 165 375 190 350 180 350 180 275 140 42...

Page 16: ...area is completely cooled down Wipe up spills as soon as possible Do not allow surplus water to seep into the range Cooktop Burners The burner heads and caps can be removed for cleaning Make sure they are absolutely dry before replacing Fig 5 1 n n DO NOT put the burner heads in a dishwasher When replacing the cooktop burner parts ensure each part locates properly Fig 5 2 If you look at the base o...

Page 17: ...ot soapy water Removing the Oven Door The oven door can be removed for ease of cleaning Open the oven door fully and release the saddle brackets situated either side Fig 5 3 Ensure that the saddle brackets are opened to their end positions to prevent the hinges from retracting into the oven door Close the oven door until it is half closed then carefully lift and un hook the door panel from the ran...

Page 18: ...re correcting work carried out by your original installer It is in your interest to track down your original installer Food is cooking too slowly too quickly or burning Cooking times may differ from your previous oven Check that you are using the recommended temperatures and shelf positions see the oven cooking guide The oven control settings and cooking times are intended to be used only as a gui...

Page 19: ...Turn off the power at the circuit breaker Before removing the existing bulb turn off the power supply and make sure that the oven is cool Open the oven door and remove the oven shelves Gently prize off the glass cover to expose the bulb Fig 6 1 Pull the bulb from its housing to remove Insert the replacement bulb and replace the glass cover Fig 6 2 Fig 6 1 Fig 6 2 ...

Page 20: ...ge must be electrically grounded in accordance with local codes or in the absence of local codes in accordance with the National Electrical Code ANSI NFPA 70 latest edition Before installing your range on linoleum or any other synthetic floor covering make sure the floor covering can withstand 80 C 180 F without shrinking warping or discoloring Do not install the range over carpeting unless a shee...

Page 21: ...nce should be made for the additional height of the flue trim which is fitted to the cooker hob For safety reasons curtains must not be sited immediately behind the range We recommend a gap of 30 76 2 cm 30 77 5 cm for Canada 31 79 cm between cupboards to allow for moving the range USA only If a flush fit is required install the range up to the cupboard at one side then install the cupboard the ot...

Page 22: ...y valve before disconnecting the old range and leave it off until the new hookup has been completed Don t forget to relight the pilot on other gas appliances when you turn the gas back on Because hard piping restricts movement of the range the use of a CSA International certified flexible metal appliance connector is recommended unless local codes require a hard piped connection Never use an old c...

Page 23: ...e Wiring must conform to National Electric Codes If the electric service provided does not meet the above specifications have a licensed electrician install an approved outlet Because range terminals are not accessible after range is in position flexible service conduit or cord must be used Provide Proper Electrical Supply This range must be supplied with 120 V 60 Hz and connected to an individual...

Page 24: ...n the knob is pressed in For each burner push in and turn a knob to the lighting position The igniter should spark and light the gas Keep holding the knob pressed in to let the gas through to the burner for few seconds Quality of Flames If the flame is distorted check that the burner head is correctly placed over the burner base n n MAKE SURE THE FLOW OF COMBUSTION AND VENTILATION AIR TO THE RANGE...

Page 25: ...ALLATION Check the appliance is electrically safe and gas sound when you have finished 21 To Fit and Remove the Oven Shelf To remove the oven shelf To fit the oven shelf DocAUS 020 0004 Overview 110DF Elan ...

Page 26: ...ane gas is supplied with the range If the appliance is to be converted this must be done before installation The conversion must be performed by a qualified LP gas installer After conversion the installation must comply with the relevant regulations and also the local electricity supply company requirements Read the instructions before converting this appliance Failure to convert the appliance cor...

Page 27: ... and gently pull towards you Remove the 2 screws holding the orifice bracket Fig 8 3 Locate the orifice and remove using an adjustable wrench Replace with oven burner orifice 132 for the main oven and orifice 110 for the small oven Reassemble in the reverse order Broiler Remove the rear guard and cover Using a wrench hold the orifice housing whilst removing the nut Remove the orifice from its hold...

Page 28: ...must be between 10 and 13 of water column 2 49 3 24 kPa When checking for proper operation of the regulator the inlet pressure must be at least 1 0 25 kPa greater than the operating manifold pressure as given above The pressure regulator located at the inlet of the range manifold must remain in the supply line regardless of whether natural or LP gas is being used Air Shutter Adjustment The air shu...

Page 29: ...eft rear 34 25 35 36 20 41 42 13 14 32 29 31 37 30 18 17 16 23 21 22 39 38 28 26 27 15 24 90 91 91 92 11 12 40 19 2 6 7 8 9 4 3 1 Oven thermostat BR BA C Oven neon Light switch 33 10 37 36 35 34 Ignition spark generator 38 37 36 35 Relay Oven safety Burner ignition Burner ignition Oven light Oven light Junction box Broiler safety valve Thermostat Cooling motor ...

Page 30: ...26 Notes ...

Page 31: ...27 Notes ...

Page 32: ...www aga ranges com AGA Marvel 1260 E VanDeinse St Greenville MI 48838 Business 616 754 5601 Fax 616 754 9690 Toll Free Telephone 800 223 3900 ...

Reviews: