
Quick Start Guide
First-Time Use / Admin Mode Setup
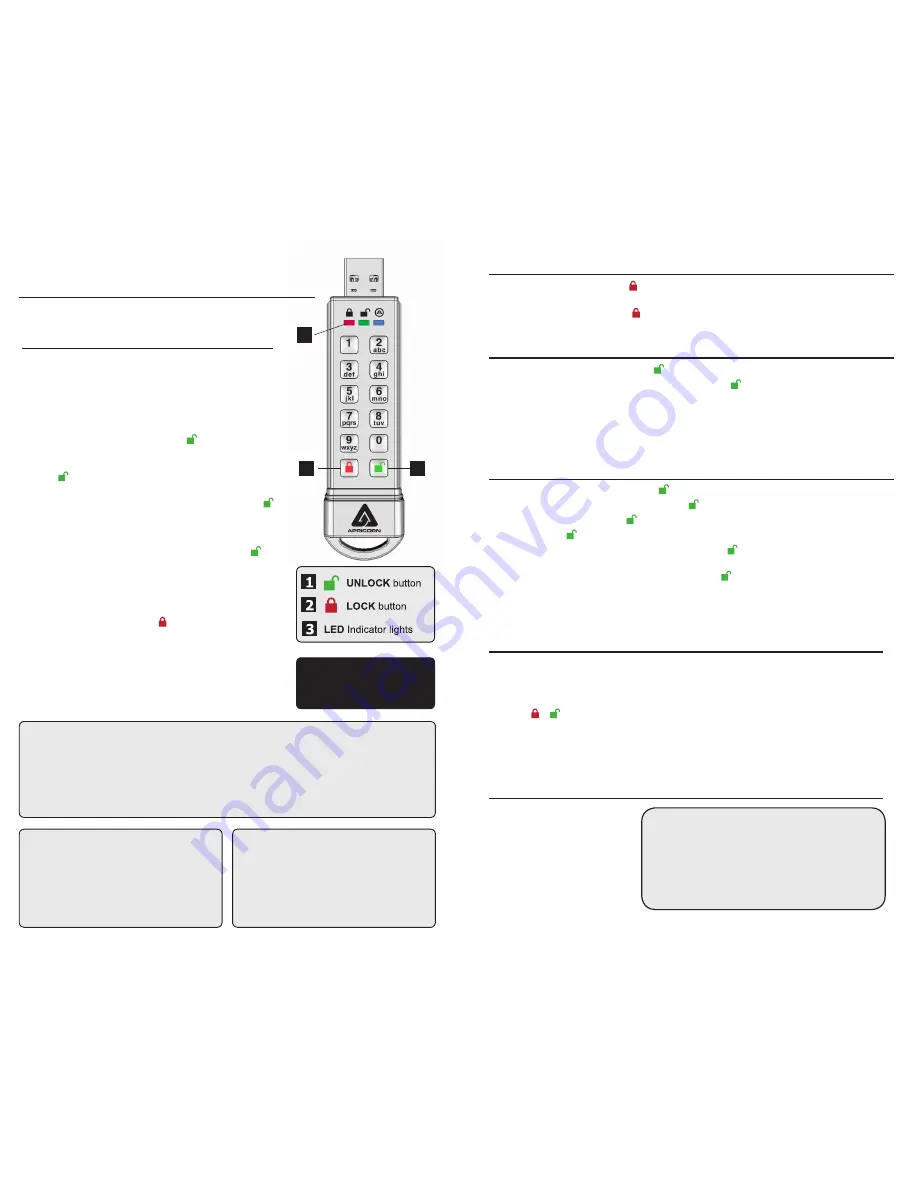
2
3
1
Aegis
Secure Key
3.0
PINs must be a minimum length of 7 digits
with a maximum of 16 digits.
Cannot contain all consecutive numbers
or all the same numbers
(e.g. 123456789,
987654321 or 11111111, 22222222, etc.)
Each Aegis Secure Key is shipped without a preset Personal
Identification Number (PIN.) To prepare the Key for use, the user
must first establish an Admin PIN that is between 7and 16 digits
in length. This Admin PIN is used to set the Secure Key’s various
Admin features and also serves as the first of two User PINS for
the Secure Key’s standard operation.
To Set Up the Admin PIN:
1. Wake up the Secure Key by pressing .
(
BLUE
and
GREEN
LEDs will glow solidly, indicating no Admin
PIN has been established.)
2. Press
+ 9
simultaneously.
(
BLUE
LED will glow solidly and
GREEN
LED will blink.)
3. Enter the PIN to be used as your Admin code and press .
(If PIN is accepted,
BLUE
LED will turn off momentarily and
GREEN
LED will blink 3 times by itself, then will continue
blinking as the
BLUE
LED glows solidly.)*
4. Quickly re-enter that same PIN once more and press
(
BLUE
LED will turn off momentarily and
GREEN
LED will
illuminate for one second until replaced by the
BLUE
LED
glowing solidly, indicating that the Admin PIN has been set and
the Secure Key is in Admin mode, ready to add another User
PIN [see reverse] or for setting up features.)
5. To exit the Admin mode, press
(
RED
LED will glow solidly)
or
wait 30 seconds and Secure Key will return to sleep mode.
6. If no additional users are to be added or Admin features set,
Secure Key setup is now complete and ready for use.
* If PIN is unacceptable, Red LED will blink 3 times and
return to solid
BLUE
/ blinking
GREEN
LEDs. Check “PIN
Requirements” section below and repeat step 3.
Note: It’s normal for this device to be warm to the touch during use.
PIN Requirements
Sleep Mode
When the key is not in use, it will enter a sleep
mode in which the key cannot be accessed.
To wake the key and prepare it to accept key
inputs, press the
UNLOCK
key once.
The
RED
LED will glow solidly.
Battery Note
The Aegis Secure Key has an internal rechargeable battery with a smart-charging circuit and
will automatically charge whenever it’s plugged into a powered USB port. After initial Admin
PIN setup, when plugged into a powered USB port while in standby mode, the Red LED will
pulse to indicate that it’s charging and will glow solidly once fully charged. Since the Secure
Key ships with a partial charge, plug it into a powered USB port for 60-80 minutes to give the
battery a full charge before initial setup (RED LED will still be blinking.)
IMPORTANT:
Do NOT press any buttons while the
Secure Key is plugged into a USB
port. Doing so may cause damage
to the USB port and Secure Key
USB Connector.
Locking the Key
To lock the key, simply press the button. When locked, the
RED
LED will glow solidly.
If data is still being written to the Secure Key, it will wait for this operation to be completed before the
locking operation takes place. The button can also be used to exit out of the Admin mode.
Note: The Aegis Secure Key will not be recognized by any operating system in its locked state.
Unlocking the Key
1. Beginning in standby mode, press the button to wake the drive.
(The
RED
LED will glow solidly.)
2. Enter either an Admin PIN or User PIN and press the button.
(If the PIN is accepted, the
GREEN
LED will quickly blink four times, then continue to blink
slowly until it’s plugged into a USB port, after which will then glow solidly;
If the PIN is incorrect, the
RED
LED will blink three times and then glow solidly.)
3. Upon correct PIN entry, the key will be unlocked and ready for use. If it is not plugged into a
USB port within 30 seconds, the key will return to sleep mode and automatically lock itself.
Adding a New User PIN
Performing a Complete Reset
Apricorn provides the following helpful resources:
1. Apricorn’s Website (
http://www.apricorn.com
)
2. E-mail us at
3. Call Technical Support at
1-800-458-5448
from
8:00 a.m. to 5:00 p.m. PST, M - F
Technical Support
1. Beginning in standby mode, press the button to wake the drive.
(The
RED
LED will glow solidly.)
2. Enter the Admin Mode by pressing and holding
+ 0
for five seconds
(
RED
LED will blink.)
3. Enter the Admin PIN and press
(
BLUE
LED will glow solidly.)
4. Press and hold
+ 1
until the
BLUE
LED glows solidly and the
GREEN
LED starts blinking.
5. Enter the PIN to be used as your User code and press .
(
BLUE
LED will turn off and
GREEN
LED
will blink 3 times by itself, then will continue blinking as
BLUE
LED resumes glowing solidly)
6. Quickly re-enter that same PIN once more and press
(If the PIN was successfully added,
BLUE
LED will turn off,
GREEN
LED will illuminate for a second
or two and then will turn off, followed by the
BLUE
LED glowing solidly indicating that the key has
returned to Admin Mode. If PIN is unacceptable or the second entry doesn’t match the first,
RED
LED will flash three times, followed by solid
BLUE
/ Blinking
GREEN
LEDs--Return to step 5 to retry.)
WARNING: BACK UP ALL IMPORTANT DATA PRIOR TO RESETTING THE SECURE KEY.
PERFORMING A
RESET WILL ERASE ALL DATA AND DISK FORMATTING. AFTER A RESET, THE SECURE KEY WILL NEED
A NEW ADMIN PIN SETUP AND WILL ALSO NEED TO BE INITIALIZED / REFORMATTED PRIOR TO USE.
FOR REFORMATTING INSTRUCTIONS, REFER TO THE SECURE KEY 3.0 USER’S MANUAL ONLINE.
To perform a complete reset of the key, do the following:
1. Press
+ + 2
together and hold as
RED
and
BLUE
LEDs blink alternately.
2. Continue to hold until blinking stops and either the
RED
or
BLUE
LED glows solidly,
then release all keys.
3. Reset is complete and the key will need a new Admin PIN.
(
BLUE
and
GREEN
LED will glow solidly.)
Formatting / Reformatting the Key
The Aegis Secure Key comes
preformatted in NTFS for
Windows
®
and is ready for use.
For the Mac OS, use Apple’s
Disk Utility to reformat the drive
to a Mac compatible file system.
Complete formatting instructions
can be found online at
www.apricorn.com/media/
uploads/ASK3_Manual.pdf
(Rev 1.8)
6/13/2016


