background image

OPERATOR MANUAL

MUM-14 

Monocular Night Vision Device

Summary of Contents for MUM-14

Page 1: ...OPERATOR MANUAL MUM 14 Monocular Night Vision Device ...

Page 2: ...Inside Cover ...

Page 3: ...OPERATOR MANUAL MUM 14 Monocular Night Vision Device ACTinBlack S à r l Rue de l Industrie L 3895 Foetz Grand Duchy of Luxembourg 352 20 30 10 30 info actinblack com www actinblack com ...

Page 4: ...5 This page intentionally left blank ...

Page 5: ... WARNING HIGHLIGHTS AN OPERATION OR PROCEDURE WHICH IF NOT STRICTLY OBSERVED COULDRESULTININJURYTOOR DEATH OF PERSONNEL CAUTION HIGHLIGHTS AN OPERATION OR PROCEDURE WHICH IF NOT STRICTLY OBSERVED COULD RESULT IN DAMAGE TO OR DESTRUCTION OF EQUIPMENT OR LOSS OF MISSION EFFECTIVENESS NOTE HIGHLIGHTS AN ESSENTIAL OPERATION PROCEDURE CONDITION OR STATEMENT ...

Page 6: ...7 iv This page intentionally left blank ...

Page 7: ...REPARATIONFOR USE 2 1 2 1 Introduction 2 1 2 2 Battery Precautions 2 1 2 3 CR123 Battery Installation 2 2 2 4 AA Battery Installation 2 3 2 5 Eyecup Installation 2 4 2 6 Demist Shield Installation 2 4 2 7 Sacrificial Window Installation 2 6 2 8 Headmount Adjustment and Installation 2 7 2 9 Attaching the Swing Arm tothe MUM 14 2 9 2 10 Attaching the Swing Arm Adapter to a Helmet 2 10 Head Mount 2 1...

Page 8: ...Adjustment 3 5 3 8 Objective Focus Ring 3 6 3 9 Hand held Operation 3 6 3 10 Head Mounted Operation 3 7 3 11 Operation in Conditions of Blowing Dust or Sand 3 9 3 12 Operation in Rainy orHumid Conditions 3 10 3 13 Operation in SaltWaterAreas 3 10 3 14 Shutting Down the Unit 3 10 3 15 Preparation for Storage 3 11 CHAPTER 4 MAINTENANCE INSTRUCTIONS 4 1 4 1 Introduction 4 1 4 2 Preparing for Maintena...

Page 9: ...HAPTER 5 TROUBLESHOOTING 5 1 5 1 Troubleshooting Procedures 5 1 APPENDIX A SPARE AND REPAIR PARTS LIST A 1 A 1 Introduction A 1 A 2 Contact Information A 1 A 3 Spare Part List A 1 APPENDIX b WARRANTY INFORMATION b 1 52 52 56 56 56 58 ...

Page 10: ...dmount Illustration 2 8 2 7 Swing Arm Adapter 2 9 2 8 Attaching the Swing Arm Adapter to a MUM 14 2 10 2 9 Attaching a MUM 14 to aHelmet Head Mount 2 10 2 10 Swing Arm Rotation 2 11 2 11 Weapon Mount Installation 2 13 2 12 Lens Cap Installation 2 14 2 13 IP Spot Flood Lens Installation 2 15 3 1 Controls and Indicators 3 2 3 2 Diopter Adjustment Ring 3 5 3 3 Objective Focus Ring 3 6 3 4 Head Mounte...

Page 11: ...OF TABLES 1 1 Standard Kit Parts List 1 2 1 2 Optional Items List 1 4 1 3 System Performance and Data 1 6 3 1 Controls and Indicators 3 3 5 1 Troubleshooting 5 1 A 1 Spare and Repair Parts List A 1 15 17 19 40 52 ...

Page 12: ...13 ix This page intentionally left blank ...

Page 13: ...n objective lens image intensifier and eyepiece lens The objective lens collects light reflected from the night scene and focuses an inverted image of the scene on the image intensifier The image intensifier converts the captured light into a visible image and reinverts the image which can then be viewed through the eyepiece lens The MUM 14 uses the MX 10160 type GEN III image intensifier and is c...

Page 14: ...up Assembly 1 3 Objective Lens Cap 1 4 Neck Cord 1 5 AA Alkaline Battery 1 6 CR123 Lithium Battery 1 7 Demist Shield 1 8 Shoulder Strap 1 9 Sacrificial Window 1 10 Lens Tissue 1 11 Operator Manual 1 12 Soft Carrying Case 1 13 Weapon Mount 1 14 Headmount Adapter 1 15 Headmount w Browpads S M L 1 16 Battery Adapter 1 Table 1 1 Standard Kit Parts List ...

Page 15: ...16 ...

Page 16: ...ist The MUM 14 is compatible with the following optional items and accessories listed in the following chart Item Description 1 Shipping Storage Case 2 Helmet Mount 3 5X Afocal Lens 4 3X Afocal Lens Table 1 2 Optional Items List ...

Page 17: ...18 ...

Page 18: ... 1 AA Alkaline or 1 CR123 Lithium Battery Life AA Alkaline 20 hrs 21 C 70 F Battery Life Lithium 40 hrs 21 C 70 F Physical Data Soft Carrying Case Dimensions 17 8cm x 30 1cm x 7 6cm 7 x 12 x 3 Monocular Dimensions L x W x H Max 11 4cm x 4 9cm x 7 9cm 4 5 x 1 9 x 3 1 Monocular Weight w battery 305g 10 7 oz Optical Data Magnification 1 0X Field of View 40 Eyepiece of Focus 4 to 6 diopters Focus Rang...

Page 19: ...ution 86 to 1 30 cy mR Environmental Data Operating Temperature 37 C to 54 C 35 F to 129 F Storage Temperature 51 C to 71 C 60 F to 160 F Submersion 20m for 1 hour Illumination Required Overcast starlight to moonlight Table 1 3 System Performance and Data cont ...

Page 20: ...21 1 8 This page intentionally left blank ...

Page 21: ...ARNING DO NOT HEAT PUNCTURE DISASSEMBLE SHORT CIRCUIT INCINERATE ATTEMPT TO RECHARGE OR OTHERWISE TAMPER WITH THE BATTERIES TURN OFF THE MUM 14 IF THE BATTERY COMPARTMENT BECOMES UNDULY HOT IF POSSIBLE WAIT UNTIL THE BATTERIES HAVE COOLED BEFORE REMOVING THEM WARNING DO NOT REPLACE BATTERIES IN A POTENTIALLY EXPLOSIVE ATMOSPHERE CONTACT SPARKING MAY OCCUR WHILE INSTALLING OR REMOVING BATTERIES AND...

Page 22: ...g a CR123 battery install as follows 1 Remove the battery cap by turning it counter clockwise 2 Check to ensure the o ring is present and in good condition If not replace it 3 Insert the battery into the battery compartment negative ends first positive ends toward the battery cap 4 Replace battery cap turning it clockwise until a stop occurs BATTERY COMPARTMENT BATTERY BATTERY CAP Figure 2 1 CR123...

Page 23: ...ng is present and in good condition If not replace it 3 Install the AA battery adapter by screwing it onto the battery sleeve in a clockwise direction until a stop occurs 4 Insert battery into the battery compartment negative ends first positive ends toward the battery cap 5 Install the battery cap onto the battery adapter turning it clockwise until a stop occurs Figure 2 2 aa Battery Installation...

Page 24: ...e eyecup into proper viewing position Adjustfor best fit The eyecup must seal around your eye to provide light security 2 6 Demist ShieldInstallation NOTE IF INCLEMENT OPERATING CONDITIONS ARE EXPECTED TO EXIST E G SIGNIFICANT TEMPERATURE CHANGE AND HIGH HUMIDITY INSTALL DEMIST SHIELD TO MINIMIZE EYEPIECE LENS FOG PRIOR TO EXECUTION OF MISSION Figure 2 3 eyecup Installation ...

Page 25: ...refully remove the eyecup 2 Gently screw the demist shield into the eyepiece until it seats being careful not to smudge the demistshield 3 Replace the eyecup Figure 2 4 Demist Installation CAUTION IF THE DEMIST SHIELD IS WIPED WHILE WET OR WITH WET LENS TISSUE YOU WILL DAMAGE THE COATING DEMIST ...

Page 26: ...ND ARE EXPECTED TO EXIST ATTACH THE SACRIFICIAL WINDOWTOPROTECTTHEOBJECTIVELENS FROM SCRATCHES OR OTHER DAMAGE 1 If the objective lens cap is in place remove it 2 Carefully push the sacrificial window into the objective lens with the sacrificial window threads facing toward the monocular 3 Securely screw the sacrificial window into the lens until it seats Figure 2 5 Sacrificial Window Installation...

Page 27: ...HEADMOUNT 3 With both hands grasp the neck pad and pull the harness over your head and the neck pad down to the back of your neck 4 Holding the chin cup in position on chin adjust both sides of the chinstrap until you feel light pressure against your chin DO NOT TIGHTEN 5 Maintain the position of the chin cup and remove any slack from the chinstrap DO NOT TIGHTEN 6 Ensure that the cross strap is n...

Page 28: ...29 2 8 8 Push the eye relief adjustment button and slide the headmount socket fully forward to receive the monocular Figure 2 6 Headmount Illustration ...

Page 29: ... 2 7 Swing arm adapter 1 Hold the MUM 14 in one hand 2 Hold the swing arm adapter in the other hand With the fore finger and the thumb rotate the dovetail knob an eight turn in either direction This will raise the centering pin 3 Slide the MUM 14 dovetail into the receiving dovetail of swing arm adapter until centered 4 Release Dovetail knob The dovetail knob is spring loaded and will recoil and c...

Page 30: ...31 2 10 not be able to release from mount while dovetail knob is interfaced properly with dovetail system of MUM 14 ...

Page 31: ...pyramid connector male end located on swing arm adaptor into receiving end of pyramid located on head or helmet mount 2 A click will be heard as the release arm snaps intoplace 3 Manually check to ensure that the swing arm adapter will not detach from the head or helmet mount Figure 2 9 attaching a mUm 14 to a Helmet Head mount ...

Page 32: ...matically stop when fully loosened 2 Pull swing arm out towards adjustment knob This will disengage the swing arm from the shaft splines and will unlock the adapter assembly 3 Rotate swing arm until in a satisfactoryposition 4 Release swing arm It will automatically recoil into a spline locked position 5 Tighten adjustment screw This will keep the swing arm from accidentally disengaging from a loc...

Page 33: ...HT OR LASER AIMING DEVICE NOTE IT IS RECOMMENDED THAT THE EYECUP BE REPLACED WITH THE SHUTTERED EYEGUARD DURING WEAPON MOUNTED USE 1 Orient the monocular and weapon mount as shown in Figure 2 11 2 Pull down on the weapon mount releaselever 3 Slide one of the two mini dovetail rails of the MUM 14 into the weapon mount alignment groove 4 Release the release lever and ensure it is locked into the min...

Page 34: ...f the monocular by holding the weapon in your normal firing position Adjust the fore aft position of the monocular as necessary by loosening the clamping screw and repositioning the weapon mount on theweapon s mounting rail Figure 2 11 Weapon mount Installation ...

Page 35: ...aps firmly over the objective lens housings until they are seated squarely 3 Ensure the lens caps are securely retained by the neck cord Figure 2 12 Lens Cap Installation CAUTION LENS CAPS SHOULD BE PLACED OVER OBJECTIVE LENSES FOR ANY DAY TIME APPLICATIONS TO PROTECT THE IMAGE TUBE FROM BEING DAMAGED ...

Page 36: ... flood Lens Installation 1 Press the IR spot flood lens over the IRsource 2 Ensure it is seated squarely against the MUM 14 housing for a secure fit Figure 2 13 IR Spot Flood Lens Installation IR SOURCE IR SPOT FLOOD LENS ...

Page 37: ...E DEPENDS ON THE LEVELOF LIGHT NIGHT LIGHT IS REDUCED BY PASSING CLOUD COVER WHILE OPERATING UNDER TREES IN BUILDING SHADOWS ETC THE MUM 14 IS LESS EFFECTIVE VIEWING INTO SHADOWS AND OTHER DARKENED AREAS THE MUM 14 IS LESS EFFECTIVE THROUGH RAIN FOG SLEET SNOW SMOKE AND OTHER REFLECTIVE MATERIAL 3 3 Controls and Indicators The MUM 14 is designed to adjust for different users and corrects for most ...

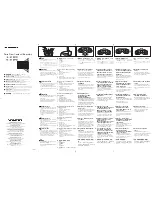
Page 38: ...39 3 2 Figure 3 1 Controls and Indicators FOCUS SWITCH KNOB SYMBOLOGY ...

Page 39: ... eyepiece just outside the intensified field of view Low Battery Indicator A blinking yellow light indicates a low battery with less than 30 minutes of battery life remaining It is visible through the eyepiece just outside the intensified field of view Objective Focus Focuses objective lens for scenes at different distances Adjusts for sharpest image of viewed object Diopter Adjustment Focuses eye...

Page 40: ...s visible 3 5 Operations with IR Source WARNING THE IR SOURCE IS A LIGHT THAT IS INVISIBLE TO THE UNAIDED EYE FOR USE DURING CONDITIONS OF EXTREME DARKNESS HOWEVER THE LIGHT FROM THE IR SOURCE CAN BE DETECTED BY THE ENEMY USING NIGHT VISION DEVICES NOTE THE PURPOSE OF THE IR SOURCE IS FOR VIEWING AT CLOSE DISTANCES UP TO 5 METERSWHENADDITIONALILLUMINATION IS NEEDED 1 Ensure that the battery is ins...

Page 41: ...e light will be located just outside the intensified field of view This is to alert the operator of a low battery condition 3 7 DiopterAdjustment To focus the eyepiece in accordance with your specific optical correction from 4 through 6 diopters do the following 1 Power the monocular ON 2 Look through the MUM 14 at the noise or snow on the screen 3 Rotate the diopter adjustment ring as necessary f...

Page 42: ...1 Power the monocular ON 2 Set the diopter adjustment for the clearest focus 3 Look through the MUM 14 so that an object or scene appears on the screen 4 Rotate the objective focus ring clockwise or counter clockwise to sharpen focus OBJECTIVE FOCUS RING Figure 3 3 Objective Focus Ring 3 9 Hand held Operation CAUTION OPERATE THE MONOCULAR ONLY UNDER DARKENED CONDITIONS OR USE THE OBJECTIVE LENS CA...

Page 43: ...t until the sharpest image is obtained 3 10 Head Mounted Operation CAUTION OPERATE THE MONOCULAR ONLY UNDER DARKENED CONDITIONS OR USE THE LENS CAP TO COVER THE OBJECTIVE LENS FOR DAYLIGHT CONDITIONS 1 Ensure that battery is installed correctly 2 Adjust and don the headmount following the instructions found in paragraph 2 8 NOTE TO MAKE IT EASIER TO ALIGN THE MONOCULAR EYECUP AND EYEPIECE LENS TO ...

Page 44: ...monocular until it is properly aligned with your eye Tighten the adjustment knob to secure themonocular NOTE THE SHARPEST IMAGE WILL BE OBSERVED ONLY WHEN THE OBJECTIVE LENS AND EYEPIECE LENS ARE PROPERLY FOCUSED 7 Rotate the diopter adjustment for the clearest view of the image intensifier screen NOTE ANY READJUSTMENT OF EYE RELIEF REQUIRES READJUSTMENT OF THE DIOPTER 8 Adjust the eye relief dist...

Page 45: ...CAUTION OPERATION IN BLOWING DUST OR SAND CAN PIT AND SCRATCH THE OPTICAL ELEMENTSANDDAMAGETHEMECHANICAL COMPONENTS UNLESS THE PRECAUTIONS GIVEN BELOW ARE OBSERVED 1 Ensure that the sacrificial window is inplace 2 Avoid pointing the monocular into the wind unless necessary for operation EYE RELIEF ADJUSTMENT BUTTON ...

Page 46: ...closed unless removing or replacing items 3 Dry the monocular mounts and accessories after exposure to rain or high humidity and before storage Do not store monocular in a wet carrying case 3 13 Operation in Salt Water Areas After exposure to salt water clean the unit as instructed in this manual by rinsing in fresh water and air drying the unit CAUTION DO NOT STOW THE UNIT ITS CARRYING CASE WHEN ...

Page 47: ... shield or sacrificial window if installed Install objective lens cap NOTE PRIORTOPLACINGMUM 14INTOCARRYING CASE ENSURE MUM 14 AND CASE ARE FREE OF DIRT DUST AND MOISTURE 5 Place the MUM 14 accessories and cleaning supplies back into their storage carrying case It is best to place the items in their original locations to prevent any possible damage to the unit and or accessories 6 Return to storag...

Page 48: ...49 3 12 This page intentionally left blank ...

Page 49: ...WIPING DEMIST SHIELD WITH LENS TISSUE WHILEWETORWITHWETLENSTISSUE CAN DAMAGE THE COATING 4 2 Preparing for Maintenance Before performing any maintenance or cleaning of the system remove the battery from the MUM 14 4 3 Cleaning the MUM 14 When necessary use a moistened clean cloth to wipe the outside of the unit EXCEPT FOR THE OPTICAL SURFACES Be sure to wipe away excess dirt and dust that may rest...

Page 50: ...ns surfaces If the lens remains dirty use a cotton swab lightly moistened with lens cleaning fluid to remove the foreign matter from the lens Dry with a clean unused lens tissue 4 5 Checking for Damage and corrosion As a general guideline conduct an inspection of the MUM 14 accessories and the case after every use Look for heavy wear and cracks in rubber or plastic Inspect for moisture or corrosio...

Page 51: ...to find the fault or all the corrective actions needed to correct the fault If the equipment malfunction is not listed or actions listed do not correct the fault notify your maintainer Malfunction Test for Inspection corrective Action Monocular Visual Ensure that the power fails to switch knob is in the ON or activate IR position Check for missing Replace battery or install improperly installed or...

Page 52: ...iece Check for fogging or Clean lens surface dirt on objective lens or eyepiece lens Check eye relief Readjust for proper eye distance relief distance Light visible around eyecup Check eyecup for resiliency If eyecup is defective refer to higher level of maintenance Diopter Check to see if the If damaged refer to higher adjustment diopter adjustment is level of maintenance cannot be bent or broken...

Page 53: ...sual If damaged return to higher does not cut level of maintenance off when Perform the following exposed to test under daylight or high light bright room light not fluorescent light Place the objective lens cap on the objective lens Activate monocular and observe that it cuts off within 70 30 seconds after energized Cycle the power switch knob to OFF and then ATUO ON or IR to reenergize monocular...

Page 54: ...55 This page intentionally left blank ...

Page 55: ...ed to identify contact and order spare and or repair parts for the DTNVG A 2 Contact Information To order spare or repair parts for the DTNVG or any of your night vision products contact ACTinBlack S à r l Rue de l Industrie L 3895 Foetz Grand Duchy of Luxembourg sales actinblack com ...

Page 56: ...57 This page intentionally left blank ...

Page 57: ...opportunity as deemed reasonable to remedy failures to meet the foregoing warranties To remedy such failures ACTinBlack shall repair or at its option replace the defective product ACTinBlack s obligation to repair or replace as aforesaid shall not apply to any goods which are normally consumed in operation or have a normal life inherently shorter that the warranty period specified above or are not...

Page 58: ...ACTinBlack for repair or replacement require a RMA Email info ACTinBlack com with a serial number and detailed information to obtain a RMA THIS WARRANTY IS EXCLUSIVE AND IN LIEU OF ANY OTHER WARRANTY EITHER EXPRESSED OR IMPLIED INCLUDING WARRANTIES OF MERCHANTABILITY OR FITNESS FOR PURPOSE ...

Page 59: ...ACTinBlack S à r l Rue de l Industrie L 3895 Foetz Grand Duchy of Luxembourg www actinblack com Part No MAN MUM 001 August 2016 ...

Reviews: