1.1
Mounting all model
1
Mounting
2
Explanations
3
Basic settings
Table 3
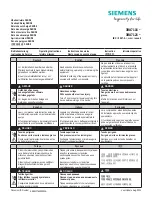
Technical data
Nominal voltage
Voltage range
3x120-240 V AC
(-20% to +15%)
Base current I
b
5 A
Rated current I
n
-
Reference current I
ref
5 A
Maximum current I
max
65 A
Terminal wire area
Frequency
50 or 60 Hz ± 5%
Accuracy Class
B (Cl. 1) and Reactive Cl. 2
Active energy
1%
Environmental
Operating
temperature
-40 to +70°C
Storage temperature
-40°C to +85°C
Humidity
75% yearly average, 95% on 30 days/year
Resistance to water
and dust
IP20 on terminal block without protective
enclosure and IP51 in protective enclosure,
according to IEC 60529.
Mechanical
environment
Class M2 in accordance with the Measuring
Instrument Directive (MID). (2014/32/UE).
Electromagnetic
environment
Class E2 in accordance with the Measuring
Instrument Directive (MID), (2014/32/UE).
Outputs
Current
2 - 100 mA
Voltage
5 - 240 V AC/DC.
5 - 40 V DC. For meters with only 1 output.
Pulse output
frequency
Programmable: 1 - 999999 imp/kWh
Pulse length
Programmable: 10 - 990 ms
Terminal wire area
0.5 - 1 mm2
Inputs
Voltage
0 - 240 V AC / DC
OFF
0 - 5 V AC / DC
ON
57 - 240 V AC / 24 - 240 V DC
Min. pulse length
30 ms
Terminal wire area
0.5 - 1 mm2
Standards
IEC 62052-11, IEC 62053-21 class 1, IEC 62053-23 class 2, ,
EN 50470-1, EN 50470-3 category B, UL 61010-1,
UL,ANSI C12.1
Material
Polycarbonate in transparent front glass.
Glass reinforced polycarbonate in bottom case and
upper case. Polycarbonate in terminal cover.
1 2 3
20
kV h
OK
SET
3
C
Out 1
13 15
B23 1xx-xxx
B23 3xx-xxx
13 15 16 17 18
C
Out 1 Out 2 Inp 3
Inp 4
I/O
(0,25 Nm)
35 36 37
RS-485
B
A
C
(0,25 Nm)
1.2
Connection -B23
L1
L2
L3
N
6
9
3
11
4
7
1
L1
L2
L3
N
3 x ≤ 65 A
(2,0 Nm)
L1
L2
L3
6
9
3
4
7
1
L1
L2
L3
3 x ≤ 65 A
(2,0 Nm)
B23 UL
INSTALLATION MANUAL
2CMC483004M0002
November 2021 Rev A
Contact us
ABB Spa
Via Dell'Industria, 18
20009 - Vittuone -
Milano Italy
Tel. +39 02 2415 0000
www.abb.com
© Copyright 2021 ABB Spa. All rights
reserved.
Specification subject to change without
notice.
Avertissement! Installation uniquement par des
personnes qualifiées en électrotechnique.
¡ Advertencia! La instalación deberá ser realizada
únicamente por electricistas especializados.
Warning! Installation by person with electrotechnical
expertise only.
Warnung! Installation nur durch elektrotechnishe
Fachkraft.
Avvertenzal! Fare installare solo da un elettricista
qualificato.
Pulse output
Pulse 1
Quantity : Active Energy Import
Frequency: 100 Imp/kWh
Length: 100 ms
Output: 1
Pulse 2
Quantity : Active Energy Export
Frequency: 100 Imp/kWh
Length: 100 ms
Output: 2
Wires
Wires: 4 Wires
(3 Phases & Neutral)
3.2
B23 - Pulse output
3.1
Default settings
PZ2
5.5 mm
OK
SET
Table 1
Button instruction
Button
Function
Down / Up (Short press / Up (long
press
OK (short press / Exit (long
press
Set
Table 2
Symbol instruction
Symbol Action
Press this button < 1 s (short
press)
Press and hold button > 1 s (long
press)
/
Setting sequence
Screen is flashing
2x
Number of keystrokes
Setting finished
1
1 2 3 !
T1
0.00
kVV h
OK
SET
2x
2
1 2 3
PULSE
OK
SET
SET
5
1 2 3 !
T1
ACt 1
kVV h
OK
SET
6
1 2 3 !
T1
ACt 1
kVV h
OK
SET
3
1 2 3
PULS 1
OK
SET
8
1 2 3
QUANT
OK
SET
7
1 2 3 !
T1
ACt 1
kVV h
OK
SET
1 2 3 !
T1
10
kV h
OK
SET
10
1 2 3 !
T1
000010
kV h
OK
SET
7x
11
1 2 3 !
T1
frequen
OK
SET
9
13
1 2 3 !
T1
LENGTh
OK
SET
14
1 2 3 !
T1
100
OK
SET
16
1 2 3 !
T1
100
OK
SET
17
1 2 3 !
T1
OUTPUT
SET
18
1 2 3 !
T1
1 OUT
OK
SET
15
1 2 3 !
T1
100
OK
SET
2x
1 2 3 !
T1
1 OUT
OK
SET
19
1 2 3 !
T1
1 OUT
OK
SET
20
1 2 3
000020
OK
SET
3x
2
1 2 3
3 ires
OK
SET
3
(No Neutral
)
1 2 3 !
4 ires
OK
SET
4
(With Neutral
)
3.3
B23/ - Wires
1 2 3
ires
OK
SET
2
(Wir
es)
1 2 3 !
T1
10
OK
SET
3. Change Value
Enter the value when
the digit blinks.
NO
2,5mm
RS-485
I/O
6 mm
13 mm
1
2
3
1 2 3 !
T1
10
kV h
OK
12
4
Explanations
1 2 3 !
T1
10
OK
SET
1
Example:
Set 10 to 20
4x
Service and maintenance
OBS! Disconnect and make sure that it is absolutely safe to
enter the installation before any service and maintenance
actions or attempt to clean the meter.
Control on a regular basis that the connections to the meter are
correct with respect to torque, insulation etc. Inspect also the
wires with respect to wear and tear. There is no service or
maintenance required for the meter itself. A meter with mal-
function cannot be repaired and hence it must be replaced.
Recalibration
It should not be necessary to recalibrate the meter during
its lifetime as it is an electronic meter with no moving parts with
electronics and voltage and current sensors that do
not naturally degrade or change with time under specified
environmental conditions. If a degradation in the accuracy is
observed the meter has probably been partly damaged (for
example due to lightning strike or extreme environmental
conditions etc.) and should be exchanged.
Cleaning
If the meter is dirty and need to be cleaned, use lightly moist-
ened cloth with a water based mild detergent. Make sure no
liquid goes into the meter as this could damage the meter and
cause danger.
Table 2
Symbol on meter
Symbol
Action
RU symbol
Warning symbol
Watthour meter
CA 1.0 3W and 4W
ANSI indication
AC symbol
Suitable only for indoor use
Local wiring rules applies and should be followed. To fulfil the
UL requirements the meter must be installed inside a cabinet or
an enclosure which is UL listed.
1 2 3
100-5
OK
SET
2
1 2 3 !
T1
5-5
OK
SET
1. Select a value
Select a value when
the digit blinks.
1 2 3 !
T1
5-5
OK
SET
2x
1
Example:
Set CT Ratio 100/5
1 2 3 !
T1
5-5
OK
SET
2. Cancel a value
3.4
Change / Select values
1 2 3 !
T1
0
.
00
kVV h
OK
SET
7x
1
(Def
ault Menu)
4
1 2 3
QUANT
OK
SET
4/10 AWG Stranded, 10/14 AWG Solid
120/208/240/415V AC 3