background image


3B SCIENTIFIC

®

 PHYSICS 


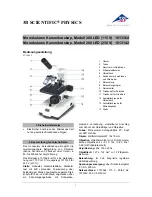
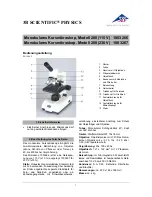
Binokulares Polarisationsmikroskop   1012404 


Bedienungsanleitung 

08/13 ALF 


1 Okular 

2 Tubus 

3 Analysator 

4  Revolver mit Objektiven  

5 Präparateklemmen 

6 Objekttisch 


7 Kondensorregler 

8  Kondensor mit Irisblende Filter-

halter und Polarisator 

9 Beleuchtung 

10 Beleuchtungsregler 

11 Netzschalter 

12  Feststellschraube für Polarisator 

13  Grob- und Feintrieb mit Feststell-

bremse 

14  Feststellschraube für Objekttisch 

15 Stativ 

16  Feststellschraube für Mikroskop-

kopf 


1. Sicherheitshinweise 


Elektrischer Anschluss des Mikroskops darf 
nur an geerdeten Steckdosen erfolgen. 

Vorsicht! Die Lampe erhitzt sich während des 
Gebrauchs. Verbrennungsgefahr! 


Während und nach Gebrauch des Mikro-
skops Lampe nicht berühren. 


2. Beschreibung, technische Daten 

Das binokulare Polarisationsmikroskop ermög-
licht die zweidimensionale Betrachtung von Ob-
jekten (dünne Schnitte von Gesteinsproben, 
Pflanzen- oder Tieren) in 40- bis 400-facher 
Vergrößerung in polarisiertem Licht.  

Stativ:

 Robustes Ganzmetallstativ, Stativarm fest 

mit Fuß verbunden; Fokussierung über beidseitig 
am Stativ angebrachte koaxiale Stellknöpfe für 
Fein- und Grobtrieb mit Kugellager und Feststell-
bremse; einstellbarer Anschlag zum Schutz der 
Objektträger und Objektive. 

Tubus: 

Binokularer Schrägeinblick 30°, Kopf um 

360° drehbar, Augenabstand zwischen 54 mm 
und 75 mm einstellbar, Dioptrienausgleich ±5 für 
beide Okulare 

Polarisationseinrichtung:

 Polarisator mit Skala 

und Analysator in Tubus einschiebbar 

Okular:

 Weitfeld-Okularpaar WF 10x 18 mm 

Objektive:

 Invers geneigter Objektivrevolver mit 

3 DIN achromatischen Objektiven 4x / 0,10, 10x 
/ 0,25, 40x / 0,65 

Vergrößerung:

 40x, 100x, 400x 

Objekttisch: 

Runder Objekttisch Ø 120 mm, um 

360° drehbar, Gradeinteilung mit Nonius und 2 
Präparateklemmen 

Beleuchtung:

 Im Fuß integrierte, regelbare 

Halogen-Leuchte 6 V, 20 W; universale Span-
nungsversorgung 85 V bis 265 V, 50/60 Hz Hz 

Kondensor:

 Abbe Kondensor N.A.1,25 mit Iris-

blende, fokussierbar über ein Zahnstangengetriebe 

Abmessungen: 

ca. 240 x 190 x 425 mm³ 

Masse: 

ca. 6 kg 

Summary of Contents for 1012404

Page 1: ...Tieren in 40 bis 400 facher Vergrößerung in polarisiertem Licht Stativ Robustes Ganzmetallstativ Stativarm fest mit Fuß verbunden Fokussierung über beidseitig am Stativ angebrachte koaxiale Stellknöpfe für Fein und Grobtrieb mit Kugellager und Feststell bremse einstellbarer Anschlag zum Schutz der Objektträger und Objektive Tubus Binokularer Schrägeinblick 30 Kopf um 360 drehbar Augenabstand zwisc...

Page 2: ...eginnen um zuerst größere Strukturdetails zu erkennen Der Übergang zu einer stärkeren Vergrößerung zur Betrachtung feinerer Details erfolgt durch Drehen des Revol vers bis zum gewünschten Objektiv Die Stärke der Vergrößerung ergibt sich aus dem Produkt des Vergrößerungsfaktors des Okulars und des Objektivs Mit der Feststellbremse geeignete Span nung des Fokusiersystems einstellen Mit dem Triebknop...

Page 3: ...ps mit einem flachen Gegenstand z B Schraubenzieher herausschrauben Sicherung ersetzen und Halter wieder ein schrauben 5 Aufbewahrung Reinigung Entsorgung Das Mikroskop an einem sauberen trocke nen und staubfreien Platz aufbewahren Bei Nicht Benutzung das Mikroskop immer mit der Staubschutzhülle abdecken Das Mikroskop keinen Temperaturen unter 0 C und über 40 C sowie keiner relativen Luftfeuchtigk...

Page 4: ......

Page 5: ...in 40x to 400x magnification in polarised light Stand Robust all metal stand with arm perma nently connected to the base Focussing by means of separate knobs for coarse and fine adjustment located on either side of the stand and operated by rack and pinion drive with ball bearings and retaining lever adjustable stopper for protecting the object slides and objective Tube Binocular head 30 viewing a...

Page 6: ...s pointed at the specimen There is a definite click when each objective is lined up properly NOTE It is best to begin with the lowest power objective This is important to reveal general structural details with the largest field of view first Than you may increase the magnification as needed to reveal small details To determine the magnification at which you are viewing a specimen multiply the powe...

Page 7: ... A knurled screw B ven tilation slots C securing screws of lamp holder 4 3 2 Changing the fuse Turn off the power switch and unplug the mains plug Unscrew the fuse holder on the back of the stand base with a screwdriver Replace the fuse and reinsert the holder in its socket 5 Storage cleaning and disposal Keep the microscope in a clean dry and dust free place When not in use always cover the micro...

Page 8: ......

Page 9: ...scope polarisant binoculaire permet d observer des objets en deux dimensions cou pes fines d échantillons de roche des plantes ou d animaux avec un agrandissement 40 à 400x de la lumière polarisée Support Bâti support entièrement métallique Grande robustesse Mise au point rapide par pignon crémaillère à roulement à billes fine par vis micrométrique à commandes coaxiales de précision avec frein de ...

Page 10: ...c le plus petit agrandis sement dans le faisceau lumineux Un clic signale la bonne position Remarque commencer par le plus petit agran dissement pour découvrir d abord les grands details de la structure Pour passer à un plus fort agrandissement pour voir des détails plus fins tourner le revolver jusqu à l objectif souhaité La force d agrandissement résulte du produit du facteur d agrandissement de...

Page 11: ... 4 3 2 Remplacement de fusible Couper l alimentation électrique et retirer impérativement la fiche secteur Dévisser le porte fusible à l arrière du mi croscope avec un objet plat par ex tourne vis Remplacer le fusible et visser de nouveau le porte fusible 5 Rangement nettoyage disposition Ranger le microscope à un endroit propre sec et exempt de poussière Si le microscope n est pas utilisé le reco...

Page 12: ......

Page 13: ...i di campioni di rocce piante o animali con ingrandimento da 40 a 400 volte in luce polarizzata Stativo Robusto stativo completamente in me tallo braccio dello stativo fissato saldamente alla base messa a fuoco attraverso manopole coas siali per regolazione macrometrica e micrometri ca separate poste ai lati dello stativo con cusci netto a sfere e freno di arresto battuta regolabile per la protezi...

Page 14: ...ide e l illuminazione regolabile Ruotare l obiettivo con l ingrandimento mi nimo fino a portarlo sul percorso dei raggi luminosi Il raggiungimento della corretta posizione viene segnalato dallo scatto dell obiettivo Nota È opportuno cominciare con l ingrandimento minimo per poter riconoscere dapprima i dettagli macroscopici delle strutture Il passaggio a fattori di ingrandimento maggiori avviene a...

Page 15: ...del portalampada 4 3 2 Sostituzione del fusibile Disconnettere l alimentazione elettrica ed estrarre assolutamente la spina Svitare il portafusibili sul lato posteriore del microscopio con un oggetto piatto ad es un cacciavite Sostituire il fusibile e riavvitare il supporto 5 Conservazione pulizia smaltimento Conservare il microscopio in un luogo pulito asciutto e privo di polvere Durante il perio...

Page 16: ......

Page 17: ...cos El microscopio de polarización binocular permite la observación bidimensional de objetos cortes delgados de muestras de rocas tejido animal o vegetal ampliados entre 40 y 400 veces con luz polarizada Soporte Soporte de metal macizo brazo soporte de montaje fijo en el pedestal focalización por medio de ambos botones coaxiales para accionamiento burdo y fino con cojinete de bolas y freno de encl...

Page 18: ...ble un círculo luminoso Se acomoda el número de dioptrias de los ojos Para lograr un contraste alto se ajusta la iluminación de fondo por medio del diafragma de iris y la iluminación regulable Gire el objetivo con el menor factor de ampliación hacia el haz de luz Un sonido de clic indica la posición correcta Nota Es mejor empezar con la ampliación más pequeña para en primer lugar reconocer los det...

Page 19: ...ornillos se fijación del casquillo de la lámpara 4 3 2 Recambio de fusible Desconecte la alimentación de corriente Es imprescindible que también desconecte el enchufe de la red En la parte posterior del microscopio desatornille el portafusibles con un objeto plano p ej Un destornillador Reemplace el fusible y vuelva a atornillar el portafusibles 5 Mantenimiento limpieza desecho El microscopio debe...

Page 20: ......

Page 21: ...o após o utilização do microscópio 2 Descrição dados técnicos O microscópio de polarização binocular possibilita a observação em duas dimensões de objetos finas lâminas cortadas de amostras de rocha plantas ou animais com um aumento de 40 até 400 vezes em luz polarizada Tripé Pé de apoio inteiramente metálico e robusto braço de apoio fixado no pé ajuste focal por meio de botões de ajuste fino e gr...

Page 22: ...au de dioptria aos olhos Para se obter uma iluminação de fundo de alto contraste deve se efetuar o ajuste por meio da íris e da iluminação ajustável Girar a objetiva com o menor grau de aumento até a linha do raio luminoso O som de um clique indicará que a posição está correta Observação é melhor começar a observação com a objetiva de menor grau de ampliação de forma a reconhecer primeiro os detal...

Page 23: ...afusos de fixação da rosca da lâmpada 4 3 2 Troca de fusível Desligue a alimentação elétrica e retire em todo caso o fio da tomada Desenrosque o suporte do fusível na parte posterior do microscópio com um objeto plano uma chave de fenda por exemplo Troque o fusível e volte a instalar o suporte 5 Armazenamento limpeza eliminação Armazenar o microscópio num lugar limpo seco e sem poeira Quando não u...

Page 24: ......

Reviews: