Scan Optics SO-5800, User Manual
The Scan Optics SO-5800 Assembly Manual is a comprehensive user guide designed to assist you in effortlessly assembling and utilizing your product. This manual is available for download, completely free of charge, from our website. Unlock the full potential of your Scan Optics SO-5800 with detailed instructions and diagrams.
Share
Download


Reviews:
No comments
Related manuals for SO-5800

LSM 900
Brand: Zeiss Pages: 22

MEC4
Brand: Unitron Pages: 20

Crossbeam 350
Brand: Zeiss Pages: 126

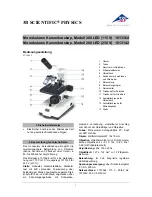
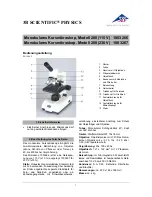
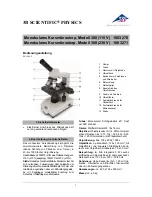
BS-200
Brand: 3B SCIENTIFIC PHYSICS Pages: 24

ERUDIT ICD
Brand: Bresser Pages: 12

SMZ645
Brand: Nikon Pages: 29

EXS-210-24
Brand: Accu-Scope Pages: 13

200 1013143
Brand: 3B SCIENTIFIC PHYSICS Pages: 12
200 1013142
Brand: 3B SCIENTIFIC PHYSICS Pages: 12

200 1003268
Brand: 3B SCIENTIFIC PHYSICS Pages: 12
200 1003266
Brand: 3B SCIENTIFIC PHYSICS Pages: 12

ME5
Brand: 3B SCIENTIFIC Pages: 4

4083.2
Brand: Optika Italy Pages: 28
300 1003271
Brand: 3B SCIENTIFIC PHYSICS Pages: 12

SteREO Discovery Vertical Illumination Device S
Brand: Zeiss Pages: 10

Vision V4002
Brand: Woodley Pages: 52

Extech Instruments MC108
Brand: FLIR Pages: 9

DW-2002H
Brand: Drawell Pages: 11


