

Bitbox Micro 1.0 Quick Start Guide
Page 1 of 2
Copyright 1010music LLC 2020
This guide will give you a high-level introduction to bitbox micro. To learn more of the details of how this module works, download the
user manual or watch tutorial videos from
https://1010music.com/microdocs
.
Find community, support, wish lists, and firmware updates
on our forum at
https://forum.1010music.com
.
Setup
1.
Insert the microSD card into the MICRO SD slot, notched edge to the right.
2.
Turn off your Eurorack and use the ribbon cable to connect the module to power:
•
The narrow connector attaches to the module, with the red side of the cable on the side of
the header with a white bar.
•
The wide connector attaches to the Eu12V power supply, with the red side of the
cable aligned with pin 1 or the -12V pins on the power supply bus.
3.
Mount the module into the rack and then power it up.
After boot up, the bitbox micro displays the Pads screen with a grid of WAV files loaded from one
of the presets provided on the microSD card.
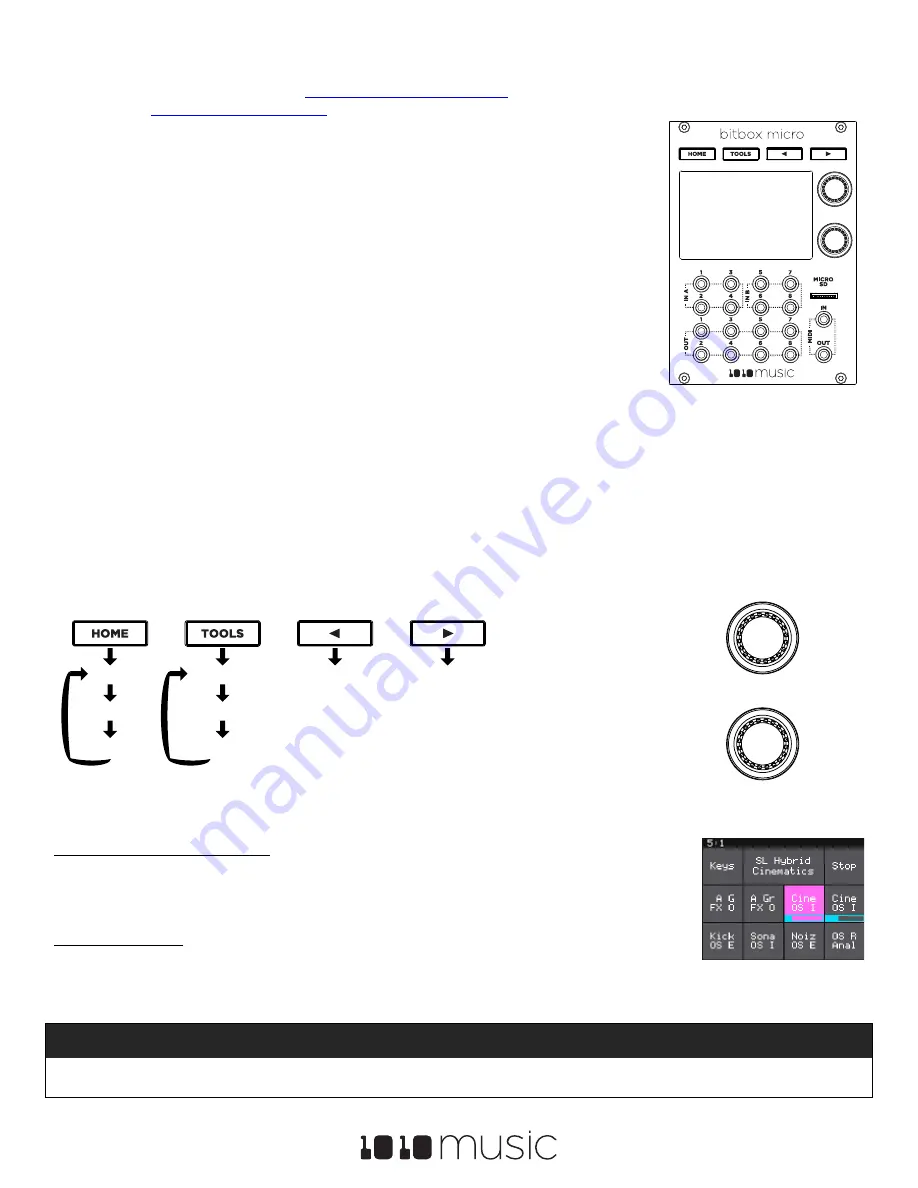
Inputs and Outputs
Bitbox micro has 8 input and 8 output jacks that support the following connections:
Inputs 1 – 2:
Gate, CV, Clock, Audio
Inputs 3 – 8:
Gate, CV, Clock
Outputs 1-6:
assignable audio
Outputs 7-8:
Master audio left and right
A gate signal on an input can trigger the corresponding pad. Connect a controller to the MIDI In jack to trigger pads and modulate
parameters.
Navigation
You control bitbox micro using the four white buttons across the top, the two knobs on the right, and the touchscreen. Push the Home
and Tools buttons repeatedly to cycle through the associated screens. Push the arrow buttons to view more or less detail about the
selected element. Turn the knobs to select elements and assign values. On the touch screen, you can use tap, pinch and stretch
gestures to select items, trigger pads, push buttons, zoom in or zoom out.
Presets
Bitbox micro stores pad configurations as Presets. A number of demonstration presets are preloaded on the micro SD card.
To Save Changes to a Preset:
1.
Touch the name of the preset at the top of the Pads screen (
SL Hybrid Cinematics
in the screen shot
on the right) to access the Preset Management screen.
2.
Touch
Save
or
File
then
Save As
to save changes. Save is disabled if there are no unsaved changes.
To Load a Preset:
1.
Touch the name of the preset at the top of the Pads screen to access the Preset Management screen.
2.
Turn a knob to select a preset, then touch
Load
to make this the active preset.
Note:
•
Bitbox micro does not automatically save your changes.
Any unsaved changes will be lost when you load a preset or power down
the module.
Pads
Mixer
FX
Settings
Input
Output
More Detail
Less Detail
Top Knob:
Select an
Element
Bottom Knob:
Assign a
Value
Pads Screen


