background image

VES-1000 Series Ethernet Switch  

2-2 

Hardware Installation


• 

Make sure the position of the VES-1008 does not make the rack unstable or top-heavy.  Take all 
necessary precautions to anchor the rack securely before installing the unit. 

Step 1. 

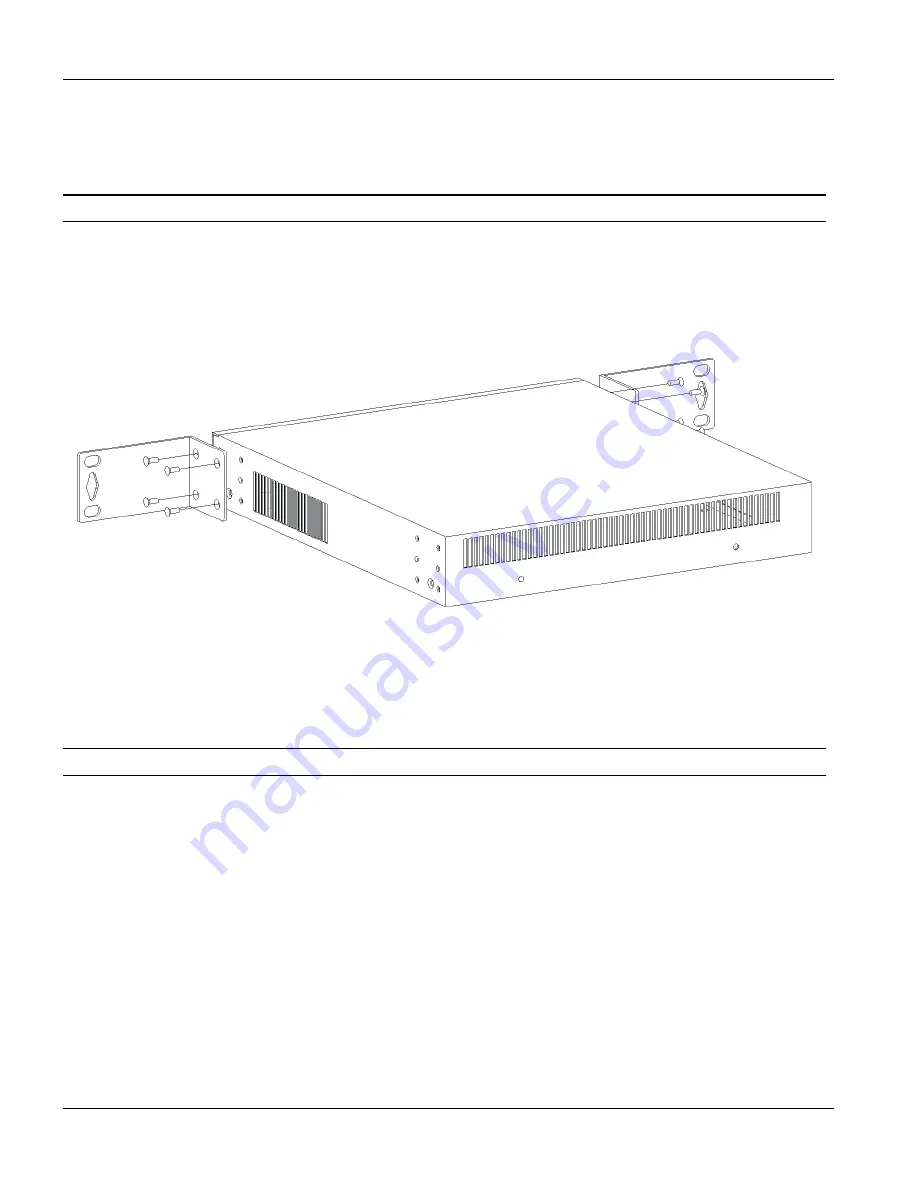
Position a mounting bracket on one side of the VES-1008, lining up the four screw holes on the bracket 
with the screw holes on the side of the unit (Figure 2-1). 

Failure to use the proper screws may damage the unit. 

Step 2. 

Using a #2 Philips screwdriver, install the M3 flat head screws that came with the brackets through the 
mounting bracket holes into the VES-1008. 

Step 3. 

Repeat Step 1 and Step 2 to install the second mounting bracket on the other side of the unit. 


Figure 2-1 Attaching the Mounting Brackets to the VES-1008 

You may now mount the VES-1008 in a rack.   

Step 1. 

Position a mounting bracket (that is already attached to the VES-1008) on one side of the rack, lining up 
the two screw holes on the bracket with the screw holes on the side of the rack (Figure 2-2). 

Failure to use the proper screws may damage the unit. 

Step 2. 

Using a #2 Philips screwdriver, install the M5 flat head screws through the mounting bracket holes into 
the rack. 

Step 3. 

Repeat Step 1 and Step 2 to attach the second mounting bracket on the other side of the rack. 

Summary of Contents for VES-1008

Page 1: ...VES 1000 Series VDSL Ethernet Switches May 2002 Version 3 40 Hardware Installation Guide...

Page 2: ...or written permission of ZyXEL Communications Corporation Published by ZyXEL Communications Corporation All rights reserved Disclaimer ZyXEL does not assume any liability arising out of the applicatio...

Page 3: ...ged by an act of God or subjected to abnormal working conditions Note Repair or replacement as provided under this warranty is the exclusive remedy of the purchaser This warranty is in lieu of all oth...

Page 4: ...sales zyxel com tw 886 3 578 2439 ftp europe zyxel com ZyXEL Communications Corp 6 Innovation Road II Science Based Industrial Park Hsinchu 300 Taiwan support zyxel com 1 714 632 0882 800 255 4101 ww...

Page 5: ...pus Applications 1 3 Chapter 2 Hardware Installation 2 1 2 1 Operating Environment 2 1 2 2 Installing the VES 1008 2 1 2 2 1 Free standing 2 1 2 2 2 Rack mounted 2 1 2 2 3 Wall Mounted 2 3 2 3 Install...

Page 6: ...ing On Your VES 1000 Series Switch 5 1 5 1 Introduction 5 1 5 2 Front Panel LEDs 5 1 Chapter 6 Hardware Troubleshooting 6 1 System Startup 6 1 6 1 1 My PWR LED Does Not Turn On 6 1 6 1 2 My SYS LED Do...

Page 7: ...n Overview for a VES 1012 3 1 Figure 3 2 Telco Cable 3 2 Figure 3 3 MDF Main Distribution Frame Wiring 3 3 Figure 3 4 Installation Scenario A Using a VES 1012 3 4 Figure 3 5 One MDF for End user and C...

Page 8: ...r C Diagram 6 VES 1012 Telco 50 Pin Assignments for Phone Lines D Diagram 7 VES 1012 Telco 50 Pin Assignments for VDSL Connections E List of Tables Table 5 1 VES 1000 Series Switches LED Descriptions...

Page 9: ...added system stability In addition to remote management capability a console port is used for local management This 8 port switch is equipped with VLAN Virtual LAN capability that can isolate each por...

Page 10: ......

Page 11: ...qually applicable for the VES 1008 The following are typical applications for the VES 1000 Series of switches 1 Multiple Tenant Unit MTU 2 Enterprise 3 Campus 1 1 1 MTU Application The following figur...

Page 12: ...et Switch 1 2 Applications Figure 1 1 Building Deployment Example Using a VES 1012 1 1 2 Enterprise Application The VES 1000 Series of switches can also be used in enterprises to multiplex employee tr...

Page 13: ...t Switch Applications 1 3 Figure 1 2 Enterprise Application Using a VES 1012 1 1 3 Campus Applications Independent networks can also have traffic multiplexed to a gigabit switch or fiber ring using a...

Page 14: ...VES 1000 Series Ethernet Switch 1 4 Applications Figure 1 3 VES 1012 Example of a Campus Application Using a Gigabit switch Figure 1 4 VES 1012 Example of Campus Application Using a Fiber Ring...

Page 15: ...Installing the VES 1008 2 2 1 Free standing Position the VES 1008 on a flat surface Make certain that the unit has adequate ventilation 2 2 2 Rack mounted Please note that rack mounted is optional fo...

Page 16: ...brackets through the mounting bracket holes into the VES 1008 Step 3 Repeat Step 1 and Step 2 to install the second mounting bracket on the other side of the unit Figure 2 1 Attaching the Mounting Bra...

Page 17: ...following precautions Precautions Make certain that the intended position for the VES 1008 is strong enough to support the combined weight of the unit and the cables It is strongly recommended that yo...

Page 18: ...ckets directly to the wall Make certain that at least one of the mounting brackets is screwed into an upright beam or stud that is located within the wall This ensures that the combined weight of the...

Page 19: ...ide of the unit Figure 2 4 Failure to use the proper screws may damage the unit Step 2 Using a 2 Philips screwdriver install the M3 flat head screws that came with the brackets through the mounting br...

Page 20: ...VES 1000 Series Ethernet Switch 2 6 Hardware Installation Figure 2 5 Mounting the VES 1012 in a Rack...

Page 21: ...at although the VES 1012 is shown in the following diagrams the following scenarios can also apply to the VES 1008 the primary difference is that a single Telco 50 cable is used for the combined USER...

Page 22: ...o one end of the cable see Diagram 5 for VES 1008 and Diagram 6 for VES 1012 in Appendix B for pin assignments and connect the other end directly to an MDF alternatively attach RJ 11 connectors and co...

Page 23: ...nto MDF blocks Multiple upper and lower MDF port connections are shown as one line in the following figures 3 4 Typical Scenarios Your existing telephone wiring usually depends on your region We descr...

Page 24: ...le to the combined USER CO Telco 50 port located on the front panel of the VES 1008 For the VES 1012 only connect the Telco 50 connector end of the cable to the Telco 50 port labeled USER on the VES 1...

Page 25: ...ections Please refer to the following figure for the connection schema MDF 1 is the original MDF used for telephone connections only MDF 2 is used for telephone connections only MDF 3 is for VDSL serv...

Page 26: ...nt panel of the VES 1008 For the VES 1012 only connect the Telco 50 connector end of the cable you want for VDSL service to the Telco 50 port labeled USER on the VES 1012 front panel Step 4 Connect th...

Page 27: ...one service is also available but there are two MDFs one for end user telephone line connections and the other one for CO telephone line connections Figure 3 7 Users and have telephone only service Fi...

Page 28: ...of the VES 1008 For the VES 1012 only connect the Telco 50 connector end of the Telco cable you want for VDSL service to the Telco 50 port labeled USER on the VES 1012 front panel Step 4 Connect the w...

Page 29: ...nect the wiring on the other side of the Telco 50 cable to the lower ports of MDF 4 using a punch down tool Step 9 Connect the top ports of MDF 4 to the bottom ports of MDF 1 using regular telephone c...

Page 30: ......

Page 31: ...he VES 1008 has a 12 volt DC power socket located on the front panel This allows for the convenient placing of the unit in locations where space may be a limitation To connect the power to the unit pl...

Page 32: ...nnecting the Power Cord to the VES 1012 and a Power Source 4 2 Front Panel Connections The VES 1000 Series of Ethernet switches all feature the Console port VDSL and WAN Ethernet switch connections on...

Page 33: ...switch through the console port Connect the male 9 pin end of the console cable to the console port of the VES 1000 Series switch Connect the other end either a female 25 pin or female 9 pin to a ser...

Page 34: ...rom the user equipment VDSL modems to the USER port and the lines from the central office switch or PBX Private Branch Exchange to the CO port Make sure that the USER line and the CO lines are not sho...

Page 35: ...chain the VES 1000 Series of switches before connecting to the WAN switch Use crossover cables between VES 1000 Series Switches and a straight through cable as described above between VES 1000 Series...

Page 36: ......

Page 37: ...lf test that takes approximately 20 seconds The SYS LED will remain on if your VES 1000 Series switch has started normally If the SYS LED does not turn on then recheck your connections or refer to the...

Page 38: ...a hardware failure in the system The system is functioning normally VDSL Green Blinking ON OFF The system is transmitting receiving to from the VDSL modem The link to the VDSL modem is up The link to...

Page 39: ...ce For VES 1012 35 watt max 100 240 VAC 1A 50 60Hz For VES 1008 24 watt max 100 240 VAC 1A 50 6 Hz 2 Make sure the power cord is connected to the VES 1000 Series switch properly 3 Make sure the fuse i...

Page 40: ...mit a low buzz and blow air If the fans are not working properly make sure the power connector is connected properly Make sure the fuse is not burnt out Replace the fuse if it is burnt out Contact you...

Page 41: ...are Speed Auto Duplex Auto Flow control On Trunking Disabled If auto negotiation is turned off on the VES 1000 Series switch an Ethernet port uses the pre configured speed and duplex mode when making...

Page 42: ...ompany for troubleshooting B Remove the telephone cable s connecting MDF 1 and MDF 2 Connect a telephone to an upper port of MDF 2 If there is no dial tone then the problem is between the combined Tel...

Page 43: ...e VES 1012 Telco CO port and MDF 2 Replace the Telco cable connecting the CO port to MDF 2 If the problem remains check the pin assignments of the CO Telco connector If the problem remains then the VE...

Page 44: ......

Page 45: ...f you need to install new fuses follow the procedure below Before you begin you will need A small flat head screwdriver 250V 3A fuse s Good lighting Removing and Installing Fuses Removing Fuses Safety...

Page 46: ...to remove the burnt out fuse from the fuse housing A burnt out fuse is blackened darkened or cloudy inside its glass casing A working fuse has a completely clear glass casing Dispose of the burnt out...

Page 47: ...ppendix B PIN Assignments C Appendix B Pin Assignments Console Port Pin Assignments Diagram 4 Console Port Assignments VES 1008 Telco 50 Pin Assignments for Phone and VDSL Diagram 5 Wiring Diagram for...

Page 48: ...ort PHONE PORT TELCO 50 PIN ASSIGNMENTS 1 8 33 2 7 32 3 6 31 4 5 30 5 4 29 6 3 28 7 2 27 8 1 26 VDSL PORT PINS TELCO 50 PIN ASSIGNMENTS 1 25 50 2 23 48 3 21 46 4 19 44 5 17 42 6 15 40 7 13 38 8 11 36...

Page 49: ...ents for VDSL Connections Diagram 7 VES 1012 Telco 50 Pin Assignments for VDSL Connections RJ 45 Pins PIN RJ 45 ETHERNET PORT 1 TX 2 TX 3 RX 4 Not connected 5 Not connected 6 RX 7 Not connected 8 Not...

Page 50: ...VES 1000 Series Ethernet Switch F Appendix B PIN Assignments...

Page 51: ...RJ 45 auto negotiating 10 100M Fast Ethernet interfaces for uplink to any third party Ethernet switch or router Temperature voltage monitoring and alarm Auto shutdown for over temperature Surge protec...

Page 52: ...ce or PBX One DB 9F RS 232 local console port Two RJ 45 auto negotiating 10 100M Fast Ethernet ports for uplink connection Built in fans Temperature fan speed and voltage sensors for monitoring Surge...

Page 53: ...5 Dimensions G H Disclaimer ii Duplex 6 3 E Enable the VDSL port 6 2 F Fans 5 1 6 2 Fiber Ring 1 3 1 4 Flow control 6 3 Free standing 2 1 Front Panel LEDs 5 1 Front Panel Connections 4 2 Console Port...

Page 54: ...r Panel Connections Connections 4 2 Power Cord 4 1 Rear Panel 4 1 Related Documentation ix Removing and Installing A Fuse A Removing Fuses A Before you Begin A Opening the Fuse Housing B Repair iii Re...

Page 55: ...U USER port 4 4 6 2 6 4 6 5 User s Guide ix 6 1 V VDSL ix VDSL Ethernet Switch ii VDSL modem 1 1 3 1 3 3 3 4 3 6 5 2 6 2 6 5 VDSL port 6 2 VES 1012 ix voltage levels 6 2 W WAN Link 6 3 Warning Sticke...

Reviews: