

1/2
Step 1
Hardware Installation
PMG5705-T10A
Dual-band Wireless AC/N GPON HGU
with 4-port GbE LAN
Copyright © 2019 Zyxel Communications Corp. All Rights Reserved.
EU Importer
Zyxel Communications A/S
Gladsaxevej 378, 2. th. 2860 Søborg, Denmark
http://www.zyxel.dk
US Importer
Zyxel Communications, Inc
1134.77 North Miller Street Anaheim, CA 92806-2001
http://www.us.zyxel.com
See the User's Guide at www.zyxel.com for more information,
including customer support and safety warnings.
EN
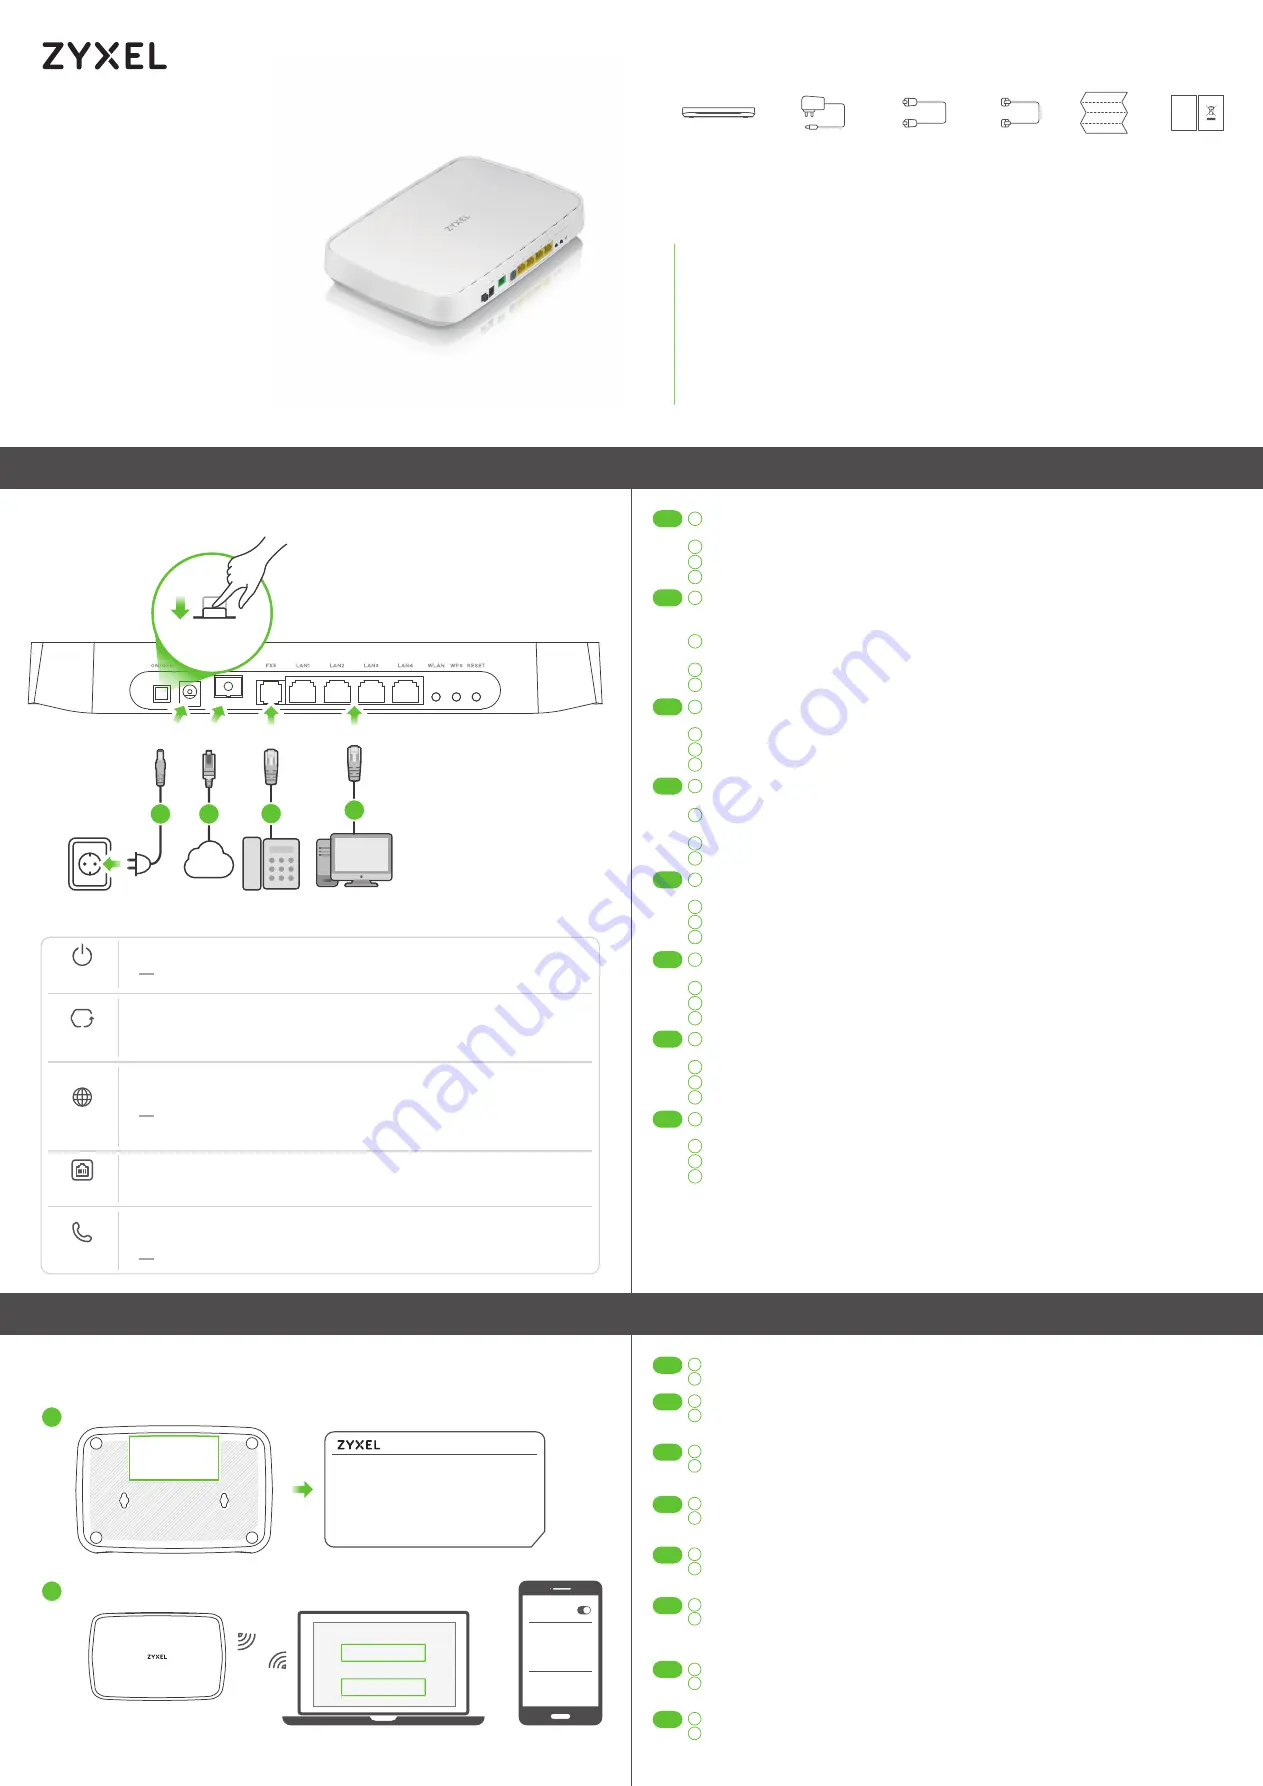
Use the included power adapter to connect the power socket to a power outlet. Press
the
ON/OFF
button to turn on the PMG5705-T10A.
Connect the fiber optic cable from your service provider's network to the
PON
port.
Connect a phone to a phone port using the phone cable.
Connect a computer to the
LAN
port using the yellow Ethernet cable.
Schließen Sie den mitgelieferten Netzadapter an den Netzanschluss und an eine
Netzsteckdose an. Drücken Sie auf die
ON/OFF
Taste, um den PMG5705-T10A
einzuschalten.
Schließen Sie das Glasfaserkabel aus dem Netzwerk Ihres Dienstanbieters an den
PON
Anschluss an.
Schließen Sie ein Telefon mit dem Telefonkabel an den Telefonanschluss an.
Schließen Sie einen Computer mit dem gelben Ethernet-Kabel an den
LAN
-Port an.
Utilice el adaptador de alimentación incluido para conectar el enchufe de alimentación a
una toma de corriente. Presione el botón
ON/OFF
para encender el PMG5705-T10A.
Conecte el cable de fibra óptica de la red de su proveedor de servicios al puerto
PON
.
Conecte un teléfono al puerto del teléfono usando el cable de teléfono.
Conecte un equipo al puerto
LAN
con el cable Ethernet amarillo.
Utilisez l'adaptateur d'alimentation inclus pour connecter la prise d'alimentation à une
prise de courant. Appuyez sur le bouton
ON/OFF
pour allumer le PMG5705-T10A.
Connectez le câble à fibre optique du réseau de votre fournisseur de services au port
PON
.
Fixez un téléphone au port téléphone à l'aide du câble téléphonique.
Connectez un ordinateur au port
LAN
en utilisant le câble Ethernet jaune.
Utilizzare l'alimentatore fornito a corredo per collegare la presa di alimentazione a una
presa della corrente. Premere il pulsante
ON/OFF
pre accedere l'PMG5705-T10A.
Collegare il cavo in fibra ottica dalla rete del fornitore di servizi alla porta
PON
.
Collegare un telefono alla porta del telefono tramite il cavo telefonico.
Collegare un computer alla porta
LAN
mediante il cavo Ethernet Giallo.
Gebruik de bijgesloten stroomadapter om de router op een stopcontact aan te sluiten.
Druk op de
ON/OFF
-toets om de PMG5705-T10A aan te schakelen.
Verbind de glasvezelkabel van het netwerk van je service provider met de
PON
-poort.
Sluit een telefoon aan op een telefoonpoort met de telefoonkabel.
Sluit een computer aan op de
LAN
-poort met de gele Ethernetkabel.
Yhdistä virtapistoke pistorasiaan mukana toimitetulla virtasovittimella. Käynnistä
PMG5705-T10A -laite painamalla virtakytkintä (
ON/OFF
).
Liitä operaattorin valokuitukaapeli
PON
-porttiin.
Kytke puhelin puhelinporttiin puhelinkaapelilla.
Kytke tietokone
LAN
-porttiin keltaisella Ethernet-kaapelilla.
Använd den medföljande strömadaptern och anslut eluttaget till ett vägguttag. Tryck på
ON/OFF
för att slå på PMG5705-T10A.
Anslut den fiberoptiska kabeln från din tjänsteleverantörs nätverk till
PON
-porten.
Anslut en telefon till telefonporten med telefonkabeln.
Anslut en dator till
LAN
-porten med den gula Ethernet-kabeln.
1
2
3
4
2
3
4
2
3
4
2
3
4
2
3
4
2
3
4
2
3
4
2
3
4
1
DE
1
FR
1
IT
1
ES
1
NL
1
SE
1
FI
Package Contents
Quick Start Guide
ENGLISH | DEUTSCH | ESPAÑOL | FRANÇAIS | ITALIANO |
NEDERLANDS | SUOMI | SVENSKA
PON
POWER
1
2
FXS
4
LAN
3
POWER
ON
Warning! To avoid possible eye injury, do NOT look into
an operating fiber-optic module's connector.
DoC
PMG5705-T10A
Power Adapter Ethernet Cable
Quick Start
Guide
Declaration of
Conformity
Safety Warning
On
- SIP account registered
Blinking
- Telephone off of the hook or incoming call
Off
- SIP account not registered
Blue
On
- Power on and system ready
Off
- Power off
Blue
On
- In Routing mode and WAN connection is up
Blinking
- Transmitting data
Off
- Physical WAN connection is down or in Bridge mode
On
- Attempted to get an IP address, but failed
Blue
Red
On
- WAN connection ready
Blinking
- Trying to link up
On
- Not receiving optical signal normally
Blue
Red
On
- LAN connection ready
Blinking
- Transmitting data via LAN
Blue
POWER
INTERNET
LAN
WAN
PHONE
Step 2
WiFi Connection
1
2
The SSID and wireless key are on the device label.
On your smartphone or notebook, find this SSID. Enter the Wireless Key to connect.
Die SSID und der WLAN Schlüssel befinden sich auf dem Etikett am Gerät.
Suchen Sie diese SSID auf Ihrem Smartphone oder Notebook. Geben Sie den Schlüssel für
die WLAN-Verbindung ein.
El SSID y la contraseña inalambrica estan en la etiqueta del Dispositivo.
En su smartphone o portátil, busque este SSID. Escriba la contraseña de conexión
inalámbrica para conectar.
Le SSID et la clé WiFi se trouvent sur l'étiquette au dos de l'équipement.
Trouvez ce SSID sur votre smartphone ou sur votre ordinateur portable. Saisissez la clé
sans fil pour vous connecter.
La SSID e la chiave wireless sono scritti sull'etichetta del dispositivo.
Trova questo SSID sul tuo smartphone o notebook. Immetti il codice Wireless per effettuare
il collegamento.
De naam van het draadloze netwerk (SSID) en bijbehorende wachtwoord staan op de label
van het apparaat.
Vind deze SSID op jouw smartphone of notebook. Voer de Draadloze toegangscode in om
te verbinden.
Löydät langattoman verkon nimen (SSID) ja salausavaimen laitteeseen liimatusta tarrassa.
Etsi SSID-tunnus älypuhelimessa tai kannettavassa tietokoneessa. Muodosta yhteys
näppäilemällä langattoman verkon avain.
SSID och trådlösa nyckeln finns på enhetens etikett.
Hitta denna SSID på din smarta telefon eller bärbara dator. Ange den trådlösa nyckeln för
att ansluta.
EN
1
2
DE
1
2
FR
1
2
IT
1
2
ES
1
2
NL
1
2
SE
1
2
FI
Using SSID
1
2
SSID
Password
OR
Wireless key
WiFi
XXXXXXXXXX
Zyxel_xxxxxx
XXXXXXXXXX
Zyxel_xxxxxx
Internet
SSID:
Zyxel_XXXXXX
Wireless key:
XXXXXXXXXX
Username:
admin
Login Password:
XXXXXXXXXX
Device
Label
Phone Cable