


ZyXEL G-270S
802.11g Wireless USB 2.0 Adapter
Quick Start Guide
Version 1.00
11/2005
Important Information
Federal Communications Commission (FCC)
Interference Statement
The 802.11g Wireless LAN Adapter has been tested to
the FCC exposure requirements (Specific Absorption
Rate).
The equipment complies with FCC RF radiation
exposure limits set forth for an uncontrolled environment,
under 47 CFR 2.1093 paragraph (d) (2).
This Transmitter must not be co-located or operating in
conjunction with any other antenna or transmitter.
Refer to the User's Guide for general FCC statements.
Procedure to View a Product's Certification(s)
1 Go to www.zyxel.com
2 Select your product from the drop-down list box on
the ZyXEL home page to go to that product's page.
3 Select the certification you wish to view from this
page.
About Your ZyXEL G-270S
The ZyXEL G-270S is an IEEE 802.11 b/g compliant
wireless LAN USB stick that fits into any USB slot. With
the ZyXEL G-270S, you can enjoy the wireless mobility
within the coverage area. The IEEE 802.11g technology
provides greater range and offers transmission rate at up
to 54 Mbps. Your ZyXEL G-270S can transmit at up to
108 Mbps when connected to an AP or wireless router
with the
Super G
feature enabled. Actual speeds
attained also depend on the distance from the AP, noise,
etc.
Installation Requirements
Before installation, make sure you have a computer with
the following:
• Pentium II 300MHz or above
• A minimum of 6 MB available hard disk space
• A minimum of 32 MB RAM
• A CD-ROM drive
• A USB port (with USB1.0/1.1, the ZyXEL G-270S can
only transmit at up to 11Mbps.)
• Windows 98 Second Edition (SE), Windows ME, Win-
dows 2000 or Windows XP
• Windows 98 SE users may need the Windows 98 SE
CD
Windows XP Users
Wireless Zero Configuration (WZC) is a wireless
configuration utility bundled with Windows XP. If you are
a Windows XP user and want to use WZC, then you can
either:
• Install the ZyXEL Utility and then disable it (by clicking
the close button in any ZyXEL Utility screen)
or
• Install the driver only. In this case, you must connect
the ZyXEL G-270S first.
ZyXEL Utility and Hardware Installation
The installation procedures are similar for all supported
Windows versions.
1 Insert the support CD into the CD-ROM drive on
your computer. The CD automatically runs.
Otherwise, locate and double-click
setup.exe
.
2 Select your language and click
OK
.
3 Click
Install Utility
to start installation.
4 A Welcome screen displays. Click
Next
.
5 Click
Next
to accept the default file location or click
Browse
to select an alternate folder.
6 Click
Finish
to restart the computer.
7 Locate an available USB port on the computer.
8 Remove the protective cap to
expose the USB connector.
Insert the ZyXEL G-270S to
an available USB port on the
computer. The LED turns on
if the ZyXEL G-270S is properly inserted.
After you install the ZyXEL Utility and insert
the ZyXEL G-270S, an icon appears in the
system tray.
Driver Installtion for Windows XP
1 Remove the protective cap to expose the USB
connector. Insert the ZyXEL G-270S to an available
USB port on the computer. The LED turns on if the
ZyXEL G-270S is properly inserted.
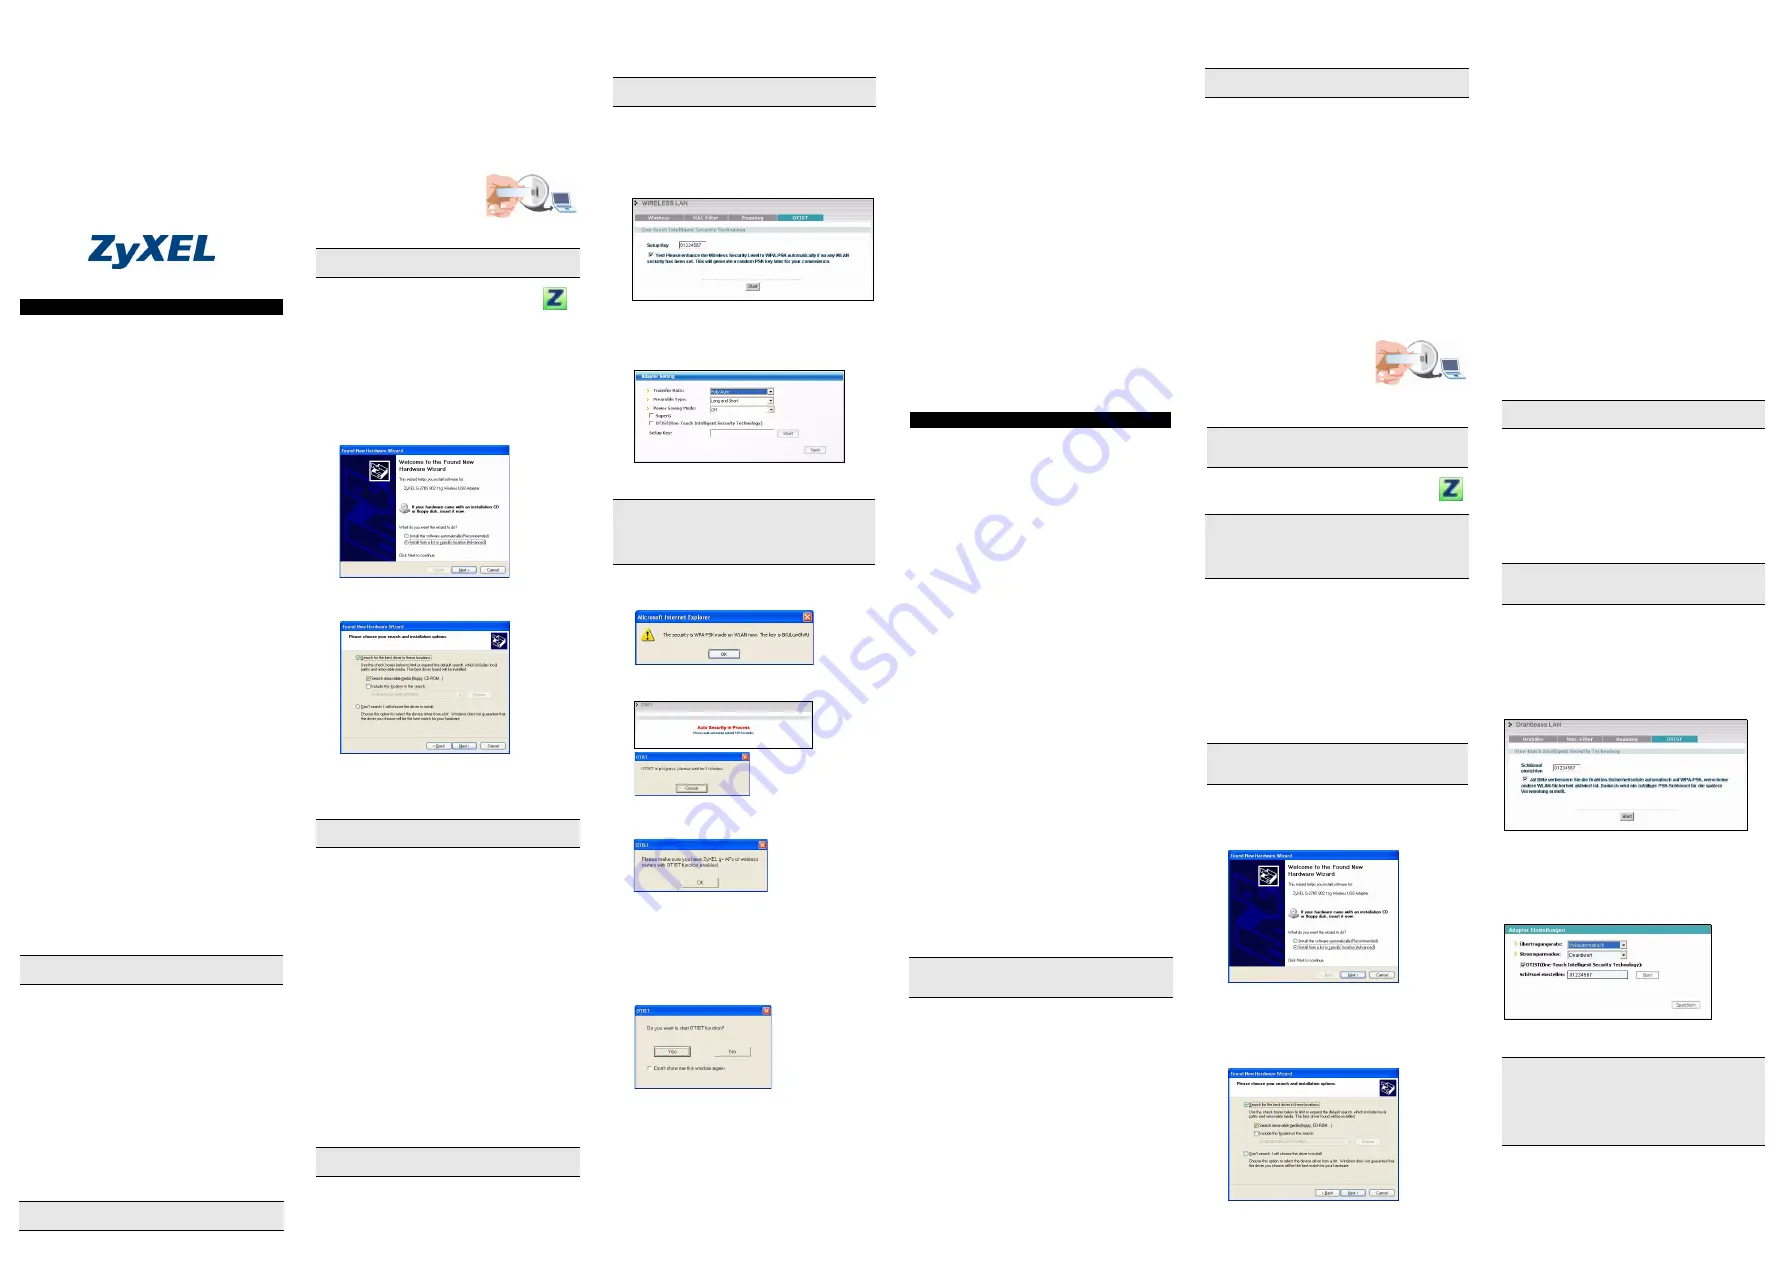
2 The
Found New Hardware Wizard
window
appears. Select
Install from a list of specific
location (Advanced)
and click
Next
.
3 Insert the included CD into your CD-ROM drive,
select
Search removable media (floppy, CD-
ROM…)
and then click
Next
.
4 A warning screen displays. Click
Continue
Anyway
.
5 After the driver has been installed successfully, click
Finish
to complete the installation.
Introduction to OTIST
In a wireless network, the wireless clients must have the
same SSID and security settings as the access point
(AP) or wireless router (we will refer to both as "AP"
here) in order to associate with it. Traditionally this meant
that you had to configure the settings on the AP and then
manually configure the exact same settings on each
wireless client.
OTIST (One-Touch Intelligent Security Technology)
allows you to transfer your AP's SSID and WEP or WPA-
PSK security settings to wireless clients that support
OTIST and are within transmission range. You can also
choose to have OTIST generate a WPA-PSK key for you
if you didn't configure one manually.
Enabling OTIST
You must enable OTIST on both the AP and wireless
client before you start transferring settings.
We use the Prestige 334WT and the G-270S screens in
this guide as an example. Screens may vary slightly for
your ZyXEL devices.
AP
You can enable OTIST using the
Reset
button or the
web configurator. If you use the
Reset
button, the default
(01234567) or previous saved (through the web
configurator)
Setup
key
is used to encrypt the settings
that you want to transfer.
Hold in the
Reset
button for one or two seconds.
In the web configurator, go to the
Wireless LAN
main
screen and then select
OTIST
. To change the
Setup key
,
enter zero to eight printable characters. To have OTIST
automatically generate a WPA-PSK key, select the
Yes
check box. If you manually configured a WEP key or a
WPA-PSK key and you also selected this check box,
then the key you manually configured is used.
Wireless Client
Start the ZyXEL Utility and click the
Adapter
tab. Select
the
OTIST
check box, enter the same
Setup Key
as
your AP's and click
Save
.
Starting OTIST
1 In the AP, a web configurator screen pops up
showing you the security settings to transfer. After
reviewing the settings, click
OK
.
2 This screen appears while OTIST settings are being
transferred. It closes when the transfer is complete.
• In the wireless client, you see this screen if it can't find
an OTIST-enabled AP (with the same
Setup key
).
Click
OK
to go back to the ZyXEL Utility main screen.
• If there is more than one OTIST-enabled AP within
range, you see a screen asking you to select one AP
to get settings from.
Notes on OTIST
1 If you enabled OTIST in the wireless client, you see
this screen each time you start the ZyXEL Utility.
Click Yes for it to search for an OTIST-enabled AP.
2 If an OTIST-enabled wireless client loses its
wireless connection for more than ten seconds, it
will search for an OTIST-enabled AP for up to one
minute. (If you manually have the wireless client
search for an OTIST-enabled AP, there is no
timeout; click
Cancel
in the OTIST progress screen
to stop the search.)
3 When the wireless client finds an OTIST-enabled
AP, you must still click
Start
in the AP
OTIST
web
configurator screen or hold in the
Reset
button (for
one or two seconds) for the AP to transfer settings.
4 If you change the SSID or the keys on the AP after
using OTIST, you need to run OTIST again or enter
them manually in the wireless client(s).
5 If you configure OTIST to generate a WPA-PSK key,
this key changes each time you run OTIST.
Therefore, if a new wireless client joins your
wireless network, you need to run OTIST on the AP
and ALL the wireless clients again.
Troubleshooting
If Windows does not auto-detect the ZyXEL G-270S, do
the following:
• Make sure the ZyXEL G-270S is inserted into the
computer USB port properly and then restart your
computer. Check the LED on the ZyXEL G-270S.
• Perform a hardware scan by clicking
Start
,
Settings
,
Control
Panel
and double-clicking
Add/Remove
Hardware
. (Steps may vary depending on the version
of Windows). Follow the on-screen instructions to
search for the ZyXEL G-270S and install the driver.
• Check for possible hardware conflicts. In Windows,
click
Start
,
Settings
,
Control
Panel
,
System
,
Hard-
ware
and then click
Device Manager
. Verify the sta-
tus of the ZyXEL G-270S under
Network Adapter
.
(Steps may vary depending on the version of Win-
dows).
• Install the ZyXEL G-270S in another computer. If the
error persists, you may have a hardware problem. In
this case, you should contact your local vendor.
Vorgehensweise zum Aufrufen einer
Produktzertifizierung
1 Gehen Sie zu www.zyxel.com
2 Wählen Sie Ihr Produkt aus der Auswahlliste auf der
ZyXEL Homepage aus, um die Seite des
entsprechenden Produkts aufzurufen.
3 Wählen Sie die Zertifizierung aus, die Sie von dieser
Seite aus aufrufen möchten.
Über Ihr ZyXEL G-270S
Der ZyXEL G-270S ist ein mit IEEE 802.11b/g
kompatibler drahtloser LAN-USB-Stick, der an jeden
USB-Anschluss passt. Mit dem ZyXEL G-270S können
Sie die drahtlose Mobilität innerhalb des
Abdeckungsbereichs genießen. Die IEEE 802.11g-
Technologie ermöglicht einen größeren
Abdeckungsbereich und eine höhere Transferrate von
bis zu 54 Mbps. Ihr ZyXEL G-270S kann Daten mit einer
Geschwindigkeit von bis zu 108 Mbps übertragen, wenn
es mit einem AP oder Wireless-Router verbunden ist, bei
dem
Super G
aktiviert ist. Tatsächlich erzielte
Geschwindigkeiten hängen auch von der Entfernung
zum Zugangsknoten, Störeinflüssen usw. ab.
Installationsanforderungen
Stellen Sie bitte vor der Installation sicher, dass Ihr
Computer die folgenden Anforderungen erfüllt:
• Pentium II 300MHz oder höher
• Mindestens 6 MB freier Festplattenspeicher
• Mindestens 32 MB RAM
• CD-ROM-Laufwerk
• Ein USB-Anschluss (bei USB1.0/1.1 kann der ZyXEL
G-270S Daten nur mit einer Datenrate von bis zu
11Mbps übertragen)
• Windows 98 Second Edition, Windows ME, Windows
2000 oder Windows XP
• Benutzer von Windows 98 SE benötigen unter
Umständen die Windows 98 SE CD
Wenn Sie mit Windows XP arbeiten
WZC (Wireless Zero Configuration) ist ein Utility-
Programm für die Drahtloskonfiguration, das bei
Windows XP enthalten ist. Wenn Sie mit Windows XP
arbeiten und WZC verwenden möchten, können Sie
entweder
• das ZyXEL Utility-Programm installieren und dann
deaktivieren (indem Sie in einem beliebigen ZyXEL
Utility-Fenster auf die Schließen-Taste klicken)
oder
• nur den Treiber installieren. In diesem Fall muss zue-
rst der ZyXEL G-270S angeschlossen werden.
ZyXEL Utility- und Hardware-Installation
Der Installationsvorgang ist für alle unterstützten
Windows-Versionen ähnlich.
1 Legen Sie die CD in das CD-ROM-Laufwerk Ihres
Computers ein. Die CD startet automatisch. Suchen
Sie andernfalls die Date
setup.exe
und klicken Sie
diese doppelt an.
2 Wählen Sie Ihre Sprache und klicken dann auf
OK
.
3 Klicken Sie auf
Installationshilfsprogramm
, um
die Installation zu starten.
4 Ein Begrüßungsbildschirm wird angezeigt. Klicken
Sie auf
Weiter
.
5 Klicken Sie auf
Weiter
, um den vorgegebenen
Zielordner zu bestätigen oder klicken Sie auf
Durchsuchen,
um einen anderen Ordner
auszuwählen.
6 Klicken Sie auf
Fertigstellen
, um den Computer
neu zu starten.
7 Machen Sie einen freien USB-Anschluss am
Computer ausfindig.
8 Entfernen Sie die
Schutzkappe vom USB-
Stecker. Stecken Sie den
ZyXEL G-270S an den USB-
Anschluss des Computers an.
Wenn der ZyXEL G-270S richtig angeschlossen ist,
beginnt die LED zu leuchten.
Nach Installation des ZyXEL Utility und
Einschieben des ZyXEL G-270S erscheint ein
Symbol im Infobereich.
Treiberinstallation unter Windows XP
Wenn Sie den Windows XP Wireless Zero Configuration
(WZC)-Dienst zur Verwaltung des ZyXEL G-270S
verwenden möchten, folgen Sie bitte den
nachstehenden Schritten, um nur den Treiber zu
installieren.
1 Entfernen Sie die Schutzkappe vom USB-Stecker.
Stecken Sie den ZyXEL G-270S an den USB-
Anschluss des Computers an. Wenn der ZyXEL G-
270S richtig angeschlossen ist, beginnt die LED zu
leuchten. .
2 Das
Hardwareupdate-Assistent-
Fenster erscheint.
Wählen Sie
Software von einer Liste oder
bestimmten Quelle installieren (für
fortgeschrittene Benutzer)
und klicken Sie
anschließend auf
Weiter
.
3 Eine Warnmeldung erscheint. Klicken Sie auf
Continue Anyway
(Installation fortsetzen).
4 Legen Sie die beigelegte CD in Ihr optisches
Laufwerk ein. Wählen Sie
Wechselmedien
durchsuchen (Diskette, CD,...)
und klicken Sie
anschließend auf
Weiter
.
5 Klicken Sie nach dem erfolgreichen Installieren des
Treibers auf
Fertig stellen
, um die Installation
abzuschließen.
Einführung von OTIST
In einem drahtlosen Netzwerk müssen die drahtlosen
Clients dieselben SSID- und Sicherheitseinstellungen
haben wie der AP (Access Point) oder der drahtlose
Router (im weiteren Textverlauf werden beide als AP
bezeichnet), damit sie sich mit ihnen in Verbindung
setzen können. Früher mussten zunächst die
Einstellungen am AP und dann genau dieselben
Einstellungen manuell an jedem drahtlosen Client
konfiguriert werden.
Mit der OTIST-Technologie (One-Touch Intelligent
Security Technology) ist es möglich, die AP SSID- und
WEP- oder WPA-PSK-Sicherheitseinstellungen zu
solchen drahtlosen Clients zu übertragen, die OTIST
unterstützen und sich innerhalb des
Übertragungsbereichs befinden. Sie können auch
festlegen, dass mit OTIST ein WPA-PSK-Schlüssel
erzeugt wird, wenn Sie keinen Schlüssel manuell
konfiguriert haben.
OTIST aktivieren
Vor dem Übertragen der Einstellungen müssen Sie
OTIST sowohl beim AP als auch beim drahtlosen Client
aktivieren.
In dieser Bedienungsanleitung verwenden wir die
Benutzeroberflächen des Prestige 334WT und G-270S
als Beispiel. Es ist möglich, dass die
Benutzeroberflächen bei Ihren ZyXEL-Geräten leicht
abweichen.
AP
Sie können OTIST mit der
Reset
-Taste oder dem Web-
Konfigurator aktivieren. Wenn Sie die
Reset
-Taste
verwenden, können Sie den Standard-
Schlüssel
einrichten
(01234567) oder den zuvor gespeicherten
Schlüssel verwenden, um die Einstellungen zu
verschlüsseln, die übertragen werden sollen.
Halten Sie die
Reset
-Taste eine oder zwei Sekunden
lang gedrückt.
Wechseln Sie im Web-Konfigurator in das
Wireless
LAN
-Hauptfenster und wählen Sie
OTIST
. Um den
Schlüssel einrichten
zu ändern, geben Sie null bis acht
druckbare Zeichen ein. Damit OTIST automatisch einen
WPA-PSK-Schlüssel erzeugt, wählen Sie die Option
Yes
(
Ja
). Wenn Sie einen WEP- oder einen WPA-PSK-
Schlüssel manuell konfiguriert haben und auch diese
Option wählen, wird der Schlüssel verwendet, den Sie
manuell konfiguriert haben.
Drahtloser Client
Starten Sie das ZyXEL-Programm und klicken Sie auf
die Registerkarte
Adapter
. Wählen Sie die Option
OTIST
, geben Sie denselben
Schlüssel einrichten
ein,
den auch der AP hat und klicken Sie auf
Save
(
Speichern
).
Starten von OTIST
1 Im AP erscheint ein Web-Konfiguratorfenster, in
dem die Sicherheitseinstellungen für die
English
If you install the Funk Odyssey Client software on the
computer, uninstall (remove) it.
Install the ZyXEL Utility before you insert the ZyXEL G-
270S.
Never bend, force or twist the ZyXEL G-270S into the
port.
Refer to the User's Guide to configure the ZyXEL G-
270S.
The AP and wireless client(s) MUST use the same Setup
key.
If you hold in the
Reset
button too long, the device will
reset to the factory defaults!
You must click
Start
in the AP
OTIST
web configurator
screen and in the wireless client(s)
Adapter
screen all
within three minutes (at the time of writing). You can start
OTIST in the wireless clients and AP in any order but
they must all be within range and have OTIST enabled.
Deutsch
Wenn Sie Funk Odyssey Client-Software auf dem
Computer installiert haben, deinstallieren (entfernen) Sie
bitte die Software.
Bitte installieren Sie das "ZyXEL Utility" bevor Sie den
"ZyXEL-Adapter" mit Ihrem Computer verbinden.
Versuchen Sie unter keinen Umständen, die ZyXEL G-
270S durch Biegen, Drehen oder Gewaltanwendung in
den Einschub zu schieben.
Wenn das ZyXEL Utility Symbol angezeigt wird, ist der
ZyXEL G-270S ordnungsgemäß installiert. Bitte lesen
Sie in der ZyXEL Bedienungsanleitung nach, um
Informationen über das Konfigurieren der ZyXEL G-270S
zu erhalten.
Der ZyXEL G-270S darf immer nur gerade, ohne
Drehen und ohne Druck in den USB-Anschluss gesteckt
werden.
Der AP und die drahtlosen Client(s) MÜSSEN denselben
Setup Key
(
Schlüssel einrichten
) verwenden.
Wenn Sie jedoch zu lange auf die
Reset
-Taste drücken,
wird das Gerät auf die Standardeinstellungen
zurückgesetzt!
Klicken Sie innerhalb von drei Minuten (beim Schreiben)
im
OTIST
-Web-Konfigurator des AP und im Fenster
Adapter
des/der drahtlosen Clients auf
Start
. Sie
können in den drahtlosen Clients und im AP in einer
beliebigen Reihenfolge OTIST starten, sie müssen sich
jedoch alle innerhalb der Reichweite befinden, und
OTIST muss aktiviert sein.


