background image

Chapter 4 NBG6818 Modes

NBG6818 User’s Guide

34

C

HAPTER

  4

NBG6818 Modes

4.1  Overview

This chapter introduces the different operating modes available on your NBG6818. Or simply how the 
NBG6818 is being used in the network.

4.2  Modes

This refers to the operating mode of the NBG6818, which can act in:

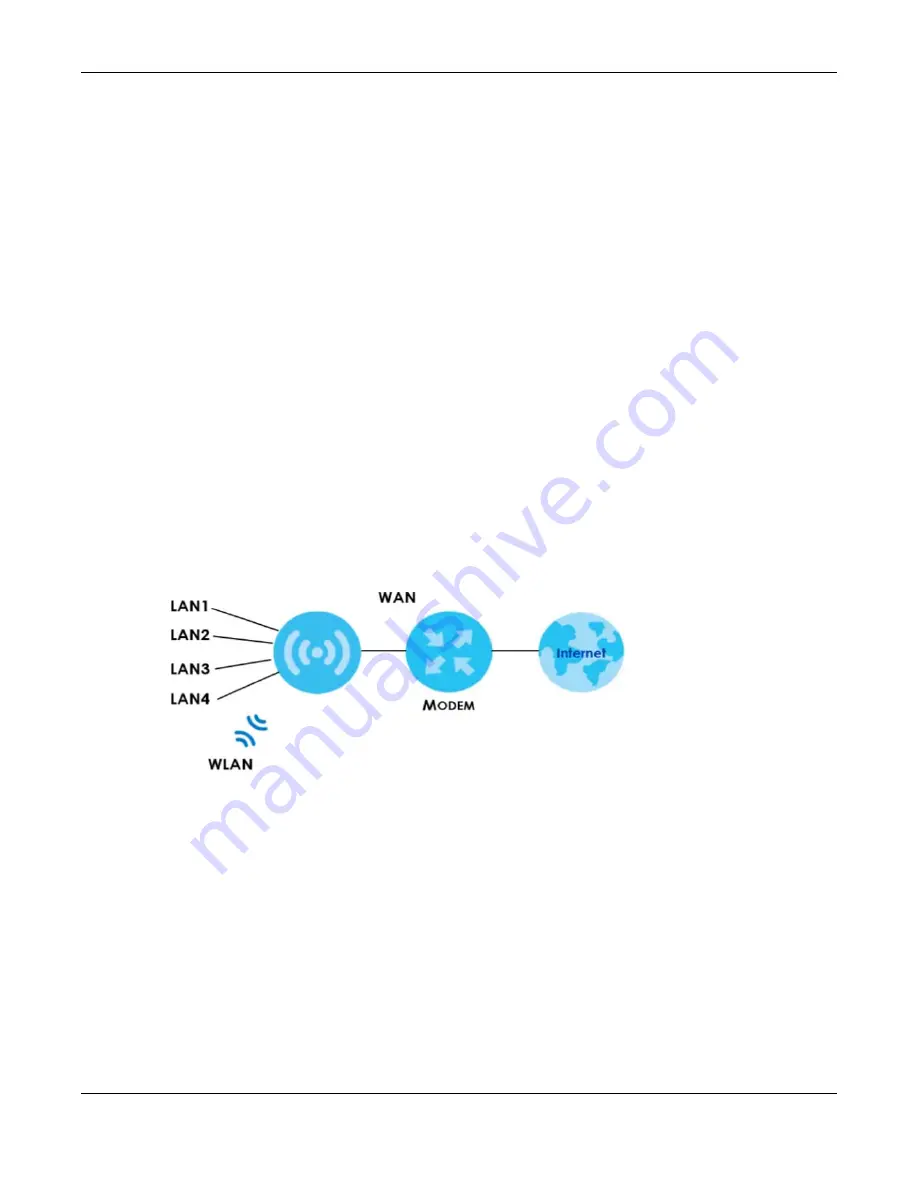
Standard Mode

: This is the default device mode of the NBG6818. Use this mode to connect the local 

network to another network, like the Internet. Go to 

Section 5.3 on page 36

 to view the 

Status

 screen 

in this mode.

Figure 12   

Standard Mode Example

Bridge Mode

: Use this mode if you want to extend your network by allowing network devices to 

connect to the NBG6818 wirelessly. Go to 

Section 6.4 on page 41

 to view the 

Status

 screen in this 

mode.

Summary of Contents for ARMOR G1

Page 1: ...ails User s Guide ARMOR G1 AC2600 Multi Gigabit Security WiFi Router Model NBG6818 Copyright 2020 Zyxel Communications Corporation LAN IP Address http zyxelwifi com OR http zyxelwifi net Version 1 00...

Page 2: ...your computer operating system Every effort has been made to ensure that the information in this manual is accurate Related Documentation Quick Start Guide The Quick Start Guide shows how to connect t...

Page 3: ...ames field labels and field choices are all in bold font A right angle bracket within a screen name denotes a mouse click For example Setting Internet Internet Connection means you first click Setting...

Page 4: ...erview User s Guide 10 Introduction 11 Wizard 17 The Web Configurator 27 NBG6818 Modes 34 Standard Mode 36 38 Bridge Mode 39 Tutorials 42 Technical Reference 55 Applications 56 WAN 77 Wireless LAN 102...

Page 5: ...g the NBG6818 12 1 5 Resetting the NBG6818 13 1 5 1 How to Use the RESET Button 13 1 6 The WPS Button 13 1 7 LEDs 14 1 8 Desk Mounting 15 1 9 Wall Mounting 15 Chapter 2 Wizard 17 2 1 Overview 17 2 2 A...

Page 6: ...the NBG6818 s WiFi Networks 43 7 4 Enable or Disable a WiFi Network 45 7 5 Add Clients to a Profile 46 7 6 Set a Profile s WiFi Schedule 47 7 7 Pause or Resume Internet Access on a Profile 49 7 8 Tur...

Page 7: ...oE Encapsulation 79 9 4 2 PPPoE Encapsulation 82 9 4 3 PPTP Encapsulation 85 9 5 NAT Port Forwarding Screen 87 9 5 1 Add Port Forwarding Rule Screen 89 9 6 Passthrough Screen 91 9 7 Port Trigger Scree...

Page 8: ...127 12 3 1 IPv6 Firewall Add Rule Screen 128 Chapter 13 System 130 13 1 Overview 130 13 2 What You Can Do 130 13 3 Status Screen 130 13 4 General Setting Screen 133 13 5 Remote Access Screen 135 13 6...

Page 9: ...Table of Contents NBG6818 User s Guide 9 Appendix D Legal Information 175 Index 181...

Page 10: ...10 PART I User s Guide...

Page 11: ...ring are also available for secure Internet computing There is an USB port on the side panel of your NBG6818 You can connect an USB memory stick an USB hard drive or an USB device for file sharing The...

Page 12: ...for Managing the NBG6818 Do the following things regularly to make the NBG6818 more secure and to manage the NBG6818 more effectively Change the password Use a password that s not easy to guess and th...

Page 13: ...ngs manually Each WPS connection works between two devices Both devices must support WPS check each device s documentation to make sure Depending on the devices you have you can either press a button...

Page 14: ...nking The NBG6818 is booting Dark Blue On Blue tooth is ready Blinking Blue tooth configuration is in process Amber Blinking Slow The NBG6818 is upgrading firmware Blinking Fast The NBG6818 is resetti...

Page 15: ...e apart for the screws Be careful to avoid damaging pipes or cables located inside the wall when drilling holes for the screws 3 If using screw anchors drill two holes for the screw anchors into the w...

Page 16: ...he screws are fastened well enough to hold the weight of the NBG6818 with the connection cables 5 Remove the rubber feet 6 Align the holes on the back of the NBG6818 with the screws on the wall Hang t...

Page 17: ...yZyxel Cloud account 2 2 Accessing the Wizard Launch your web browser and type http zyxelwifi com or http zyxelwifi net as the website address Note The wizard appears automatically when the NBG6818 is...

Page 18: ...the next step in the wizard The following screen shows if you are not connected to the Internet Note You may need to turn off your network firewall if access to the Internet from the NBG6818 is blocke...

Page 19: ...ser s Guide 19 3 Enter 1 128 single byte printable ASCII characters but not as your 2 4G 5G WiFi Name and WiFi Password Select the check box Keep 2 4G 5G name the same if you want to use the same name...

Page 20: ...Chapter 2 Wizard NBG6818 User s Guide 20 4 Wait a moment for your WiFi settings to be applied to your NBG6818...

Page 21: ...shows if you have set up your WiFi name and password successfully Click Next to go to the next step in the wizard 6 Wait a moment for the NBG6818 to check if your device is updated with the latest fir...

Page 22: ...er s Guide 22 7 You need to create a myZyxel Cloud account to log into the NBG6818 Click Next to go to the next step in the wizard 8 A pop up message shows Click OK to be redirected to the registratio...

Page 23: ...uide 23 9 Enter your Email and Password if you already have a myZyxel Cloud account If not you can create one by clicking Sign Up You can also click the Facbook or Google icon to create an account wit...

Page 24: ...Chapter 2 Wizard NBG6818 User s Guide 24 10 The legal page shows after you log in Select the check box I understand and agree the Zyxel Cloud Terms of Use and then click Confirm...

Page 25: ...wing page asks for your authorization to use your account Click Authorize to finish registering your myZyxel Cloud account You will be directed back to the NBG6818 web configurator 12 Wait a moment fo...

Page 26: ...al password to access the NBG6818 directly You can choose to log in with your myZyxel Cloud account or your local password the next time you log in Note You can change your local password in System Ge...

Page 27: ...ed by default Java permissions enabled by default 3 2 Accessing the Web Configurator 1 Make sure your NBG6818 hardware is properly connected refer to the Quick Start Guide 2 Launch your web browser 3...

Page 28: ...The NBG6818 Overview screen displays allowing you to monitor your NBG6818 It shows if the NBG6818 is online and how many wireless clients are currently connected to your device as well as their upstre...

Page 29: ...3 3 Navigation Panel Use the submenus on the navigation panel to configure NBG6818 features Your navigation panel varies depending on the mode of your NBG6818 See Chapter 5 on page 36 for more inform...

Page 30: ...the speed of the connection between your NBG6818 and the broadband modem router Speed Test History Use this screen to view a summary of previously run speed tests Parental Control Device Use this scr...

Page 31: ...change your NBG6818 s port triggering settings Port Trigger Use this screen to configure ALGs Application Layer Gateway and VPN pass through settings Dynamic DNS Use this screen to configure dynamic...

Page 32: ...rmware reboot the NBG6818 without turning the power off or reset the NBG6818 to factory default Operating Mode Use this screen to select whether your device acts as a router or a bridge Logs Use this...

Page 33: ...Scheduling Use this screen to schedule the times the Wireless LAN is enabled LAN LAN IP Use this screen to configure the NBG6818 s LAN IP address and subnet mask Use this screen to configure the IPv6...

Page 34: ...f the NBG6818 which can act in Standard Mode This is the default device mode of the NBG6818 Use this mode to connect the local network to another network like the Internet Go to Section 5 3 on page 36...

Page 35: ...ng the mode of your NBG6818 refer to Section 13 7 on page 137 Note Choose your device mode carefully to avoid having to change it later When changing to another mode the IP address of the NBG6818 chan...

Page 36: ...l network to another network for example the Internet In the figure below the NBG6818 connects the local network LAN1 LAN4 to the Internet Figure 14 NBG6818 in Standard Mode 5 2 What You Can Do Use th...

Page 37: ...he firmware version System Operation Mode This is the device mode to which the NBG6818 is set see Section 13 7 on page 137 for more information Enable IPv4 Firewall This shows if the IPv4 firewall is...

Page 38: ...AN Information MAC Address This shows the LAN Ethernet adapter MAC Address of your device IP Address This shows the LAN port s IP address IP Subnet Mask This shows the LAN port s subnet mask DHCP Serv...

Page 39: ...Bridge Mode Many screens that are available in Standard Mode are not available in Bridge Mode such as port forwarding and firewall See Section 3 3 on page 29 for more information 6 2 What You Can Do S...

Page 40: ...nfigurator in Bridge Mode Log in to the Web Configurator in Bridge mode do the following 1 Connect your computer to the LAN port of the NBG6818 2 The default IP address of the NBG6818 in bridge mode i...

Page 41: ...ice mode to which the NBG6818 is set see Section 13 7 on page 137 for more information Enable IPv4 Firewall This shows if the IPv4 firewall is enabled on the NBG6818 Enable IPv6 Simple Security This s...

Page 42: ...ode Configure a Port Forwarding Rule 7 2 Run a Speed Test With the NBG6818 Web Configurator you can check the speed of the connection between your NBG6818 and the broadband modem router 1 Click the Na...

Page 43: ...following table describes the different NBG6818 s profile networks and their privileges Note A user can only configure the WiFi networks security settings if they are connected to the Main WiFi networ...

Page 44: ...iFi Network Enter the 2 4G 5G Name and Password clients use to connect to the WiFi network You can configure two different WiFi Names for the Main WiFi 2 4G and 5G networks Select Keep 2 4G 5G name th...

Page 45: ...G6818 is set up you can use separate WiFi networks for your clients The WiFi settings will be applied to all clients in the same network Note This is not available if you are using bridge mode 1 Click...

Page 46: ...le guest WiFi and enter the WiFi Name SSID and WiFi Password Click Apply to save your changes 7 5 Add Clients to a Profile Profiling clients allows you to easily block allow Internet access or set a s...

Page 47: ...etail select a predefined profile and click Apply 7 6 Set a Profile s WiFi Schedule When you create or edit a profile you can schedule the NBG6818 to automatically disable or enable WiFi access during...

Page 48: ...6818 User s Guide 48 2 Click Enable to activate this profile s Internet schedule Click the Edit icon to modify a profile s Internet schedule 3 Click the start time cell and drag down to the end time t...

Page 49: ...k a profile of client devices from accessing the Internet immediately and resume it later Note This is not available if you are using bridge mode 1 Click the Navigation Panel icon on the top left corn...

Page 50: ...Resume button to resume network access at once or click the Quick Block button to pause Internet access for that specific profile 7 8 Turn on or off the NBG6818 s LED Light 1 In the Overview screen f...

Page 51: ...etwork and another network such as the Internet Bridge Use this mode so the NBG6818 bridges traffic between clients on the same network Note Features such as parental Control UPnP Port Forwarding are...

Page 52: ...g packets to a specific or appropriate IP address in the private network using ports set a port forwarding rule Note This is not available if you are using bridge mode 1 Click the Navigation Panel ico...

Page 53: ...Click Add Rule to create a port forwarding rule Add a service name a port number or a range of ports to define the service to be forwarded specify the transport layer protocol used for the service an...

Page 54: ...Chapter 7 Tutorials NBG6818 User s Guide 54...

Page 55: ...55 PART II Technical Reference...

Page 56: ...Living Network Alliance DLNA is a group of personal computer and electronics companies that works to make products compatible in a home network DLNA clients play files stored on DLNA servers The NBG68...

Page 57: ...ol and auditing It is used to transport traffic over the Internet or any insecure network that uses TCP IP for communication 8 1 3 Before You Begin Make sure the NBG6818 is connected to your network a...

Page 58: ...e index number of the rule Type The shows the type of device to which this rule applies Network This shows the type of network the devices are connected to Name This shows the name of the user to whic...

Page 59: ...ule Click the Action icon then Add New Profile to show the following screen Table 9 Edit Device Detail LABEL DESCRIPTION Device Name Enter a name for the device to which this rule applies Type Choose...

Page 60: ...le Name Enter a name for this rule Select All Click Select All then deselect the blocks you don t want or click on blocks separately to specify days and times to turn the Wireless LAN on or off Desele...

Page 61: ...urity and anonymity for all transmitted data It also provides faster connection speeds than other VPN protocols Note We do not recommended activating OpenVPN Server and OpenVPN Client at the same time...

Page 62: ...25 OpenVPN Server The following table describes the fields in this screen Table 12 OpenVPN Server LABEL DESCRIPTION OpenVPN Server Dynamic DNS This field shows the status of your Dynamic DNS Make sur...

Page 63: ...lients can connect to the NBG6818 OpenVPN server Enter an IPv4 address and subnet mask Advertise DNS to Clients Select Enable if you want the NBG6818 to broadcast its OpenVPN server to OpenVPN clients...

Page 64: ...s through which the clients are allowed to connect to an account Actions Click the icons under Actions to delete or edit an existing OpenVPN account settings Click to delete an existing OpenVPN accoun...

Page 65: ...ng table describes the fields in this screen Apply Click Apply to save your changes back to the NBG6818 Cancel Click Cancel to exist this screen without saving Table 14 OpenVPN Account List Add Rule L...

Page 66: ...penVPN Server account Click to edit an existing OpenVPN Server account Table 15 OpenVPN Client LABEL DESCRIPTION Table 16 OpenVPN Server List Add Rule LABEL DESCRIPTION Description Enter 1 32 single b...

Page 67: ...wing screen Figure 31 USB Application SAMBA The following table describes the labels in this screen Apply Click Apply to save your changes back to the NBG6818 Cancel Click Cancel to exist this screen...

Page 68: ...ire username and password Select Yes to need a user account for access to the connected USB stick from any computer Otherwise select No User Accounts Before you can share files you need a user account...

Page 69: ...to 20 characters Only letters and numbers allowed Password Enter the password used to access the shared files You can enter up to 20 characters Only letters and numbers are allowed The password is ca...

Page 70: ...ount No This is the index number of the user account Status This field displays whether a user account is activated or not Select the check box to enable the account Clear the check box to disable the...

Page 71: ...0 characters Only letters and numbers are allowed The password is case sensitive USB Specify the user s access rights to the USB storage device which is connected to the NBG6818 s USB port Read Write...

Page 72: ...s a group of personal computer and electronics companies that works to make products compatible in a home network The NBG6818 media server enables you to Publish all share folders for everyone to play...

Page 73: ...he IP address of the NBG6818 the default IP address of the NBG6818 is 192 168 123 1 and press ENTER The share folder usb1 is available Table 21 USB Application USB Media Sharing LABEL DESCRIPTION USB...

Page 74: ...18 s USB port Note This example uses the FileZilla FTP program to browse your shared files 1 Download FileZilla and install the FTP software to your computer 2 Go to USB Application FTP On the FTP Set...

Page 75: ...lete the rules Figure 39 Add Rule Edit 4 Open FileZilla enter the Host IP address of the NBG6818 the default IP address is 192 168 123 1 the Username and Password and the port number 21 and then click...

Page 76: ...Chapter 8 Applications NBG6818 User s Guide 76 5 Once you log in the USB device displays in the usb1 folder...

Page 77: ...sing bridge mode 9 2 What You Can Do Use the Internet Connection screen to enter your ISP information and set how the computer acquires its IP DNS and WAN MAC addresses Section 9 4 on page 79 Use the...

Page 78: ...ress if you use the Ethernet or ENET ENCAP encapsulation method DNS Server Address Assignment Use Domain Name System DNS to map a domain name to its corresponding IP address and vice versa for instanc...

Page 79: ...hes to use 192 168 123 1 as its LAN IP address Figure 41 Auto IP Change Example Auto IP Change only works under the following conditions The NBG6818 must be in Standard Mode see Section 13 7 on page 1...

Page 80: ...EL DESCRIPTION Internet Connection Internet Service Provider Type You must choose the IPoE option when the WAN port is used as a regular Ethernet IPv4 IPv6 Select IPv4 Only if you want the NBG6818 to...

Page 81: ...ion to have the WAN interface use a manually specified MAC address Enter the MAC address in the fields LAN WAN Subnet Conflict Automatically change the LAN IP Select this option to have the NBG6818 ch...

Page 82: ...effort for both you and the ISP or carrier as it requires no specific configuration of the broadband modem at the customer site By implementing PPPoE directly on the NBG6818 rather than individual com...

Page 83: ...this screen Table 23 Network WAN Internet Connection PPPoE Encapsulation LABEL DESCRIPTION Internet Connection Internet Service Provider Type Select PPPoE if you connect to your Internet via dial up I...

Page 84: ...e MAC address you want to use IPv6 Address This section is NOT available when you select IPv4 Only in the IPv4 IPv6 field Automatic IP DHCP Select this option if you want to obtain an IPv6 address fro...

Page 85: ...to 10 0 0 1 or 192 168 123 1 accordingly when the NBG6818 gets a dynamic WAN IP address in the same subnet as the LAN IP address See Section 9 3 1 on page 78 for more information The NAT DHCP server...

Page 86: ...ter the gateway IP address in this field DNS Server First DNS Server Second DNS Server Third DNS Server Select User Defined if you have the IP address of a DNS server Enter the DNS server s IP address...

Page 87: ...rver from your location Your ISP may periodically check for servers and may suspend your account if it discovers any active services at your location If you are unsure refer to your ISP Configuring Se...

Page 88: ...s Behind NAT Example Use this screen to enable NAT set a default server and view the summary table of your NBG6818 s port forwarding settings Click Settings Internet NAT Port Forwarding to show the fo...

Page 89: ...servers for specified services NAT supports a default server A default server receives packets from ports that are not specified in the port forwarding summary table below Select this to use the defa...

Page 90: ...CP_UDP If you have chosen a pre defined service in the Service Name field the protocol will be configured automatically External Port This shows the port number used to connect to this service using t...

Page 91: ...provides audio data and video conferencing FTP File Transfer Protocol an Internet file transfer service SNMP Simple Network Management Protocol An application layer protocol that can be used to excha...

Page 92: ...e to make sure SIP VoIP works correctly with port forwarding and address mapping rules SNMP Select Enable to allow a manager station to manage and monitor the NBG6818 through the network via SNMP RTSP...

Page 93: ...t number ranging between 6970 7170 4 The Zyxel Device forwards the traffic to Jane s computer IP address Only Jane can connect to the Real Audio server until the connection is closed or times out The...

Page 94: ...port settings Click to delete the rule Click to edit the rule Table 28 Expert Mode WAN NAT Port Trigger continued LABEL DESCRIPTION Table 29 Add Port Trigger Rule LABEL DESCRIPTION Name Type a unique...

Page 95: ...able describes the labels in this screen Apply Click Apply to save your changes Cancel Click Cancel to exist this screen without saving Table 29 Add Port Trigger Rule LABEL DESCRIPTION Table 30 Settin...

Page 96: ...back to the NBG6818 Cancel Click Cancel to begin configuring this screen afresh Table 30 Settings Internet Dynamic DNS continued LABEL DESCRIPTION Table 31 Settings Internet UPnP LABEL DESCRIPTION UPn...

Page 97: ...Make sure the computer is connected to a LAN port of the NBG6818 Turn on your computer and the NBG6818 1 Click the start icon Control Panel and then the Network and Sharing Center 2 Click Change Advan...

Page 98: ...Turn on network discovery and click Save Changes Network discovery allows your computer to find other computers and devices on the network and other computers on the network to find your computer Thi...

Page 99: ...ou how to use the UPnP feature in Windows 10 UPnP server is installed in Windows 10 Activate UPnP on the NBG6818 in Settings Internet UPnP Make sure the computer is connected to the LAN port of the NB...

Page 100: ...Chapter 9 WAN NBG6818 User s Guide 100 2 Click Network and Sharing Center 3 Click Change advanced sharing settings...

Page 101: ...select Turn on network discovery and click Save Changes Network discovery allows your computer to find other computers and devices on the network and other computers on the network to find your compu...

Page 102: ...The wireless network in the figure is encircled in blue In this wireless network devices A and B are called wireless clients The wireless clients use the access point AP to interact with other devices...

Page 103: ...n addition you should change the default SSID to something that is difficult to guess This type of security is fairly weak however because there are ways for unauthorized devices to get the SSID In ad...

Page 104: ...use encryption to protect the information that is sent in the wireless network Encryption is like a secret code If you do not know the secret code you cannot understand the message The WPA PSK WiFi P...

Page 105: ...r company network Figure 56 Example Bandwidth for Different Networks WPS WiFi Protected Setup WPS is an industry standard specification defined by the WiFi Alliance WPS allows you to set up a wireless...

Page 106: ...the NBG6818 from a computer connected to the wireless LAN and you change the NBG6818 s SSID channel or security settings you will lose your wireless connection when you press Apply to confirm You mus...

Page 107: ...apply to the NBG6818 Password The password has two uses Manual Manually enter the same password on the Zyxel Device and the client Enter 8 63 ASCII characters or exactly 64 hexadecimal 0 9 a f charact...

Page 108: ...he guest WiFi Select Disable to turn it off Name SSID An SSID profile is the set of parameters relating to one of the NBG6818 s BSSs The SSID Service Set IDentifier identifies the Service Set with whi...

Page 109: ...ilter LABEL DESCRIPTION MAC Filter Select to turn on Enable or off Disable MAC address filtering Filter Action Define the filter action for the list of MAC addresses in the MAC Filter Summary table Se...

Page 110: ...en Note With WPS wireless clients can only connect to the wireless network using the first SSID on the NBG6818 Table 35 Settings WiFi MAC Filter Add LABEL DESCRIPTION Type This field displays the MAC...

Page 111: ...and wireless setup or security settings have been changed from default The current wireless setup and security settings also appear in this screen This displays Unconfigured if WPS is disabled and the...

Page 112: ...wing screen Figure 63 Settings WiFi Scheduling The following table describes the labels in this screen Table 37 Expert Mode Wireless Scheduling LABEL DESCRIPTION WiFi Scheduling Select Enable to activ...

Page 113: ...gure a manage IP addresses and partition your physical network into logical networks 11 2 What You Can Do Use the LAN IP screen to configure the IP addresses for your NBG6818 on the LAN Section 11 4 o...

Page 114: ...Pv4 address of 192 168 123 1 with subnet mask of 255 255 255 0 24 bits DHCP server enabled with 128 client IPv4 addresses starting from 192 168 123 33 These parameters should work for the majority of...

Page 115: ...Chapter 11 LAN NBG6818 User s Guide 115 Figure 66 Settings LAN LAN IP Standard Mode...

Page 116: ...available if you are using bridge mode DHCP Server Select Enable to activate DHCP for LAN Select Disable to stop the NBG6818 from acting as a DHCP server DHCP Dynamic Host Configuration Protocol RFC 2...

Page 117: ...nd the field to the right displays the read only default gateway IP address of your computer Select None if you do not want to configure DNS servers If you do not configure a DNS server you must know...

Page 118: ...o automatically detect the MAC address of a computer on your LAN Otherwise select User Defined to enter the MAC address of a computer on your LAN in the MAC Address field MAC Address This field displa...

Page 119: ...this section to configure your LAN settings while in Bridge Mode Click Settings LAN LAN IP to show the following screen Note If you change the IP address of the NBG6818 in the screen below you will ne...

Page 120: ...imal notation The default setting is 192 168 1 2 If you change the IP address you will have to log in again with the new IP address Subnet Mask The subnet mask specifies the network number portion of...

Page 121: ...stateless auto configuration on this interface The interface will generate an IPv6 IP address itself from a prefix obtained from an IPv6 router in the network Select SLAAC Stateless DHCPv6 to enable I...

Page 122: ...r the 48 to 64 address prefix length to specify in an IPv6 address compose the network address Prefix Valid Lifetime Enter the valid lifetime for the prefix Link Local Only Select this option to only...

Page 123: ...LAN The following figure illustrates the default firewall action User A can initiate an IM Instant Messaging session from the LAN to the WAN 1 Return traffic for this session is also allowed 2 However...

Page 124: ...Local Area Network port attaches to a network of computers which needs security from the outside world These computers will have access to Internet services such as e mail FTP and the World Wide Web...

Page 125: ...ts Otherwise select LAN WAN to reply to all incoming LAN and WAN Ping requests Firewall Setup Enable Firewall Select Enable to activate the firewall The NBG6818 performs access control and protects ag...

Page 126: ...on or service is initialized Dest Port Range This is the port number range of the destination that define the traffic type for example TCP port 80 defines web traffic Source Port Range This is the por...

Page 127: ...affic for the application or service is entering The NBG6818 applies the firewall rule to traffic initiating from this computer Source IP Address Enter the IP address of the computer that initializes...

Page 128: ...pplied in turn Service Name This is a name that identifies or describes the firewall rule MAC Address This is the MAC address of the computer for which the firewall rule applies Dest IP Address This i...

Page 129: ...rule to traffic initiating from this computer Source IP Address Enter the IP address of the computer that initializes traffic for the application or service The NBG6818 applies the firewall rule to tr...

Page 130: ...Use the Remote Access screen to configure the interface s from which the NBG6818 can be managed remotely and specify a secure client that can manage the NBG6818 Section 13 5 on page 135 Use the Maint...

Page 131: ...Chapter 13 System NBG6818 User s Guide 131 Figure 77 Settings System Status Standard Mode...

Page 132: ...nable IPv6 Simple Security This shows if the IPv6 firewall is enabled on the NBG6818 System Uptime This is the total time the NBG6818 has been on WAN Information Note This is not available if you are...

Page 133: ...tem General Setting to show the following screen Figure 79 Settings System General Setting Standard Mode DHCP Server This shows whether the NBG6818 acts as a DHCP Server and provides LAN IP addresses...

Page 134: ...ve to log in with your password again Very long idle timeouts may have security risks A value of 0 means a management session never times out no matter how long it has been left idle not recommended S...

Page 135: ...puter storage device or media server To use this feature the remote hardware such as the network adapter on a computer must support Wake On LAN using the Magic Packet method You need to know the MAC a...

Page 136: ...N Status Select Enable to have the NBG6818 forward a WoL Magic Packet to all devices on the LAN if the packet comes from the WAN or remote network and uses the port number specified in the Port field...

Page 137: ...in this section to clear all user entered configuration information and returns the NBG6818 to its factory defaults You can also press the RESET button on the rear panel to reset the factory defaults...

Page 138: ...IP addresses the LAN IP address and the WAN IP address Figure 84 LAN and WAN IP Addresses in Standard Mode Bridge A bridge enabled all Ethernet ports to be bridged together and be in the same subnet T...

Page 139: ...rd Mode Select Standard Mode if your device routes traffic between a local network and another network such as the Internet This mode offers services such as a firewall or bandwidth management You can...

Page 140: ...Chapter 13 System NBG6818 User s Guide 140 Click Apply to save your settings Click Cancel to discard all changes Click Settings System Logs to show the following screen Figure 87 Settings System Logs...

Page 141: ...sing the power adaptor or cord included with the NBG6818 Make sure the power adaptor or cord is connected to the NBG6818 and plugged in to an appropriate power source Make sure the power source is tur...

Page 142: ...your NBG6818 I cannot see or access the Login screen in the Web Configurator Make sure you are using the correct IP address The default IP address of the NBG6818 in Standard Mode is 192 168 123 1 If...

Page 143: ...stem Operation Mode setting If the NBG6818 is in Standard Mode make sure the WAN port is connected to a broadband modem or router with Internet access Your computer and the NBG6818 should be in the sa...

Page 144: ...nced suggestions Advanced Suggestion Check the settings for QoS If it is disabled you might consider activating it 14 5 Resetting the NBG6818 to Its Factory Defaults If you reset the NBG6818 you lose...

Page 145: ...at factors may cause intermittent or unstabled wireless connection How can I solve this problem The following factors may cause interference Obstacles walls ceilings furniture and so on Building Mater...

Page 146: ...requires a special driver install the driver from the installation disc that came with the device After driver installation reconnect the USB device to the NBG6818 and try to connect to it again with...

Page 147: ...Please have the following information ready when you contact an office Required Information Product model and serial number Warranty Information Date that you received your device Brief description of...

Page 148: ...pines Zyxel Philippines http www zyxel com ph Singapore Zyxel Singapore Pte Ltd http www zyxel com sg Taiwan Zyxel Communications Corporation https www zyxel com tw zh Thailand Zyxel Thailand Co Ltd h...

Page 149: ...xel Communications A S https www zyxel com dk da Estonia Zyxel Estonia https www zyxel com ee et Finland Zyxel Communications https www zyxel com fi fi France Zyxel France https www zyxel fr Germany Z...

Page 150: ...Zyxel Communications Poland https www zyxel com pl pl Romania Zyxel Romania https www zyxel com ro ro Russia Zyxel Russia https www zyxel com ru ru Slovakia Zyxel Communications Czech s r o organizac...

Page 151: ...ca Argentina Zyxel Communications Corporation https www zyxel com co es Brazil Zyxel Communications Brasil Ltda https www zyxel com br pt Colombia Zyxel Communications Corporation https www zyxel com...

Page 152: ...ations Corporation https www zyxel com me en North America USA Zyxel Communications Inc North America Headquarters https www zyxel com us en Oceania Australia Zyxel Communications Corporation https ww...

Page 153: ...ur network Windows Vista XP 2000 Mac OS 9 OS X and all versions of UNIX LINUX include the software components you need to use TCP IP on your computer If you manually assign IP information instead of u...

Page 154: ...r s IP Address NBG6818 User s Guide 154 2 In the Control Panel click View network status and tasks under the Network and Internet category 3 Click Change adapter settings 4 Double click Local Area Con...

Page 155: ...s IP Address NBG6818 User s Guide 155 Note During this procedure click Continue whenever Windows displays a screen saying that it needs your permission to continue 5 Select Internet Protocol Version 4...

Page 156: ...ic IP address that was assigned to you by your network administrator or ISP You may also have to enter a Preferred DNS server and an Alternate DNS server if that information was provided Click Advance...

Page 157: ...he screens in this section are from Mac OS X 10 4 but can also apply to 10 3 1 Click Apple System Preferences 2 In the System Preferences window click the Network icon 3 When the Network preferences p...

Page 158: ...select Using DHCP from the Configure IPv4 list in the TCP IP tab 5 For statically assigned settings do the following From the Configure IPv4 list select Manually In the IP Address field type your IP...

Page 159: ...gs Check your TCP IP properties by clicking Applications Utilities Network Utilities and then selecting the appropriate Network Interface from the Info tab Figure 88 Mac OS X 10 4 Network Utility Mac...

Page 160: ...Setting Up Your Computer s IP Address NBG6818 User s Guide 160 2 In System Preferences click the Network icon 3 When the Network preferences pane opens select Ethernet from the list of available conne...

Page 161: ...st select Using DHCP for dynamically assigned settings 5 For statically assigned settings do the following From the Configure list select Manually In the IP Address field enter your IP address In the...

Page 162: ...r s Guide 162 6 Click Apply and close the window Verifying Settings Check your TCP IP properties by clicking Applications Utilities Network Utilities and then selecting the appropriate Network interfa...

Page 163: ...uration The following screens use the default Ubuntu 8 installation Note Make sure you are logged in as the root administrator Follow the steps below to configure your computer IP address in GNOME 1 C...

Page 164: ...ix B Setting Up Your Computer s IP Address NBG6818 User s Guide 164 4 In the Network Settings window select the connection that you want to configure then click Properties 5 The Properties dialog box...

Page 165: ...hanges and close the Properties dialog box and return to the Network Settings screen 7 If you know your DNS server IP address es click the DNS tab in the Network Settings window and then enter the DNS...

Page 166: ...KDE using the openSUSE 10 3 Linux distribution The procedure screens and file locations may vary depending on your specific distribution release version and individual configuration The following scr...

Page 167: ...mputer s IP Address NBG6818 User s Guide 167 2 When the Run as Root KDE su dialog opens enter the admin password and click OK 3 When the YaST Control Center window opens select Network Devices and the...

Page 168: ...ss NBG6818 User s Guide 168 4 When the Network Settings window opens click the Overview tab select the appropriate connection Name from the list and then click the Configure button 5 When the Network...

Page 169: ...c IP address Select Statically assigned IP Address if you have a static IP address Fill in the IP address Subnet mask and Hostname fields 7 Click Next to save the changes and close the Network Card Se...

Page 170: ...w Verifying Settings Click the KNetwork Manager icon on the Task bar to check your TCP IP properties From the Options sub menu select Show Connection Information Figure 92 openSUSE 10 3 KNetwork Manag...

Page 171: ...Appendix B Setting Up Your Computer s IP Address NBG6818 User s Guide 171 Figure 93 openSUSE Connection Status KNetwork Manager...

Page 172: ...50 Commonly Used Services NAME PROTOCOL PORT S DESCRIPTION AH IPSEC_TUNNEL User Defined 51 The IPSEC AH Authentication Header tunneling protocol uses this service AIM New ICQ TCP 5190 AOL s Internet...

Page 173: ...l from a POP3 server through a temporary connection TCP IP or other PPTP TCP 1723 Point to Point Tunneling Protocol enables secure transfer of data over public networks This is the control channel PPT...

Page 174: ...nd terminal emulation protocol common on the Internet and in UNIX environments It operates over TCP IP networks Its primary function is to allow users to log into remote host systems TFTP UDP 69 Trivi...

Page 175: ...ions not expressly approved by the party responsible for compliance could void the user s authority to operate the device This product has been tested and complies with the specifications for a Class...

Page 176: ...ice 2014 53 EU Dansk Danish Undertegnede Zyxel erkl rer herved at f lgende udstyr udstyr overholder de v sentlige krav og vrige relevante krav i direktiv 2014 53 EU National Restrictions In Denmark th...

Page 177: ...2014 53 EU Polski Polish Niniejszym Zyxel o wiadcza e sprz t jest zgodny z zasadniczymi wymogami oraz pozosta ymi stosownymi postanowieniami Dyrektywy 2014 53 UE Portugu s Portuguese Zyxel declara qu...

Page 178: ...8W and or Off mode power consumption 0 5W and or Standby mode power consumption 0 5W Wireless settings please refer to the chapter about wireless settings for more detail European Union Disposal and...

Page 179: ...ols Various symbols are used in this product to ensure correct usage to prevent danger to the user and others and to prevent property damage The meaning of these symbols are described below It is impo...

Page 180: ...haser This warranty is in lieu of all other warranties express or implied including any implied warranty of merchantability or fitness for a particular use or purpose Zyxel shall in no event be held l...

Page 181: ...ders 127 129 DHCP server 114 Digital Living Network Alliance 56 disclaimer 175 DLNA 56 indexing 73 overview 72 rescan 73 DLNA compliant client 56 DNS Server 78 Domain Name System See DNS DynDNS 127 12...

Page 182: ...using the WPS See WPS MBSSID 11 Media access control 108 media client 72 media file 72 73 type 73 media server overview 72 meida file play 72 mode 11 N NAT and ALG 91 O OpenVPN Client 65 OpenVPN Serve...

Page 183: ...AN Wide Area Network 77 WAN MAC address 78 warranty 180 note 180 Web Configurator how to access 27 web configurator 12 wireless channel 145 wireless LAN 145 wireless LAN scheduling 112 Wireless networ...

Reviews: