

Ref.No.
:
122014
Battery Life (with backlit)
6 hrs continuous use
Dimensions
94.65 x 74.03 x 233.68mm (3.73 x 2.91 x 9.20 inch)
Weight
390 grams(13.8 oz) including batteries (AA*4pcs)
EMC/RFI: Readings may be affected if the unit is operated within radio frequency electromagnetic field strength of approximately 3 volts per
meter, but the performance of the instrument will not be permanently affected.
SOFTWARE STARTING UP
First you have to open the document “USB VCOM Software for windows” to install the USB driver.
Connect the application set to the power supply and the PC. Then start “ArraySW.EXE”.
The next step is to initialize the interface. Depending on your system you have to choose the pursuant COM Port. You have to
regard the following steps:
1.) Connect the USB jack. If you want to connect the device directly to the computer, you have to use USB cable.
2.) Power up the device by connecting the USB power jack.
3.) Select “ COM* ” in the Interface-Combo-Box.
4.) Click “ Start ” in the Interface-Button. If TIM03 is present, the GUI will show data in the dialogue.
5.) Press TURN OFF button to stop working the Thermal Imaging Software.
PROGRAM FEATURES
This is a short overview of all functions of the program:
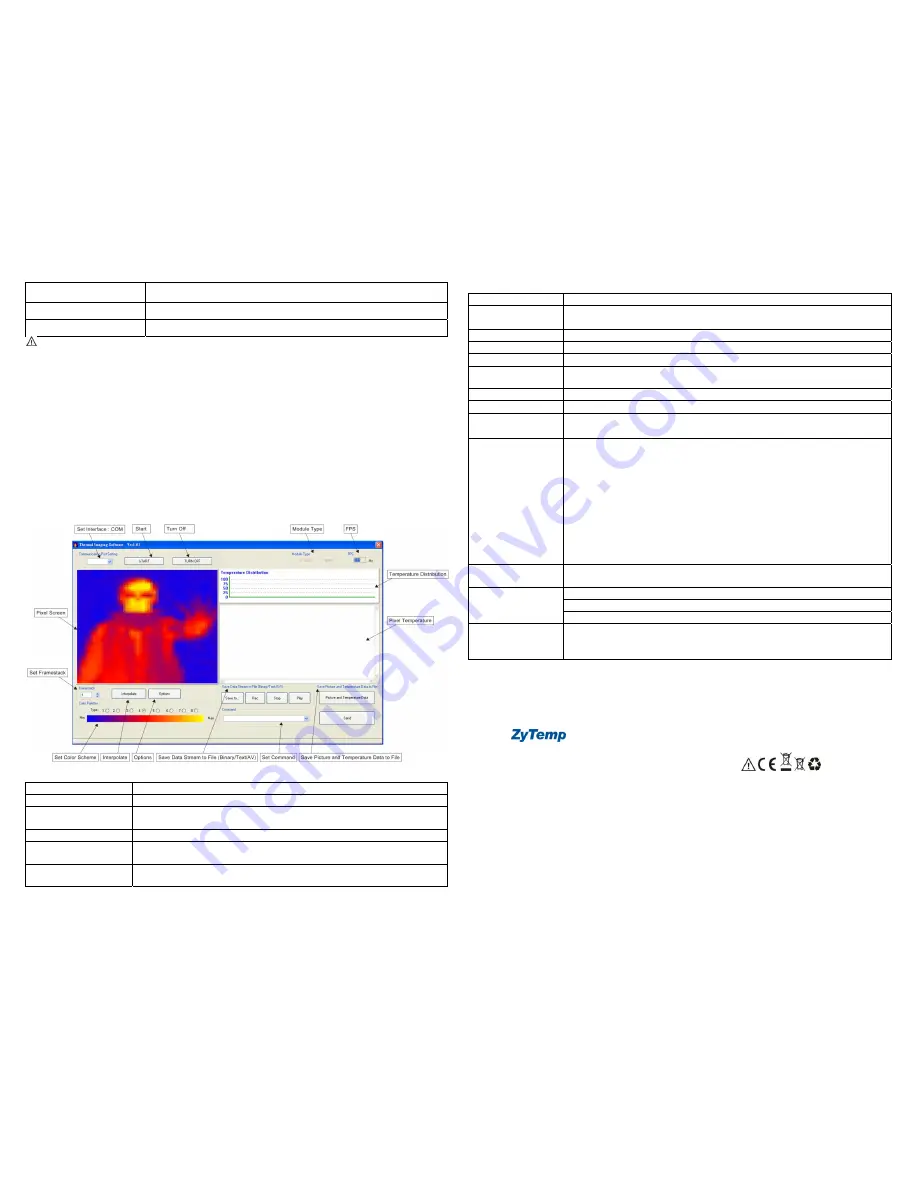
As you can see in the screenshot some elements are information-giving others are for control. First we will discuss the information
giving elements:
Item Function
Pixel Screen
The Pixel Screen shows a calculated RGB-Value for the temperature each thermopile sees.
Temperature Distribution of all
Pixels
This field shows a histogram. It represents the distribution of temperatures.
Pixel Temperature
This field shows the temperature of all thermopiles.
False Color Scale
The False Color Scale shows the range of the chosen color scheme and the minimum and
maximum Value in the Pixel Screen.
Single Pixel Information
Single Pixel Information shows several information of a pixel selected at the Pixel Screen by
mouse or keyboard (use arrows).
Note: If a setting in any dialogue-box is changed, it must be confirmed with ENTER.
The control elements are:
Item Function
Set Interface : COM
Determine your COM port.
Protocol specifications :Transfer rate 460800 baud,8 bata bits,no parity,1 stop bit,NONE
Start/Turn Off
Starts and stops capturing of data.
Module Type
Thermopile sensor array is 32*31
FPS
Show Frames per second.
Set Framestack
Framestack allows integrating over multiple pictures for better quality because of noise reduction
by accepting a lower frame rate. The Framestack can get a size between 1 and 300.
Set Color Scheme
There are eight different color schemes available.
Interpolate
Interpolation simulates a higher resolution, from 32x31 to 128x127 pixels for example.
Options
Set temperatures in
°
C
、
°F or K .
Set mirror frame: X-Axis/Y-Axis/Both.
Save Data Stream to File
(.bds/.txt /.avi)
The data stream can be saved in a file (.bds/.txt/.avi). For analysis the text files are easier to
handle.
First click “Save to…” and enter name, file type and destination where you want it to save. To
begin data capturing click “Rec” in the Save to File-Box. The Button is highlighted red, as long as
data capturing proceeds. You can stop recording by pressing “Stop” in the Save to File-Box. The
red highlighting of the Rec-Button disappears.
If you want to play the stored stream with your program, press “Play”. A new window appears.
Press “Open stream…” and open the desired file. Now enter the Frame rate, press enter and
confirm with play.
It is also possible to reduce the size of the file by setting the figure in the “Every Frame”-field to a
different amount. When “Every Frame” is set to 6, for example, then only each sixth frame is
recorded. This value is also used, when a recorded data stream is played.
Play SD card files(.bin)
First save the SD card files to your computer, press “Open stream…” and open the desired binary
file(.bin) as described above.
Set Command
“K”: Continuously display temperature data of thermal images on PC
“x” : Stop transferring thermal images
“T” : Transfer to the thermal imager camera and display temperature data
Save Picture and Temp.
Data to File
Temperatures and Pixel:
saves Temperature- values table to Excel (TIM_TempV_*****.xls)
saves Pixels to BMP (TIM_Temp_*****.bmp)
A new way to measure temperature
Radiant Innovation Inc. Http://www.ZyTemp.com
1F, No.3, Industrial East 9
th
Road, Science-Based Industrial Park, HsinChu, Taiwan 300.


