ZYLUX TygerDog TD1000A-X User Manual Download Page 8


7


Tyre Pressure & Safety Information. 


Please take the time to choose a suitable location so operation can be 
performed quickly and safely. 

o


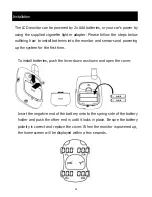
Be sure that the LCD monitor is firmly fixed to the windshield or 
dashboard using the supplied mounting hardware. 

o


Please practice safe driving and only take the time necessary to read 
the information displayed on the screen.   


Ensure the sensors communicate with the LCD monitor before initially 
fitting them to your tyres to save time and hassle. 


Tyredog TPMS has a unique SecureFit mechanism to prevent sensors 
from coming loose. You can decide whether to install it or not.   


Regularly check if sensors are fitted tightly. If necessary, spread water 
with detergent on the valve stem to see if your valves are leaking.   


If a rapid deflation warning sounds, stop the car immediately to check the 
tyre for damage. Remember to be safe when pulling over.   


The monitor will automatically make connections when it is powered on. 
It is normal for some readings to freeze until sensor updates are received.   


All Tyredog sensors have their own unique codes and are designed to 
reject interference from other devices operating on the same frequency.   


Many factors can cause tyre pressure to rise and fall. For example, warm 
weather or long distance trips will lead to a rise in tyre pressure.     


It  is  normal  for  tyre  pressure  to  decrease  over  long  periods  of  time. 
Periodically re-inflate tyres especially if your car is not regularly driven.   


If you have any questions or problems concerning your unit that are not 
covered in this manual, please consult your nearest Tyredog dealer. 


Summary of Contents for TygerDog TD1000A-X

Page 1: ...0...

Page 2: ...DESIGN 6 TYRE PRESSURE SAFETY INFORMATION 7 PACKAGE CONTENTS PARTS CHECKLIST 8 SYSTEM COMPONENTS 10 GUI LAYOUT 12 INSTALLATION 13 MONITOR 13 SENSORS 14 MOUNTING BRACKET 16 OPERATION 17 MAIN BUTTON LO...

Page 3: ...22 LOW PRESSURE WARNING 22 HIGH PRESSURE WARNING 23 HIGH TEMPERATURE WARNING 24 LOW BATTERY WARNING 25 BATTERY INFORMATION 26 TROUBLESHOOTING 27 SPECIFICATIONS 28 REFERENCE CHART 29 NOTES 30 USER GUI...

Page 4: ...ry common for rubber valve stems to require replacement without showing signs of wear Never overload your vehicle Overloading is extremely dangerous and can cause failure of tyres suspension and drive...

Page 5: ...s time taken to inspect tyres It can be very time consuming to walk around large vehicles to inspect each tyre A TPMS will help pinpoint a faulty tyre to save time Everybody from driving enthusiasts t...

Page 6: ...he world s smallest valve cap sensor The extremely lightweight compact sensor has been designed to simplify installation and remove the need to have wheels balanced when fitted Through wireless techno...

Page 7: ...ssure or temperature giving you peace of mind Design z All sensors can be securely locked onto tyre valves for added safety z Learnable sensors are available so in the event of theft or damage sensors...

Page 8: ...gent on the valve stem to see if your valves are leaking If a rapid deflation warning sounds stop the car immediately to check the tyre for damage Remember to be safe when pulling over The monitor wil...

Page 9: ...8 Package Contents Parts Checklist Item QTY TD1000A LCD Monitor ONE Mounting bracket ONE Bracket base TWO AAA Battery LR03 TWO Cigarette lighter adapter ONE...

Page 10: ...screws The 3 way adapter is sold individually and only available from an authorized TYREDOG re seller RECCOMMENDED ONLY FOR DEEP DISH OR TRUCK WHEELS Replacement learnable sensor Must be ordered as sp...

Page 11: ...Screw Monitor bracket Angle adjustment Pivoting ball joint Bracket base Mute Temperature Backlight Power switch Screw hole for bracket Bracket hooker Battery cover Connect to cigarette adapter Antenna...

Page 12: ...user to install tyre pressure system at home without any technical knowledge or assistance 3 way adapter The 3 way adapter is an optional accessory and must be purchased separately RECCOMMENDED ONLY F...

Page 13: ...12 GUI Layout...

Page 14: ...tor and sensors and powering up the system for the first time To install batteries push the lever down as shown and open the cover Insert the negative end of the battery onto to the spring side of the...

Page 15: ...screwed on tight EG Sensor RL is online but no pressure is detected This is indicating that the sensor is online but not yet mounted Repeat this process with the remaining sensors until all sensors a...

Page 16: ...nal valve caps slide the SecureFit fixing ring over the valve stem with the flat surface towards the wheel 2 Screw the Tyredog sensor on in a clockwise direction until you feel the valve stem come und...

Page 17: ...sure of a permanent position Screw the monitor arm to the base you have chosen making sure the ball joint is seated correctly in the socket Hook the bracket into the slot at the rear of the unit and t...

Page 18: ...unit is switched on the boot up screen will be displayed and then the home screen When booting for the first time all sensors will show 00 0psi values At any other time the most recent information wi...

Page 19: ...a strike thorough it on the GUI Temperature Pressing the temperature button will illuminate the display and show all temperatures for 5 seconds Backlight When on battery power pressing the backlight...

Page 20: ...he Temperature and Backlight buttons are used to adjust the setting values Press mute again to advance to the next setting SEt Uni Pressure unit KPA PSI BAR Kg cm SEt Uni Teperature Unit C Celsius F F...

Page 21: ...se a sensor is lost stolen or damaged it can be replaced with a Learnable Sensor These sensors have their own special code and can only replace those of the same type and wheel location For example if...

Page 22: ...permanent 12 volt source Once the system is in learning mode you can proceed to program your new learnable sensors Simply insert the battery into the learnable sensor to activate its code in the moni...

Page 23: ...ate for four seconds The corresponding sensor location will alternate between the current pressure and Lo P The monitor will continue to beep 3 times for every 1 PSI the pressure drops until the probl...

Page 24: ...for four seconds The corresponding sensor location will alternate between the current pressure and Hi P The monitor will continue to beep 3 times for every 1 PSI the pressure rises until the problem i...

Page 25: ...nd back light will illuminate for four seconds The corresponding sensor location will alternate between the current pressure and Hi t The monitor will continue to beep 3 times for every 1 degree the t...

Page 26: ...be displayed in the middle section of the screen LEFT When a sensor battery is running low a vertical low battery indicator will be displayed in the corner of the screen respective to the sensor RIGHT...

Page 27: ...from your nearest Tyredog reseller Notes on batteries z Keep lithium batteries out of reach of children z Should a battery be swallowed immediately consult a doctor z Wipe the battery with dry cloth t...

Page 28: ...o sensors one by one 6 Fit sensors to valves one by one If you feel your system has a fault which cannot be rectified by this procedure please contact your Tyredog dealer Always ensure batteries have...

Page 29: ...onths depending on daily operation time Dimensions 20 5mm Diameter x 20mm Height Weight 10 g 1g Monitor specification Frequency 433 92MHz Operating voltage 3 Volts DC Battery 12 Volts DC External Batt...

Page 30: ...29...

Page 31: ...material or workmanship see Exclusions the Customer will be asked to ship to the nearest service point The product must be packaged appropriately for safe shipment To prove that the product is under...

Page 32: ...31 Distributed by ZYLUX DISTRIBUTION PTY LTD 166 Christmas Street Fairfield Vic 3078 Website www zylux com au Email info zylux com au Tel 03 9482 2203...

Reviews: