background image

6


INSTALLATION


System Installer must adhere to Article 820-40 of the NEC that provides guidelines for proper grounding 

and specifies that the cable ground shall be connected to the grounding system of the building, as close 

to the point of cable entry as possible

.


UNPACKING and INSPECTION


Each  unit  is  shipped  factory  tested.  Ensure  all  items  are  removed  from  the  container  prior  to  discarding  any  packing 

material. 
Thoroughly inspect the unit for shipping damage with particular attention to connectors and controls. If there is any 

sign  of  damage  to  the  unit  or  damaged  or  loose  connectors  contact  your  distributor  immediately.  Do  not  put  the 

equipment into service if there is any indication of defect or damage.


HARDWARE INSTALLATION and CONNECTIONS


1.

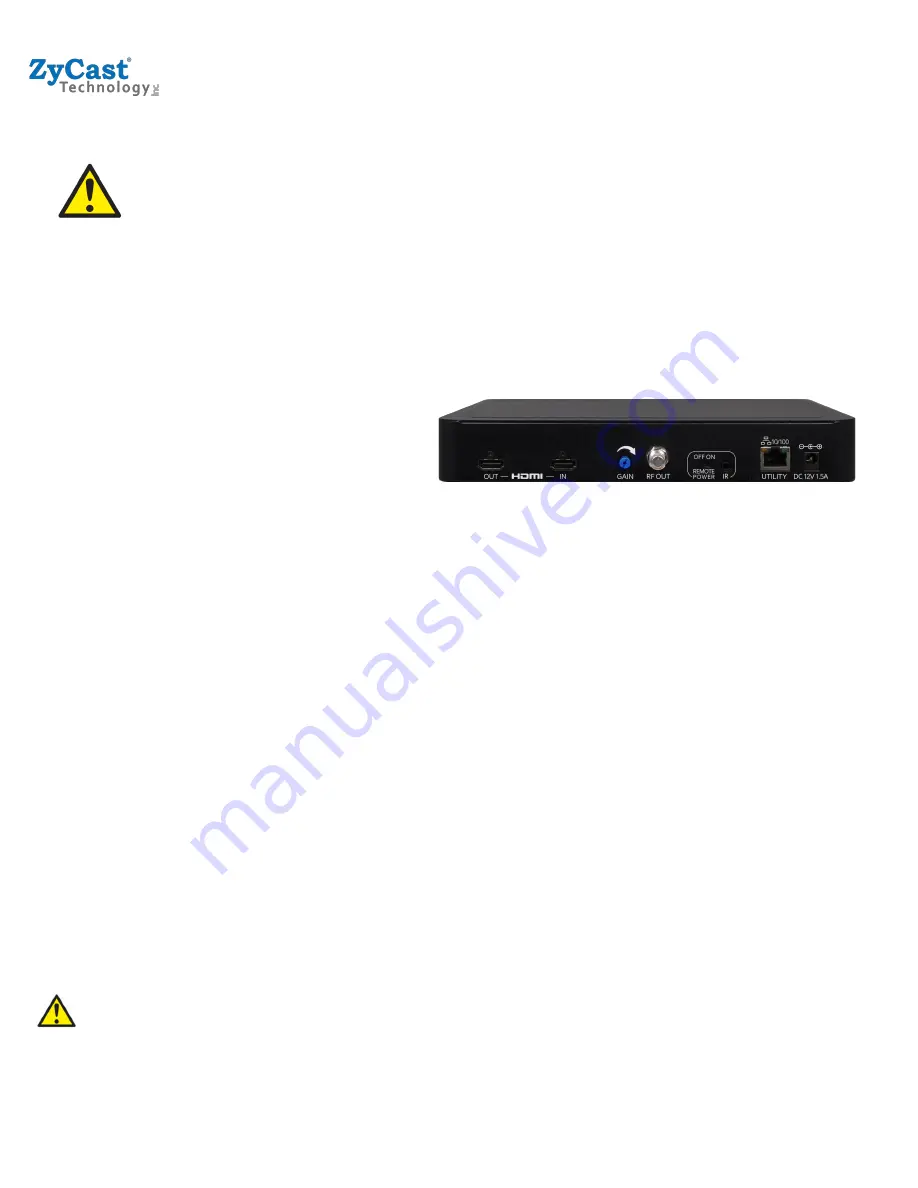
Use a HDMI cable to connect the video source (e.g., CATV, DVD, VCR, Camera) to the unit’s 

HDMI IN 

port.  It is highly recommended that quality HDMI cable be used for all video source connections. 

2.

Use a HDMI cable to connect the unit’s 

HDMI OUT 

port to a television. Or Use a quality 75

Ω

 coaxial 

cable with “F” connectors from the unit’s 

RF OUT 

jack to the distribution system (combiner or reverse 

splitter) or directly to a television. 

3.

Connect the included power supply to the unit’s 

DC 12V 

POWER jack.  

4.

Connect the power supply to an appropriately rated AC power outlet. 

5.

Use a quality RJ45 cable to connect the 

Web Management 

port to a computer RJ45 port for setup/

manage the unit. 

6.

If applicable, connect an IR repeater jack to the 

IR REPEATER 

port for IR remote control function. If 

needed, you can turn 

ON

 the 

REMOTE POWER

 for sending a 12V power through RF OUT to the 

connected module. 

7.

Connect the included adaptor to the unit's

 DC 12V 

Power plug. 

8.

Connect the adaptor to an appropriately related AC power outlet. 


Reset to Default – Turn OFF the unit. While pressing UP and DOWN buttons at the same time, turn ON the unit. 

Release the UP and DOWN buttons when the LCD shows Reset to Default. The unit will reset to factory default. 

This can also be defaulted via WEB GUI (under Administration) 


Caution: Once this process is complete the unit will automatically reset to the factory default settings. 

All settings or changes to the encoder/modulator will be lost.


 Rev.190420

Summary of Contents for Q4K-R1

Page 1: ...INSTALLATION CONFIGURATION MANUAL Q4K R1 4K Pass Through HD Encoder Modulator ...

Page 2: ...TS PRODUCT DESCRIPTION FEATURES Q4K R1 SPECIFICATIONS UNPACKING and INSPECTION HARDWARE INSTALLATION and CONNECTIONS DEVICE PROGRAMMING and SETUP DEFAULT CONNECTION to the GUI INTERFACE via STATIC IP ADDRESS Q4K R1 4K HD ENCODER MODULATOR NOTES 3 3 4 4 5 6 6 7 7 16 ...

Page 3: ...ny other power supply could cause damage and invalidate the manufacturer s warranty DO NOT power on the unit until all cables and connections to the device have been properly connected The device should be installed in an environment consistent with its operating temperature specifications Placement next to heating devices and ducts is to be avoided as doing so may cause damage The device should n...

Page 4: ... the commercial and institutional market hotels motels sports bars restaurants hospitals casinos business and university campuses digital signage etc as well as home entertainment systems Features H 264 AVC Encoding Up to 4K HDMI Input 4K HDMI Loop through HD RF Output HDMI 2 0 HDCP 2 2 Compliant Built in IR control Gain Control 20dB Manual Attenuation RJ 45 Port for Web Management Video Resolutio...

Page 5: ... IR Emitter Single Connector 1x F Female Web GUI Supported Firefox Chrome Frequency Range 177 5MHz to 816 5MHz Ch6 Ch69 Password Protected GUI User Settable Output Level 85 dBµV Typical With 20dB Range Manually Adjustable Power Supply 12VDC 1 5A Flatness Across Full Band 2 dB Consumption 6 5 Watts MER 39 dB Typical Operation Temperature 0c to 45c Carrier OFDM Mode 2K 8K Storage Temperature 20c to ...

Page 6: ...vision Or Use a quality 75Ω coaxial cable with F connectors from the unit s RF OUT jack to the distribution system combiner or reverse splitter or directly to a television 3 Connect the included power supply to the unit s DC 12V POWER jack 4 Connect the power supply to an appropriately rated AC power outlet 5 Use a quality RJ45 cable to connect the Web Management port to a computer RJ45 port for s...

Page 7: ...onnect an Ethernet Cable to your PC Laptop 2 Modify your PC Laptop IP address to 192 168 1 11 3 Enter 192 168 1 9 into your web browser 4 Enter GUI and make required device changes 5 Save all changes as required upload and reboot changes 6 Verify parameters then end web session Note The installer can choose to set enable DHCP via Front Panel LCD or at the WEB MANAGEMENT SETUP section Note To setup...

Page 8: ...er up the Encoder Connect encoder using a standard CAT5 6 cable from the Web Management port located on the rear panel of the encoder to a switch or direct to PC Connect a CAT5 6 cable from the switch to a PC 2 Set the PC via the Control Panel to Obtain an IP address automatically Start Control Panel View Network Status and Tasks 3 Select Change Adapter Settings from the left plane Rev 190420 ...

Page 9: ...ect Local Area Connection Icon Then Right Click Select Properties Internet Protocol Version 4 TCP IPv4 Properties 5 Select Obtain an IP address automatically Obtain DNS server address automatically Rev 190420 ...

Page 10: ...ly Select Start Computer Network 7 After selecting Network the unit will show up on the right side under Media Devices Each device will show up by Device Address ex ZyCast001 002 003 Right Click on the icon for the Encoder you want to setup Select View device webpage Rev 190420 ...

Page 11: ...will be displayed as shown figure for example 9 Select the Common Setup tab User will be presented with encoders Authentication Required screen 10 Enter User Name and Password User Name admin Password Admin123 Rev 190420 ...

Page 12: ...rements LCN Channel Name Also allow control of the Output Resolution HD SD Bitrate HDCP and PID s these are not required to be changed in most installations Note For use in Australia with Foxtel IQ4 4K STB please use default Resolution of 720p for smooth clear HD pictures Rev 190420 ...

Page 13: ... the attenuation by adjusting the Gain control from the unit RF Setup RF Setup will allow you to change the RF Output Channel Also ONID NID and TSID these are not required to be changed in most installations Rev 190420 ...

Page 14: ...k Setup will allow you to change the Hostname DHCP IP Address and other IP settings Administration Administration will allow you to upload or download settings to the Q4K R1 also Reboot or Reset to Default Password Rev 190420 ...

Page 15: ...ou agree simply click Submit and they will be sent to the modulator LCD Menu Password is 0000 The LCD menu is in the same order as the WEB GUI Encoder Setup Default LCN Logic Channel Number 101 Channel Name Channel 1 Provider Name ZyCast HD Bitrate 24 SD Bitrate 5 Output Resolution 720p Program Number 101 HDCP Test Audio Output MP2 PID s Rev 190420 ...

Page 16: ...Network Name ZyCast Network Setup Reboot Reset to Default Download Settings Upload Settings Password Q4K R1 4K HD Encoder Modulator Notes PRODUCT NOTES ITEM VALUE DEVICE NAME PURCHASE DATE INSTALLATION DATE SERIAL NUMBER FIRMWARE VERSION Rev 190420 ...

Reviews: