


LCT-1631A Manual V1.0
16
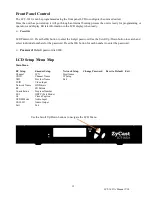
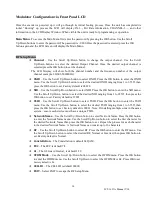
Modulator Configuration via Front Panel LCD
Once the encoder is powered up it will go through its initial booting process. Once the unit has completed its
initial “Booting” up process the LCD will display IN-1..., Bit Rate information, CHANNEL-1...., and other
information in the LCD Display Window. When visible the unit is ready for programming or operation.
Main Menu
–
To access the Main Menu first enter the password by pressing the OK button. Use the Scroll
Up/Down buttons to enter the password. The password is - 0000.Once the password is entered press the OK
button again and the LCD Screen will display the Main Menu.
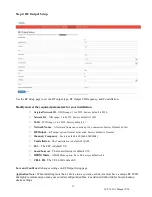
RF Setup Menu
◈
Channel
– Use the Scroll Up/Down button to change the output channel. Use the Scroll
Up/Down buttons to select the desired Output Channel. Once the desired output channel is
selected press the OK button to set the channel.
The LCD Display will show both the channel number and the frequency number of the output
channel example: 39(606.5000MHz)
◈
ONID
–
Use the Scroll Up/Down button to select ONID. Press the OK button to enter the ONID
menu. Use the Scroll Up/Down button to select the desired ONID ranging from 1 to 65535 then
press the OK button to set. Factory default is 08228.
◈
NID
–
Use the Scroll Up/Down button to select NID. Press the OK button to enter the NID menu.
Use the Scroll Up/Down button to select the desired NID ranging from 1 to 65535 then press the
OK button to set. Factory default is 12801.
◈
TSID
–
Use the Scroll Up/Down button to select TSID. Press the OK button to enter the TSID
menu. Use the Scroll Up/Down button to select the desired TSID ranging from 1 to 65535 then
press the OK button to set. Factory default is 00001. Note: If installing multiple units in the same
system – ensure each device must have a unique TSID.
◈
Network Name
– Use the Scroll Up/Down button to select Network Name. Press the OK button
to enter the Network Name menu. Use the Scroll Up/Down button to select the first character for
the desired Network Name then press the OK button to set. Repeat the process for each character
in the desired Network Name. A Network Name can consist up to 16 characters.
◈
RF
– Use the Scroll Up/Down button to select RF. Press the OK button to enter the RF menu. Use
the Scroll Up/Down button to select the desired RF, Normal or Inverted, then press OK button to
set. Factory default is Normal.
◈
Constellation
– The Constellation is default 64 QAM.
◈
FEC
– The FEC is default 7/8.
◈
GI
– The GI, Guard Interval, is default 1/32.
◈
OFDM Mode
– Use the Scroll Up/Down button to select the OFDM menu. Press the OK button
to enter the OFDM menu. Use the Scroll Up/Down to select the OFDM 2k or 8k. Press OK to set.
Factory default is 8k.
◈
CELL ID
– The CELL ID is default 00000.
◈
EXIT
– Select EXIT to escape the RF Setup Menu.