background image

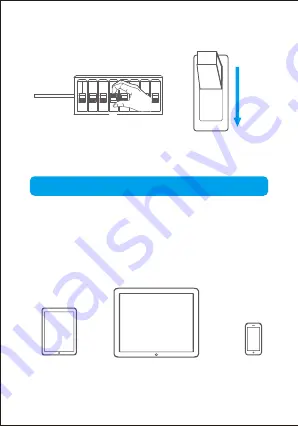
Step 11: Turn on the power to the floodlight at the fuse box

OFF

ON

ON

Using Your Floodlight Camera

Please prepare the following stuff before using this 
floodlight camera.

A smartphone or tablet using IOS 12.0 / Android 6.0 or 
higher (A Mac or Windows PC will not work with this 
product).

Preparation

iPad

iPhone

Android phone

14

Summary of Contents for GF-L300PRO

Page 1: ...loodlight Camera User Manual Thank you for purchasing our products This manual addresses the safety guidelines warranty and operating instructions Please review this manual thoroughly before operating...

Page 2: ...Package Contents 1 At a Glance 2 Setting Up Your Floodlight Camera 4 Using Your Floodlight Camera 14 Specifications 23 FAQs 25 Safety and Warranty 26 Contents...

Page 3: ...ts Please note The power cable included in the package is for you to test the product and get familiar with the functions of the product before installation 1 1 2 3 4 5 6 9 10 7 8 GF L300PRO Floodligh...

Page 4: ...At a Glance 2 Floodlight PIR Sensor Infrared Light Light Sensor Night Vision Mode Lens Camera...

Page 5: ...3 Reset Button Micro SD Card Slot Micro SD Card Slot Cover Camera Lock Collar Base Floodlight Adjustment Knob...

Page 6: ...ght The installation height will influence the motion sensor s performance and the viewing angle of the camera When the motion detector is installed at a distance of 3 meters 9 feet from the ground an...

Page 7: ...Parallel to groud 30 26 feet 8 Meters...

Page 8: ...combustible or flammable surfaces Connect it to a power source AC 110V to 240V Install it in a place where it can be protected from heavy rain heat and humidity for long service life Step 1 Turn off...

Page 9: ...turning counterclockwise 2 Remove the mounting bracket Step 3 Install the waterproof rubber gasket on the mounting bracket Align the four corners of the gasket with the four corners of the mounting b...

Page 10: ...tion We recommend you use a level to make sure alignment to ground is correct Step 5 Select a proper place for drilling 1 Drill a hole in the mounting place that does not influence plumbing electrical...

Page 11: ...sh all the wires through the large opening of the bracket carefully 2 Tighten the screws to fix the bracket on the mounting area Pay attention to the horizontal position on the top White Neutral Black...

Page 12: ...onnect the white wire neutral to the neutral wire coming out of your junction box 3 Connect the black wire hot to the hot wire coming out of your junction box using another wire nut Please note If you...

Page 13: ...ep 8 Install the floodlight camera onto the bracket 3 Align the mounting posts with the holes on the floodlight camera and press them together 11 4 Secure the floodlight by screwing the screws clockwi...

Page 14: ...Step 9 Put the waterproof rubber cap on the screw hole 12...

Page 15: ...he angle of the floodlight and the camera After adjusting the angle of the camera and floodlight put the waterproof rubber cap on the screw hole Please note Do not remove the floodlight part or the ca...

Page 16: ...FF ON ON Using Your Floodlight Camera Please prepare the following stuff before using this floodlight camera A smartphone or tablet using IOS 12 0 Android 6 0 or higher A Mac or Windows PC will not wo...

Page 17: ...System State The Green LED indicator turns on and you can hear a voice prompt three times after about 40 seconds The Green LED indicator flashes slowly The Green LED indicator flashes fast The Green...

Page 18: ...ks normally please format the Micro SD card before using it Installing the Micro SD Card Insert the Micro SD card properly into the slot as below Wrong Correct Taking out the Micro SD card Push in the...

Page 19: ...ould be within 3 meters 9 feet during configuration Do not use Chinese or special symbols such as etc to name the Wi Fi or set its password The name and password of the Wi Fi can not be blank Make sur...

Page 20: ...the package Side Customize AT T 11 57 AM Device Name Front Door BackYard What would you like to name the device Side How to find the camera ID Cannot scan QR code AT T 11 57 AM Scan the QR code on the...

Page 21: ...7 AM Next Input WiFi Password Cancel Test1 Please input WiFi password WiFi SSID WiFi Password AT T 11 57 AM Connecting to your device in about 60S please wait Configure Device 40 4 Put your smartphone...

Page 22: ...t for about 60 seconds and the configuration is done the Green LED indicator turns off when the configuration is successful Configure success AT T 11 57 AM Configure complete 100 Configure Device 6 Ta...

Page 23: ...30 AT T 11 57 AM My Device Oneline BackYard Remote Notification Floodlight Switch QR Code View Photos and Videos Settings AT T 11 57 AM BackYand Storage SOS ON Siren AUTO 2018 01 01 08 30 Emergency Ca...

Page 24: ...e app or want to replace the Wi Fi system you can reset the camera Reset the floodlight camera 22 1 When the floodlight camera is powered on press and hold the Reset button on the bottom of for 5 seco...

Page 25: ...on Pixel 2 Megapixels Minimum Illumination 0 3 lux PIR Detection Angle 120 f 3 6mm F 2 0 Horizontal angle of view 120 Lens Audio Compression Standard G 711 G 726 Frame Rate Video Compression Type H 26...

Page 26: ...e format Micro SD Card Siren Other Requirements Network Specification Port Protocol ONVIF Support Protocol TCP IP HTTP TCP ICMP UDP ARP IGMP SMTP FTP DHCP DNS DDNS NTP UPNP RTSP Wireless Standard WiFi...

Page 27: ...FAQs Please refer to the FAQ list in the iObsurv app AT T 11 57 AM My Device AT T 11 57 AM My Device FAQ Feedback Product instructions Tap FAQ to enter the FAQ page Open the app then tap 25 1 2...

Page 28: ...r heating or crackling noise that can be heard from the device Do not attempt to disassemble this product The high voltage inside this product may cause personal injury When you need to repair this pr...

Page 29: ...azing products Please contact us if you have any questions about our devices Warranty Make all electrical and grounded connections following the National Electrical Code NEC and any applicable local c...

Reviews: