

The Zurn Medium Ratcheting
QickClamp crimp tool is factory set to
provide proper crimps. This should be
checked before use by making a test
crimp connection and checking it with
the QickClamp Go Gauge. As long as
the finished crimp connection gauges
properly, there is no need to adjust
the tool.
We recommend checking finished
crimp connections frequently with
the Zurn QickClamp Go Gauge.
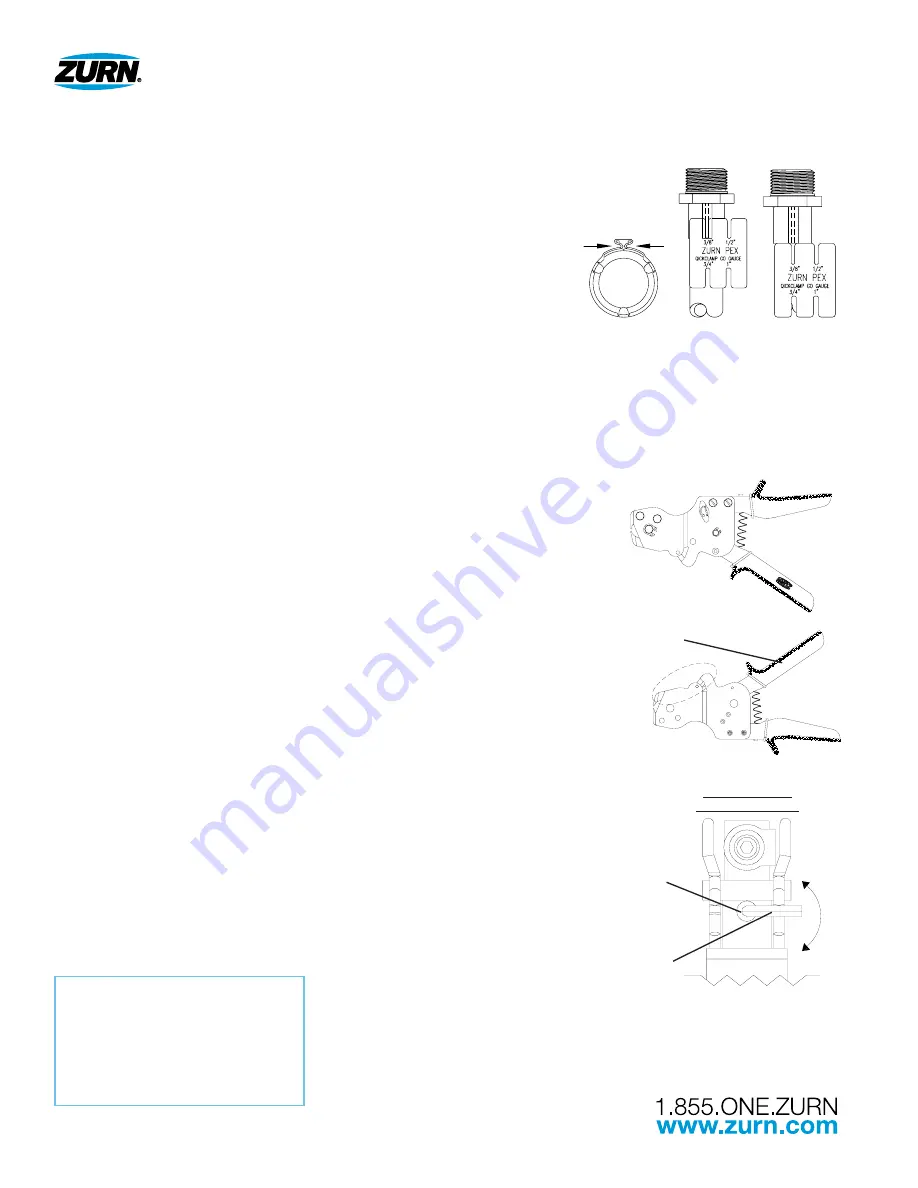
Using the QickClamp
Go Gauge
Check a completed connection with
the appropriate sized section of the
QickClamp Go Gauge. The gauge
should be applied to the half of the
QickClamp that is farthest away from
the fitting as shown in the ‘Gauging
Area’ illustration. If the QickClamp
does not go into the Go Gauge, the
fitting should be cut out, the tool
adjusted, and the fitting replaced. For
tool adjustment, see the instructions
supplied with the tool.
Adjusting the
Medium Ratcheting
QickClamp Tool
1. Close the jaws about half-way with
3 or 4 squeezes of the handles
(Figure 1).
2. Holding the tool with the jaws
pointed toward you and the moving
handle on top (Figure 2), find the
adjusting screw on the ratchet arm.
It is the lower screw that is visible
through a small hole.
3. Use the Allen wrench supplied with
the tool to raise or lower the screw.
4. Raising the screw by turning
counter-clockwise will cause the
jaw gap to increase at the point
the LED light comes on. It will
be rare that this adjustment will
be required.
5. Lowering the screw by turning
clockwise will cause the jaw gap to
decrease at the point the LED light
comes on. Do not turn the screw
more than ¼ turn at a time before
making a test crimp and checking
with the QickClamp Go Gauge.
Do not adjust more than required
to give finished clamps that
gauge properly.
OPERATING INSTRUCTIONS
Medium Ratcheting QickClamp
®
Tool
- QCRTQCRM
Form No. ZMKTG370-96, Rev. 04/16
ZURN PEX
®
,
INC.
116 Maple Street, Commerce, TX 75428 Phone: 855-ONE-ZURN (855-663-9876) • 1-800-209-2148
Gauging Area
Good Crimp
Adjust Tool and
Replace
Medium Ratcheting QickClamp
TM
Tool - QCRTQCRM
Operating Instructions
Check a completed connection with the appropriate
section of the QickClamp Go Gauge. Slide the appropriate
slot of the gauge onto the crimped pinch ear. If the
QickClamp pinch ear does not fit in the Go Gauge slot, the
fitting should be cut out, the tool adjusted and the fitting
replaced.
Using the QickClamp Go Gauge
Gauging Area
Good Crimp
Bad Crimp, Adjust
Tool & Replace Fitting
Adjusting Medium Ratcheting QickClamp Tool
Step 1: Close the jaws about half-way with 3 or 4 squeezes of the
handles (Figure 1).
Step 2: Holding the tool with the jaws pointed toward you and the
moving handle on top (Figure 2), find the Adjusting Screw
on the ratchet arm. It is the lower screw that is visible
through a small hole.
Adjusting Screw
Detail Side View of
Adjusting Screw Area
Moving Handle
The Zurn Medium Ratcheting QickClamp crimp tool is factory set to provide proper crimps. This should be checked before use by making a
test crimp
connection and checking it with the QickClamp Go Gauge. As long as the finished crimp connection gauges properly, there is no
need to adjust the tool.
We recommend checking finished crimp connections frequently with the Zurn QickClamp Go Gauge.
Form No. ZPFN185 Date: 6/11/09
C.N. No.120064
Rev.
ZURN PEX
®
PLUMBING AND RADIANT HEATING SYSTEMS
HWY 11 EAST, COMMERCE, TX, U.S.A. 75429 PHONE: 800/872-7277 FAX: 800/209-2148 WEBSITE: www.zurn.com
IN CANADA:
ZURN INDUSTRIES LIMITED
3544 NASHUA DRIVE, MISSISSAUGA, ONTARIO L4V 1L2 PHONE: 905/405-8272 FAX: 905/405-1292
Allen Wrench
Step 4: Raising the screw by turning counter-clockwise will
cause the jaw gap to increase at the point the LED light
comes on. It will be rare that this adjustment will be
required.
Step 5: Lowering the screw by turning clockwise will cause the
jaw gap to decrease at the point the LED light comes on.
Do not turn the screw more than ¼ turn at a time before
making a test crimp and checking with the QickClamp Go
Gauge. Do not adjust more than required to give finished
clamps that gauge properly.
Step 3: Use the allen wrench supplied with the tool to raise or
lower the screw.
Figure 1
Figure 2
Note: Using this tool for anything other than its
intended use will void the warranty.
For troubleshooting and repair assistance,
do not return tool directly to wholesaler.
Call Zurn Customer Care for assistance
at 1-855-ONE-ZURN.
See www.zurn.com for warranty information.


