background image

Chapter 5 Installation

The installation procedure is the same as that of wall installation.

Install the device to the suspended ceiling.

Perform the following steps to install the device to a ceiling.

1.

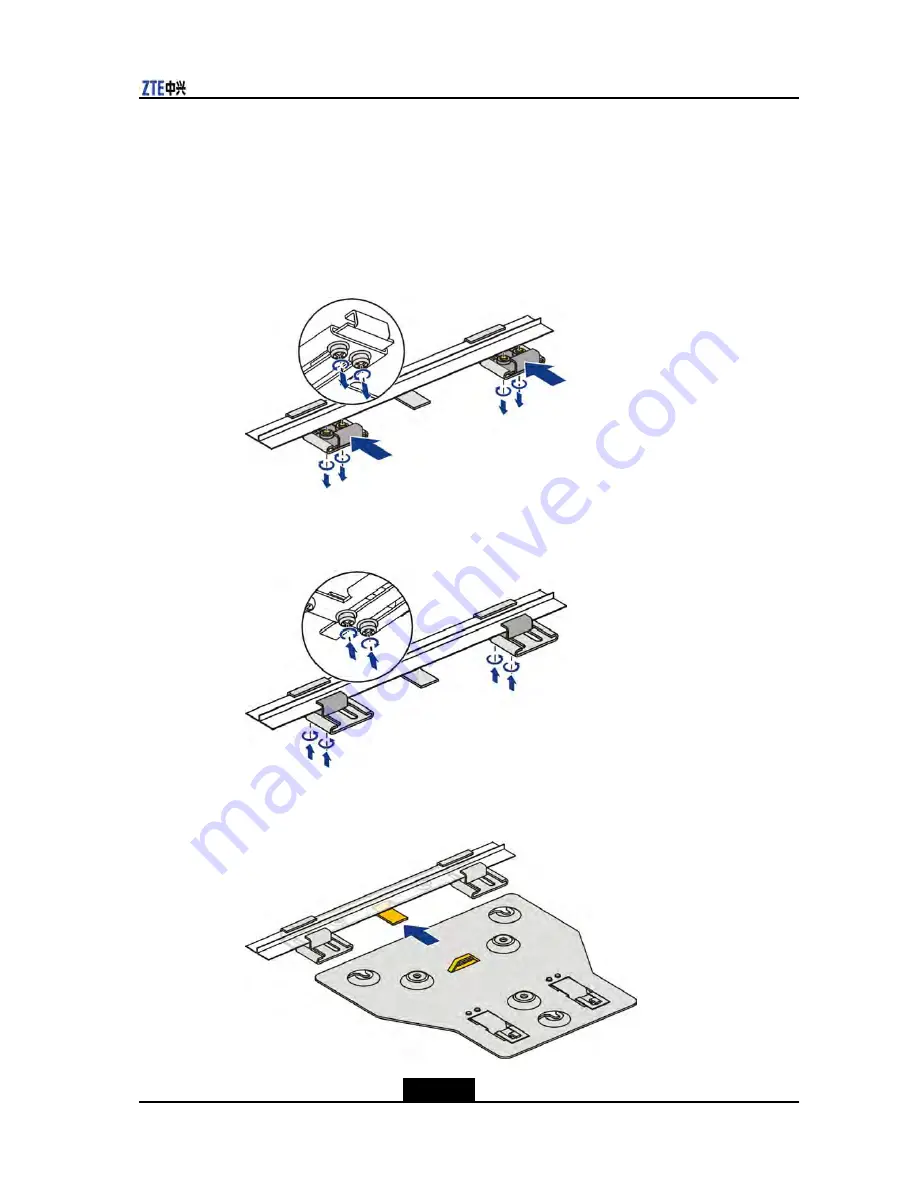
Confirm the position to install the device. Loosen the mounting frame and install the

frame to the beam of the suspended ceiling, see

Figure 17

.

Figure 17 Loosening the Mounting Frame

2.

Lock the mounting frame to the beam and secure the screws, see

Figure 18

.

Figure 18 Securing the Mounting Frame to the Beam

3.

Install the adapter to the mounting frame, see

Figure 19

.

Figure 19 Installing the Adaptor to the Mounting Frame

5-5

SJ-20130807102306-001

ZTE Proprietary and Confidential

Summary of Contents for ZXWL W822E

Page 1: ...eless Access Point User Manual Version V1 0 ZTE CORPORATION NO 55 Hi tech Road South ShenZhen P R China Postcode 518057 Tel 86 755 26771900 Fax 86 755 26770801 URL http ensupport zte com cn E mail support zte com cn ...

Page 2: ...s for a particular purpose title or non infringement ZTE CORPORATION and its licensors shall not be liable for damages resulting from the use of or reliance on the information contained herein ZTE CORPORATION or its licensors may have current or pending intellectual property rights or applications covering the subject matter of this document Except as expressly provided in any written license betw...

Page 3: ... 1 Chapter 2 Product Description 2 1 Chapter 3 Power Supply 3 1 Chapter 4 Antenna Installation 4 1 Chapter 5 Installation 5 1 Chapter 6 Fat AP Commissioning Instruction 6 1 Chapter 7 Fit AP Commissioning Instruction 7 1 Appendix A Q A A 1 I ...

Page 4: ...a stable surface Usage l When you stop using this device or need to clean it turn off the device and remove the power cable Note that the power adapter may be hot l After you power off the device wait at least 15 seconds before you power it on again l If you will not use the device for a long period remove the power cable to avoid damage caused by lightening or voltage and power surges Service Do ...

Page 5: ... automatic detection of network cable connections through MDI MDI X l Supports desktop wall and ceiling mount modes l Based on the Unified ZTE CSP Platform which enables the ZXWL W822E to easily switch between fit and fat AP modes and provide a reliable and managable carrier class WLAN network l Complies with the IEEE 802 11a 802 11b 802 11g and 802 11n standards and uses the OFDM technology With ...

Page 6: ... 2 4 G frequency WLAN function is disabled or faulty ON The 5 G frequency WLAN function is enabled Flashing Data is being transmitted 5 G OFF The 5 G frequency WLAN function is disabled or faulty ON Ethernet port 1 is connected properly Flashing Data is being transmitted through Ethernet port 1 ETH1 OFF Ethernet port 1 is not used for fails to operate properly ON Ethernet port 2 is connected prope...

Page 7: ...ble l Used to cascade multiple APs RESET Press and hold this button for five seconds to restore the settings to the defaults After the restoration the device is restarted DC12V Power port used to connect to the power adapter The input power must be DC 12 V 2 A Technical Specifications Table 3 shows the technical specifications of the ZXWL W822E Table 3 Technical Specifications Item Specification D...

Page 8: ...l Power the device through the attached external power adapter see Figure 3 Figure 3 Powering the ZXWL W822E through the Power Adapter l If the switch does not support PoE power supply the remote 48 V Ethernet power supply through the standard PoE module is used see Figure 4 3 1 SJ 20130807102306 001 ZTE Proprietary and Confidential ...

Page 9: ...owering the ZXWL W822E through the Standard PoE Module l Power the device through the switch that supports the standard PoE module see Figure 5 Figure 5 Powering the ZXWL W822E through a PoE Switch 3 2 SJ 20130807102306 001 ZTE Proprietary and Confidential ...

Page 10: ...ntenna into the protective sheath Figure 6 Antenna Installation one 2 Connect the antenna to the 2 5 G or 5 G antenna interface and tighten it clockwise Figure 7 Antenna Installation two 3 Put the protective sheath near the device shell 4 1 SJ 20130807102306 001 ZTE Proprietary and Confidential ...

Page 11: ...Point User Manual Figure 8 Antenna Installation three 4 Installing the other antenna the antenna is installed successfully see Figure 9 Figure 9 Antenna Installation four 4 2 SJ 20130807102306 001 ZTE Proprietary and Confidential ...

Page 12: ...e meter l If the AP is installed in a weak electricity well it is 1 5 to 2 meters high from the floor to ensure ventilation In addition the well must be free from dust l If the AP is installed to the ceiling it must be near the manhole to facilitate maintenance If the ceiling is not installed do not install the AP above the location where the suspended ceiling will be installed Otherwise the AP wi...

Page 13: ...al anchors and hammer the anchors into the wall completely with a rubber hammer see Figure 11 Figure 11 Installing the Universal Anchors 4 Secure the positioning bolts in the universal anchors 5 Install the installation adaptor on the wall see Figure 12 5 2 SJ 20130807102306 001 ZTE Proprietary and Confidential ...

Page 14: ...ptor Caution The device is securely installed onto the installation adaptor when you hear a click sound which indicates that the positioning reed is in position Figure 13 Installing the Device 7 The device is successfully installed on the wall see Figure 14 5 3 SJ 20130807102306 001 ZTE Proprietary and Confidential ...

Page 15: ...ed installation components The components include a mounting frame and a device adapter see Figure 15 and Figure 16 Figure 15 Mounting Frame Figure 16 Device Adapter Based on the installation environment the device can either be installed to the common ceiling or suspended ceiling Install the device to the common ceiling 5 4 SJ 20130807102306 001 ZTE Proprietary and Confidential ...

Page 16: ...evice Loosen the mounting frame and install the frame to the beam of the suspended ceiling seeFigure 17 Figure 17 Loosening the Mounting Frame 2 Lock the mounting frame to the beam and secure the screws see Figure 18 Figure 18 Securing the Mounting Frame to the Beam 3 Install the adapter to the mounting frame see Figure 19 Figure 19 Installing the Adaptor to the Mounting Frame 5 5 SJ 2013080710230...

Page 17: ...Figure 20 Securing the Screws of the Adapter 5 Install the device to the adapter Caution The device is securely installed onto the installation adaptor when you hear a click sound which indicates that the positioning reed is in position 5 6 SJ 20130807102306 001 ZTE Proprietary and Confidential ...

Page 18: ...e 21 Installing the Device to the Adapter 6 The device is successfully installed on the suspended ceiling see Figure 22 Figure 22 Device Installed on the Suspended Ceiling 5 7 SJ 20130807102306 001 ZTE Proprietary and Confidential ...

Page 19: ... Configure the IP address of the debugging PC Ensure that the ZXWL W822E and the PC are in the same network segment Perform the following steps to configure the PC a Select Start Control Panel Network Connection The Network Connection window is displayed b Right click Local Area Connection and select Properties The Local Connection Properties dialog box is displayed c Double click Internet Protoco...

Page 20: ...default the IP address of the ZXWL W822E is 192 168 0 228 The subnet mask is 255 255 255 0 AP Configuration To configure the AP perform the following steps 1 Log in to the AP a Open the IE browser on the debugging PC and enter 192 168 0 228 in the address bar and press Enter The Please login to continue dialog box is displayed see Figure 24 6 2 SJ 20130807102306 001 ZTE Proprietary and Confidentia...

Page 21: ...e AP Mode dialog box is displayed b Set AP Mode to Fat see Figure 25 Figure 25 AP Mode Dialog Box Note By default the ZXWL W822E is in fit AP mode If it is in fat mode you do not need to modify it c Click Submit The device is restarted automatically The AP mode is modified successfully 3 Set the WAN port a Select Network WAN WAN Connection The WAN Connection page is displayed see Figure 26 6 3 SJ ...

Page 22: ...AN Type is set to DHCP the connected STA device obtains the IP address dynamically l If WAN Type is set to static enter the IP address mask default gateway and the DNS address l If WAN Type is set to PPPOE enter the corresponding username and password 4 Set the LAN port a Select Network LAN Address Management The Address Management page is displayed see Figure 27 6 4 SJ 20130807102306 001 ZTE Prop...

Page 23: ...ask The subnet mask of the AP on the LAN side DHCP Service Set this parameter to DHCP Server DHCP Start IP Address The start IP address allocated to a terminal DHCP End IP Address The end IP address allocated to a terminal DNS1 DNS address Default Gateway AP address 5 Set WLAN a Select Network WLAN Basic The Basic page is displayed b Set the required parameters For a description of the parameters ...

Page 24: ...hannel 2 4 G Select a channel based on the management environment and the anti interference requirements Channels 1 to 13 are available Default auto Channel 5 G Channels 149 153 157 161 and 165 are available When multiple APs are configured the APs must be configured with different channels to avoid interference Only Select 1 6 11 If this check box is selected only channels 1 6 and 11 are availabl...

Page 25: ...a Select Network WLAN Security The Security page is displayed b The ZXWL W822E supports multiple authentication methods To use the WPA PSK method set Authentication Type to WPA PSK see Figure 29 Figure 29 WPA PSK Authentication Type c Enter the password in the WPA Passphrase text box The range is from 8 to 63 characters d Click Submit 8 Optional Set the additional information 6 7 SJ 20130807102306...

Page 26: ...tem time select Application Time Management l To set the firewall select Security Firewall l To restart the device or restore to the default settings select Management Device Management System Management 6 8 SJ 20130807102306 001 ZTE Proprietary and Confidential ...

Page 27: ...t need to be configured If it cannot be connected verify that no configuration of the AP is modified 1 Log in to the AP For how to log into the AP refer to the Fat AP Commissioning Instruction section 2 Select Administration AP Management AP Mode Check the AP By default it is set to Fit 3 Select Network WAN WAN Connection Check the AC Discovery Mode By default it is set to DHCP 7 1 SJ 201308071023...

Page 28: ...rference source l The STA and the AP are not compatible The STA may not comply with the 802 11 standard so it cannot be connected to the AP Why the bandwidth is not as high as expected after a WLAN is established In most cases this is caused by interference In addition aging of the device may reduce the bandwidth because the transmission power is reduced You can try the following methods to handle...

Page 29: ... for a period The WLAN is interfered Try the following methods to handle the problem l Check whether the devices are connected properly by checking the cables and the antenna l Power off the device and then restart it l Restore the device to the default setting and configure it again l Check whether the devices on both the wire and wireless sides are attacked by viruses A 2 SJ 20130807102306 001 Z...

Page 30: ... to which the receiver is connected Consult the dealer or an experienced radio TV technician for help FCC Caution Any changes or modifications not expressly approved by the party responsible for compliance could void the user s authority to operate this equipment This device complies with Part 15 of the FCC Rules Operation is subject to the following two conditions 1 This device may not cause harm...

Reviews: